Operation Manual EXECUTIVE - Advanced Mosquito Defense Systems - Favex
←
→
Transcription du contenu de la page
Si votre navigateur ne rend pas la page correctement, lisez s'il vous plaît le contenu de la page ci-dessous
Advanced Mosquito Defense Systems

EXECUTIVE                                For Outdoor Use Only
                                              1440-653 Rev 09/21

Operation Manual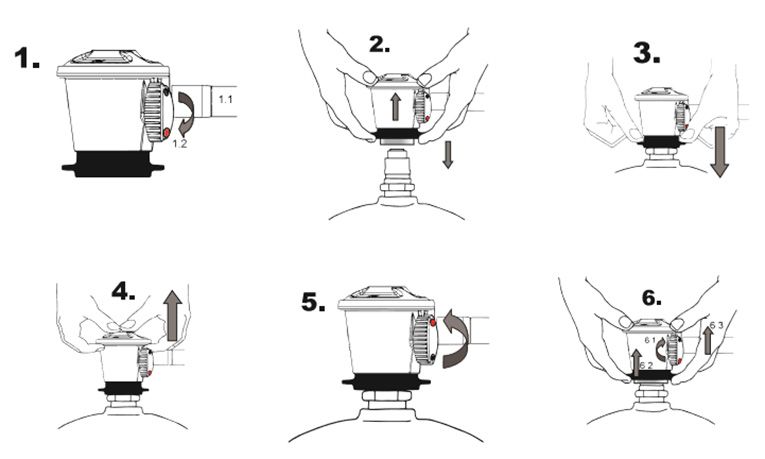
CAUTION / WARNUNG / MERK / HUOMIO / VAR FÖRSIKTIG! / ATTENZIONE
   CAUTION - The appliance is not to be used by persons (including children) with reduced physical, sensory or mental capabilities, or lack of
   experience and knowledge, unless they have been given supervision or instruction - children being supervised not to play with the appliance.
   This symbol on the product or its packaging indicates that this product must not be disposed of with your other household waste. Instead, it is
   your responsibility to dispose of your waste equipment by handing it over to a designated collection point for the recycling of waste electrical
   and electronic equipment. The separate collection and recycling of your waste equipment at the time of disposal will help conserve natural
   resources and ensure that it is recycled in a manner that protects human health and the environment. For more information about where you
   can drop off your waste for recycling, please contact your local authority, or where you purchased your product.

   WARNUNG - Das Gerät darf nicht von Personen (einschließlich Kindern) mit eingeschränkten physischen, sensorischen oder geistigen
   Fähigkeiten oder mangelnder Erfahrung und mangelndem Wissen verwendet werden, es sei denn, sie werden beaufsichtigt oder
   wurden unterwiesen - Kinder sollten beaufsichtigt werden, um sicherzustellen, dass sie nicht mit dem Gerät spielen.
   Das Symbol auf dem Produkt oder seiner Verpackung weist darauf hin, dass dieses Produkt nicht als Restmüll entsorgt werden darf.
   Es in Ihrer Verantwortung, Ihre Altgeräte ordnungsgemäß zu entsorgen, indem Sie sie an eine dafür vorgesehene Sammelstelle für
   das Recycling von Elektro- und Elektronik-Altgeräten abgeben. Die getrennte Sammlung und Wiederverwertung Ihrer Altgeräte zum
   Zeitpunkt der Entsorgung trägt dazu bei, natürliche Ressourcen zu schonen und sicherzustellen, dass sie in einer Weise recycelt
   werden, die die menschliche Gesundheit und die Umwelt schützt. Weitere Informationen darüber, wo Sie Ihre Abfälle zum Recycling
   abgeben können, erhalten Sie bei Ihrer örtlichen Abfall- und/oder Umweltbehörde oder beim Kauf Ihres Produkts.

   MERK - Apparatet skal ikke brukes av personer (inkludert barn) med reduserte fysiske, sensoriske eller mentale evner, eller mangel på
   erfaring og kunnskap, med mindre de er under tilsyn eller blir instruert. Barn under tilsyn skal ikke leke med apparatet.
   Symbolet på produktet eller emballasjen indikerer at produktet ikke må kastes sammen med annet husholdningsavfall. Det er ditt ansvar
   å avhende utstyret ved å levere det til et egnet innsamlingssted for resirkulering av elektrisk og elektronisk utstyr. Separat innsamling og
   gjenvinning av kassert utstyr på tidspunktet for avhending vil bidra til å bevare naturressursene og sikre at det resirkuleres på en måte som
   ivaretar helse og miljø. For mer informasjon om hvor du kan levere avfall til gjenvinning, kan du kontakte lokale myndigheter eller der du
   kjøpte produktet.

   HUOMIO – Henkilöiden (mukaan lukien lapset), joiden fyysinen, henkinen tai aistikapasiteetti on heikentynyt tai joilla ei ole tarvittavaa
   kokemusta tai tarvittavia tietoja, ei tule käyttää tätä laitetta, ellei heitä valvota tai ellei heitä ole opastettu sen käytössä. Lapsia tulee vahtia,
   etteivät he leiki laitteen kanssa.
   Tuotteessa tai sen pakkauksessa oleva merkintä tarkoittaa, ettei tätä tuotetta saa hävittää kotitalousjätteen mukana. Sen sijaan on sinun
   vastuullasi, että hävität käytetyn laitteen viemällä sen elektronisille ja sähkölaitteille tarkoitettuun keräyspisteeseen kierrätystä varten.
   Käytetyn laitteen hävittäminen erikseen kierrättämällä auttaa säilyttämään luonnonvaroja ja varmistamaan, että laite kierrätetään ihmisten
   terveyttä ja ympäristöä suojelevalla tavalla. Lisätietoja siitä, mihin voit viedä kierrätysjätteet, saat ottamalla yhteyttä paikallisiin viranomaisiin
   tai tuotteen myyntipaikkaan.

   VAR FÖRSIKTIG! Anordningen får inte användas av personer (inklusive barn) med nedsatt fysisk, sensorisk eller mental förmåga eller som
   saknar erfarenhet eller kunskap, förutom när de övervakas eller instrueras. Man måste även säkerställa att barn inte leker med anordningen.
   Symbolen på produkten eller på dess förpackning anger att produkten inte får slängas med hushållsavfall. Det åligger dig istället att kassera
   anordningen genom att ta den till en designerad insamlingspunkt för återvinning av kasserad elektrisk och elektronisk utrustning. Den
   separata insamlingen och återvinningen av din kasserade utrustning bidrar till att skydda naturresurser och säkerställa att den återvinns på
   ett sätt som skyddar människors hälsa och miljön. För mer information om vart du kan ta ditt avfall för återvinning ska du kontakta lokala
   myndigheter eller platsen där du köpte produkten.

   ATTENZIONE - Questo apparecchio non deve essere utilizzato da persone (bambini inclusi) con ridotte capacità fisiche, sensoriali o
   mentali, o persone che non abbiano adeguata esperienza o conoscenza, a meno che non siano sotto stretta sorveglianza o siano state
   adeguatamente istruite circa l’uso dell’apparecchio stesso. I bambini sotto la supervisione di un adulto non devono giocare con questo
   apparecchio.
   Il simbolo sul prodotto o sull’imballaggio indica che questo apparecchio non può e non deve essere smaltito con altri rifiuti domestici.
   Pertanto, è vostra responsabilità consegnare questo prodotto da smaltire ad un ente specializzato nel riciclaggio di materiale elettrico
   ed elettronico. La raccolta differenziata e il riciclaggio di tali rifiuti nel momento dello smaltimento aiuteranno a preservare le risorse
   naturali e garantiranno un riciclaggio adatto a proteggere il benessere dell’uomo e dell’ambiente. Per ulteriori informazioni su dove
   poter smaltire i rifiuti riciclabili, si prega di contattare l’ autorità locale pertinente, o il punto vendita dove si è acquistato il prodotto.
MISE EN GARDE / PRECAUCIÓN / CUIDADO / ADVARSEL / ВНИМАНИЕ
   MISE EN GARDE – Cet appareil ne peut pas être utilisé par des personnes mineures (moins de 18 ans) et par des personnes ayant
   des capacités physiques, sensorielles ou mentales réduites ou dénuées d’expérience ou de connaissance même s’ils (si elles) sont
   correctement surveillé(e)s ou si des instructions relatives à l’utilisation de l’appareil en toute sécurité leur ont été données et si les
   risques encourus ont été appréhendés. Les personnes mineures ne doivent pas jouer avec l’appareil. Le nettoyage et l’entretien par
   l’usager ne doivent pas être effectués par des personnes mineures. L’appareil doit être utilisé uniquement avec l’alimentation fournie
   avec l’appareil.
   Le symbole apposé sur le produit ou son emballage indique qu’il ne doit pas être mis au rebut avec les déchets ménagers. Il vous
   incombe de mettret au rebut votre équipement usagé en l’apportant à un point de collecte désigné pour le recyclage de l’équipement
   électrique et électronique. La collecte et le recyclage séparés de votre équipement usagé au moment de la mise au rebut permettra de
   préserver les ressources naturelles et de s’assurer qui’il est recyclé d’une manière qui protège la santé humaine et l’environnement.
   Pour de plus amples renseignements sur l’endroit où vous pouvez déposer les déchets à recycler, veuillez vous adresser aux autorités
   locales ou au magasin où vous avez acheté le produit.

   PRECAUCIÓN: el aparato no debe ser utilizado por personas (incluidos niños) que tengan su capacidad física, sensorial o mental
   disminuida, o falta de experiencia y conocimientos, a menos que cuenten con supervisión o instrucciones (los niños deben ser
   supervisados para que no jueguen con el electrodoméstico).
   El símbolo que aparece en el producto o el embalaje indica que este producto no debe desecharse como si fuese cualquier otro
   producto desechable de su hogar. En su lugar, usted es responsable de desechar el aparato depositándolo en uno de los puntos de
   recogida designados para reciclaje de productos eléctricos o electrónicos. Al separar y reciclar su equipo desechable de este manera,
   ayudará a conservar los recursos naturales y a asegurarse de que el reciclaje se realice de tal modo que proteja la salud humana y el
   medioambiente. Para más información sobre dónde depositar el producto desechable para su reciclaje, póngase en contacto con las
   autoridades de su localidad, o con el establecimiento donde adquirió el producto.

   CUIDADO - O aparelho não deverá ser usado por pessoas (incluindo crianças) com reduzidas capacidades físicas, sensoriais nem
   mentais, nem com falta de experiência ou de conhecimentos, a não ser que lhes tenham sido dada instrução ou supervisão - deverá
   haver vigilância para que as crianças não brinquem com o aparelho.
   O símbolo no produto ou na sua embalagem indica que este produto não deverá ser eliminado com outros lixos domésticos. Em vez
   disso, será da sua responsabilidade eliminar o seu equipamento adequadamente entregando-o num local de recolha de equipamentos
   eléctricos e electrónicos para serem reciclados. A recolha separada e a reciclagem dos seus equipamentos usados ajudarão a
   conservar os recursos naturais e a assegurar que eles sejam reciclados de uma maneira que proteja a saúde humana e o ambiente.
   Para obter mais informações sobre onde poderá entregar os seus lixos para reciclagem, por favor contacte as suas autoridades locais
   ou o local onde comprou o seu produto.

   ADVARSEL - Apparatet må ikke anvendes af personer (herunder børn) med nedsatte fysiske, sensoriske eller mentale evner eller
   manglende erfaring og viden, medmindre de er blevet vejledt eller instrueret – børn, også dem, der er under opsyn, må ikke lege med
   apparatet.
   Symbolet på produktet eller emballagen angiver, at dette produkt ikke må bortskaffes sammen med andet husholdningsaffald. I stedet
   er det dit ansvar at bortskaffe det brugte udstyr ved at aflevere det på et angivet indsamlingssted for genbrug af kasseret elektrisk
   og elektronisk udstyr. Denne særskilte indsamling og genbrug af dit kasserede udstyr på tidspunktet for bortskaffelsen hjælper med
   at bevare naturens ressourcer og sikrer, at udstyret genbruges på en måde, der beskytter menneskers helbred og miljøet. For mere
   information om, hvor du kan aflevere dit affald til genbrug, bedes du kontakte din kommune eller det sted, hvor du købte produktet.

   ВНИМАНИЕ – Настоящим прибором нельзя пользоваться лицам (включая детей) с ограниченными
   физическими возможностями, характеристиками сенсорной системы и умственными способностями;
   лицам, не обладающим достаточным опытом или знаниями, или не получившим необходимых инструкций
   или подготовки; необходимо следить за тем, чтобы дети не играли с настоящим прибором.
   Знак на этом приборе или на его упаковке указывает на то, что настоящий прибор нельзя выбрасывать
   с бытовым мусором. Вместо этого, Вы обязаны утилизировать использованный прибор, оставив его
   в соответствующем пункте сбора утильсырья и отходов производства электрического и электронного
   оборудования. Сбор и утилизация Вашего использованного оборудования поможет в сохранении
   природных ресурсов, в защите здоровья людей и окружающей среды. За дополнительной информацией
   о том, куда можно принести использованный прибор для утилизации, обращайтесь в местные органы
   власти или в местоприобретения прибора.
Welcome
Congratulations on your purchase of Mosquito Magnet®. Now you can begin to enjoy your outdoor living space again.

Mosquito Magnet® is the #1 mosquito trap in North America. Backed by 18 years of research and independent
testing, Mosquito Magnet® is scientifically proven to effectively reduce mosquitoes & other biting insects from
your yard.
Mosquito Magnet® is easy to use. In this manual, you’ll learn everything you need to know about how it works,
optimal trap placement, maintenance, storage and warranty information. The keys to success are trap placement,
utilization of the correct co-formulant for your area and routine maintenance. For optimal catch rate, you’ll need
to change the propane tank and co-formulant every 21 days.
Visit us online at www.mosquitomagnet.com for additional information regarding Mosquito Magnet® tips,
testimonials, and additional product offerings.

Woodstream™ Corporation
69 North Locust Street
Lititz, PA 17543
1-800-953-5737
www.mosquitomagnet.com

The Mosquito Magnet® traps are covered by one or
more of the following patents:
US & Canada
US Patents: Nos. 5,813,166; 6,655,080; 6,662,489; 6,817,140; 6,840,005;
6,848,466; 6,892,492; 7,074,830; 7,181,885; 7,281,351; 7,293,387;
7,536,824; 7,614,180; 7,910,091; 7,987,631; 8,006,432; 8,067,469;
                                                                                 FOR YOUR SAFETY
8,141,291; 8,347,549; 8,470,881; 8,753,110; 8,973,299; 9,949,471          If you smell gas:
Canada Patents: Nos. 2322038; 2460876; 2558775; 2569737; 266346
All Other Countries                                                       1. Shut off the gas to the appliance.
Australia: 735984; 2002356537; 2005226680; 2005251813; 2007258277;        2. Extinguish any open flame.
2008246208; 2012202864 Brazil: 9908104-0; PI0213059-9; PI0508967-0        3. Open lid.
China: ZL0281957.X; ZL20058000881.0; ZL200580025316.5;
                                                                          4. If odor continues, immediately call your
ZL200580046646.2; ZL200780029874.8; ZL200910254151.9
Denmark: 1432304
                                                                             gas supplier or your fire department.
Europe: 1049373; 1432304; 1537780; 1827093; EP1725094B; EP1765068B
Finland: 1432304; 1827093; EP1725094B
France: 1049373; 1432304; 1537780; 1765068; 1827093; EP1725094B
Germany: 1049373; 1725094; 60211538.8                                            FOR YOUR SAFETY
Hong Kong: HK1107743; HK1112810; HK1148207 Italy: 1049373; 1432304;
1537780; 1725094; 1765068; 1827093
                                                                          1. Do not store or use gasoline or other
Japan: 4317748; 4741578; 5444525                                             flammable vapors and liquids in the
Mexico: 314022                                                               vicinity of this or any other appliance.
New Zealand: 506403; 542745                                               2. An LP cylinder not connected for use
Portugal: 1765068                                                            shall not be stored in the vicinity of this
Sweden: 1432304; 1537780; 1765068; 1827093; EP1725094B                       or any other appliance.
United Kingdom: 1049373; 1432304; 1537780; 1725094; 1765068; 1827093

Made in China
Contents
Safety Instructions E6-7
Principal Parts E8
Assembly Instructions E9
Set-Up E10-11
Charging Instructions
Trap Placement
Propane Tank Installation
Instructions E12
Starting Instructions
Shut Down Instructions
When Not In Use
End of Season Storage
For Best Results
Smart Technology E13
Maintenance E14
Maintenance Patented Counterflow Technology™
Propane Tank Changing Tips
Maintenance Schedule
Troubleshooting E15 How the Mosquito Magnet® Works
Mosquitoes and other biting insects use the attractant carbon
dioxide (CO2) to locate people. The Mosquito Magnet® mimics
a human by converting propane to CO2, with its patented
catalytic conversion technology.
Attracted by the CO2 mosquitoes and other biting insects are
drawn to the Mosquito Magnet®. When they reach the trap,
the insects are vacuumed into a bug bag by our patented
Woodstream™ Corporation Counterflow Technology™, where they dehydrate and die
69 North Locust Street within 24 hours.
Lititz, PA 17543
www.mosquitomagnet.com The Mosquito Magnet® is silent, odorless and runs 24/7.
When properly placed in your yard, the trap begins working
immediately. Noticeable results can be achieved in 7
to 10 days, to greatly reduce your biting insect popula-
tion, allow 4 weeks. To increase the effectiveness of CO2 a
co-formulant can be added such as R-Octenol or Mosquito
Magnet® Pod. Leave the Mosquito Magnet® out all summer
long, to control the mosquito population in your yard.
Model No.: Executive
Serial No.: Only biting insects are targeted including mosquitoes,
Type of Gas: Propane no-see-ums, black flies and midges. Beneficial insects
Manifold Pressure: 100 – 110 psi such as butterflies, bees or moths are not targeted.
Minimum Gas
Supply Pressure: 11.0 in. WC
Input Rating: 759 Btu/Hr.
Minimum Clearances: 50-60cmSafety Instructions
Please read and follow all safety Note: Some or all of the following required safety
instructions for propane powered devices may
instructions and warnings. apply to your trap. Allow trap to cool for 5 minutes
before re-starting.
Children and adults should be alerted to Warning: Improper installation, adjustment,
alteration, service or maintenance can cause injury
the hazards of high surface temperatures or property damage. Read the installation, operating
and should stay away to avoid burns or and maintenance instructions thoroughly before
installing or servicing the trap.
clothing ignition.
Caution: The gas pressure regulator provided with this
appliance must be used. This regulator is set for an outlet
pressure of 11.0 in. Water Column. The minimum inlet gas
Young children should be carefully supply pressure is 11.0 in. Water Column from regulator.
supervised when they are in the
• This unit is not intended to be installed in or on recreational
area of the heater. Keep out of vehicles and/or boats.
reach of children. • The gas supply must be turned off at the LP-Gas supply
cylinder when this appliance is not in use.
• The installation must conform with local codes.
Clothing or other flammable materials • To test for a gas leak, place soapy water around the
should not be hung from the heater, connector, regulator, and gas hose assembly. If bubbles
appear, there is a gas leak.
or placed on or near the heater.
• Inspect the hose before each use of the unit. If it is evident there
is excessive abrasion or wear, or the hose is cut, it must be
replaced prior to the unit being put into operation. The
replacement hose shall be that specified by the manufacturer.
• The trap is equipped with an internal spark ignition device. Failure
to follow starting procedure will result in the trap not starting.
• Installation and repair should be done by a qualified service
person (find service centers on www.mosquitomagnet.com).
The heater should be inspected before use and at least
annually by a qualified service person. More frequent
cleaning may be required as necessary. It is imperative that
the control compartment, burners, and circulating air
passageways of the heater be kept clean.
E6Safety Instructions
• Maintain adequate clearances of 50-60cm around air • The pressure regulator and hose assembly supplied with
openings into the combustion chamber, clearances from this appliance must be used for connection to the LP-Gas
combustible material, provisions for accessibility and for cylinder. Replacement pressure regulators and hose
combustion and ventilating air supply. Keep the trap area assemblies must be specified by the manufacturer.
clear and free from combustible materials, gasoline, and • Avoid improper use of extension cords. Keep connections
other flammable vapors and liquids. The appliance is not away from moisture and avoid damage to the cord.
to be used in locations where flammable vapor or • If the supply cord is damaged, it must be replaced by the
explosive dust is likely to exist. manufacturer or its service agent or a similarly qualified
• Do not obstruct the flow of combustion and ventilation air. person in order to avoid hazard.
• Keep the ventilating openings of the cylinder enclosure • Do not store near heat or fire or where temperature may
free and clear from debris. exceed 60°C.
• Clean the trap with a water damp cloth, if necessary. • PPG Regulator and Hose Assembly Class A
• A maximum of a 20 lb. LP-Gas cylinder shall be used. • Rated Working Pressure: 2.74 kPa
• The LP-Gas cylinder supply system must be arranged for Outlet Pressures: 2.50 kPa to 3.5 kPa
vapor withdrawal and the cylinder must include a collar to Velocity: 165 ft/min to 275 ft/min
protect the cylinder valve.
• The trap shall be used outdoors only in a well ventilated
space and shall not be used in a building, garage, or any Visit www.mosquitomagnet.com
other enclosed area.
• The LP-Gas cylinder must be disconnected and removed
from the appliance, if the appliance is stored indoors.
• LP-Gas cylinders must be stored outdoors in a well-
ventilated area out of reach of children.
• Disconnected cylinders must have threaded valve plugs
tightly installed and must not be stored in a building, garage,
or any other enclosed area.
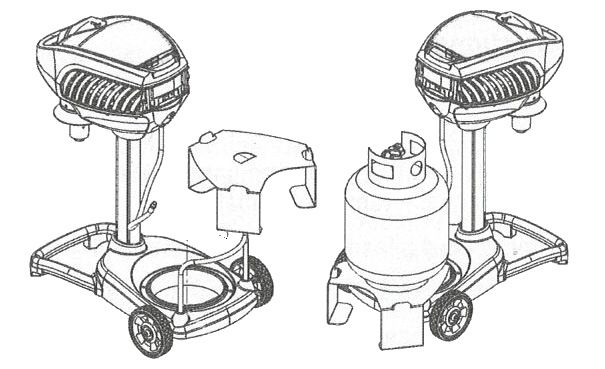
E7Principle Parts
COOL
OFF MO
WARM
RUN
DE
ATTENT
ION
MODE
Power Head (1)
Self-Contained
Executive Trumpet (1)
Regulator Hose (1)
Support Pole (1)
Base Support (1)
Parts Included
Bug Bag Remote Battery Charger Rechargeable Battery
E8Assembly Instructions
Trap Assembly:
Step 1 Step 3
Place base upside down on a flat surface, unfold Place trap power head onto pole. Press down firmly
U-shaped support leg until it locks in place. with two hands to secure.
Step 2 Assembled trap should have the front of power
head/trumpet placed farthest from the wheels in the
same direction as base U-shaped legs.
Step 4
The battery is not fully charged at the factory;
charge the battery before the first use. Under proper
usage, one charge lasts all season. See page 10 for
further details.
CAUTION
Turn base and leg assembly right-side-up and place
support pole into cavity on base.
Bug Bag Installation:
DO NOT BUMP HOSE ATTACHMENT WITH PROPANE TANK.
To insert Bug Bag, first engage front/open section DO NOT TAMPER WITH HOSE ATTACHMENT CONNECTED TO TRAP.
then gently push the back end down into place.
1
2
MODE
N!
NTIO
ATTE
MODE
OFF
L
COO M
RUN
WAR
E9Set-Up
Charging Instructions Remove Back Panel
1. Remove cover panel from rear of Power Head Unit (panel
snaps off). Press the battery latch & pull out of the trap to
disconnect. Remove the battery by pulling up on the bottom
and rotating the battery out of position.
2. The Battery Charger is not rated for Outdoor use. The battery
must be charged indoors.
3. Plug the Battery Charger into a suitable indoor outlet.
4. Connect the re-chargeable battery to the battery charger.
5. The LED on the Battery Charger will indicate Red when the
battery is charging, when the battery is fully charged the LED
will indicate Green. The typical charge time is less than two
hours. Insert & Connect Battery
6. The battery charger is automatic, it will shut down to a safe
maintenance charge current when the battery is fully charged.
It will not over charge the battery. For maximum life, do not
leave the battery on the charger for extended periods.
7. When the battery is fully charged, disconnect the battery from
the battery charger and return it in the Mosquito Magnet
Executive.
8. Insert and connect the re-chargeable battery.
9. Replace the cover panel on the rear of Power Head Unit.
Trap Placement
1. Determine the direction of the prevailing wind.
Check local weather patterns if you are unsure.
2. Stand in the center of the area you are trying to protect
and look toward the prevailing wind.
3. Proper placement of the trap will be approximately 10m
in front of you, within 1.5-2m of ground cover (i.e. bushes,
flowerbeds, tree line, marshbed). Ensure that trap is not
directly against any blockades such as buildings, fences, etc.
4. It is recommended that the trap be placed in the shade.
5. Do not place trap directly above a water source
(sprinklers, hose, etc.).
6. Trap must be placed on level ground to avoid tipping
or uneven propane distribution.
7. For optimal trap placement in your yard, refer to the
instructional video at www.mosquitomagnet.com/videos to
build your own yard diagram for correct trap placement.
E10Set-Up
Propane Tank Installation
1. After trap is placed in its ideal location, place propane Step 1 - Propane Tank Placement
tank onto the molded cradle.
2. Make sure propane tank is fully closed. Attach
propane regulator hose to propane tank. Secure
tightly by hand. Do not use tools.
3. Turn propane on by slowly turning valve counter-clockwise.
Take care not to turn too quickly to avoid engagement of
safety valve.
DO NOT MOVE TRAP WITH TANK ATTACHED!
TANK MUST BE DISCONNECTED FROM REGULATOR
BEFORE TRAP IS RELOCATED TO AVOID DAMAGE TO
REGULATOR AND/OR TRAP. BE ADVISED, DAMAGE
CAUSED FROM FAILURE TO COMPLY WITH THIS
INSTRUCTION IS NOT COVERED UNDER WARRANTY. Step 2 - Attach Regulator
CAUTION Step 3 - Slowly Open Valve
DO NOT BUMP HOSE ATTACHMENT
WITH PROPANE TANK. DO NOT
TAMPER WITH HOSE ATTACHMENT
CONNECTED TO TRAP.
E11Instructions
**READ MANUAL BEFORE STARTING**
Charge your battery per instructions. Under proper For Best Results (unit must run for 24 hours/day)
usage, battery will last all season.
• Your trap will begin capturing immediately with
Starting Instructions significant reduction in the mosquito population in
It is recommended that you read the entire manual 7-10 days. Allow 4 weeks to significantly reduce the
before starting the Mosquito Magnet® trap. mosquito population in your yard.
1. To start the trap, press and hold the ON/OFF button for
three seconds until the orange LED illuminates.
2. RUN will show on the display. WARM and the indicator
arrows will also flash on the display. The LED (indicator
above ON/OFF button) will be orange.
3. The fan will ramp from low speed to high speed after
approximately 3 minutes.
4. The display will flash WARM and the LED will be orange
for approximately 15-25 minutes while the trap is
warming up.
5. After the trap reaches operating tempurature, the LED
will be green and WARM will disappear from the display.
Shut Down Instructions
• Allow trap to cool for 5 minutes before re-start.
To turn off the trap, press the ON/OFF button. RUN will show
• Never spray insecticide in or around trap.
on the display. COOL and the indicator arrows will flash on
• Trap can be left running in the rain.
the display. The LED will be green. After a two minute cool
• If using lime or fertilizer compounds, be sure to shut
down, the fan will stop, the LED will turn off and OFF will
down the trap first to prevent dust or fine mist from
show on the display.
being drawn into trap and clogging bug bag.
When Not In Use
If the unit is not in use, the gas must be turned off at the Warning: Improper installation, adjustment, alteration,
supply cylinder. Storage of this unit indoors is permissible only service or maintenance can cause injury or property
if the cylinder is disconnected and removed. Cylinders must damage. Read the installation, operating and maintenance
be stored outdoors, out of reach of children and must not be instructions thoroughly before installing or servicing this
equipment.
stored in a building, garage or any other enclosed area.
End of Season Storage Caution: The gas pressure regulator provided with this
appliance must be used. This regulator is set for an outlet
Push ON/OFF switch to OFF position to shut down the trap.
pressure 11.0 in. water column.
The LED light will go out and the fan will continue running
until trap is cool. Close the propane tank valve The gas supply must be turned off at the LP-Gas supply
and disconnect regulator. cylinder when this appliance is not in use.
Any open Mosquito Magnet® cartridge should be removed and
discarded. See co-formulant label for disposal instructions. The
bug bag should also be discarded prior to storing the trap.
STORAGE: The trap should be stored indoors in a garage
or shed in the off-season. Cover trumpet to prohibit insects
from nesting. Cover unit with a tarp and secure tightly at the
bottom to keep out dust, spider webs and other debris.
E12Smart Technology
Setting Fuel-Saving Modes 5. If the trap is set in the fuel-saving mode, the battery must
The trap has the option to run 24/7 or in one of 4 Fuel-sav- be disconnected and then reconnected every time the propane
ing Modes which can extend the life of your propane tank. tank is refilled. The battery disconnect is required to reset the
The propane tank will last 21 days by operating your trap Fuel Saving timer.
24/7, which is recommended for the corresponding propane Cold Temperature Shutdown
usage expended based on the mode of operation. The trap has a temperature sensor that can be used
to automatically put the trap in a standby mode when
Operation Shut Down Shut Down the outdoor air temperature and the trap temperature are both
Fuel-Saving Tank Life* Day Time Night Time below a user selectable set point. Research has shown that
Mode 1 22 days 1 Hr 1 Hr there is very little mosquito activity when the air temperature
Mode 2 24 days 2 Hr 2 Hr drops below 50ºF (10ºC). However, in some locations and with
some mosquito species, activity can continue at temperature
Mode 3 27 days 3 Hr 3 Hr
shutdown point starting at 50ºF (10ºC). The trap has a user
Mode 4 30 days 4 Hr 4 Hr selectable cold temperature shutdown point starting at 50ºF
*Based on a 20lb. (9.07kg.) propane tank (10ºC) and incrementing down in increments of 5ºF (2.8ºC) to a
minumum temperature of 30ºF (-1ºC). The default setting on
The Fuel-Saving Mode of operation will stop the propane
the trap is no cold temperature shutdown.
use in the middle of the day & during the middle of the night.
Research has shown mosquito activity is typically lowest To access the Cold Temperature Shutdown parameters, press
during these time frames. and hold the Mode button for at least 3 seconds until the Cold
NOTE: The “Smart Technology” system automatically Temperature Shutdown menu appears. Toggle through the
learns the cycles of day and night within a 24 hour temperature choices by pressing the Mode button, beginning
period while in the Fuel-Saving Mode. This system with Off (blank) and then to 30, 35, 40, 45, and 50 (ºF). Continue
uses a photo sensor to allow the trap to learn and to toggle the Mode button after 50 will return to Off (blank) and
adjust shut downs based on the shift in sunrise and then repeat the cycle. Once a temperature choice has been
sunset as seasons change. made, stop pressing the Mode button; wait approximately 3 sec-
onds; and your temperature choice will be automatically saved.
Fuel-Saving Modes
If the trap is running (the word RUN is visible and the green LED
1. Press the MODE button
Mode light is on), and a cold temperature shutdown value has been
to select the Gas Saver
selected, the trap will shut down when the air temperature and
Mode Setting.
the trap temperature has dropped below that set point. When the
trap is in the Cold Temperature Shutdown Mode the word COOL
2. Every time the MODE button is pressed the Mode
and the Thermometer icon will flash. The trap will restart when
will cycle through 1, 2, 3, 4, Off, 1, etc.
the temperature sensor indicates that the air temperature and
the trap temperature are approximately 5ºF (2.8ºC) above the
3. Mode 1 will shut down the trap 1 hour during the middle
selected cold temperature shutdown value.
of the day and 1 hour during the middle of the night
Modes 2, 3, and 4 correspond to 2, 3, and 4 hours If the trap is in warm up mode when the temperature drops
of shut down time respectively. below the selected set point, it will shut down, but it will not
restart automatically.
4. To indicate the trap is in Fuel-Saver
Mode, the arrows will flash and Low Battery Warning
the green LED light will be off. The battery icon and attention will flash if the battery
Additionally, the Sun element will needs to be recharged.
flash during the day and the Moon element will flash during Child Safety Lock
the night when the trap is in Fuel-Saving Mode. The fan The ON/OFF button needs to be held for 3 full seconds to turn-on
will continue to operate in the trap, at a reduced speed, to the trap.
prevent any escape of mosquitoes but will not capture any
additional mosquitoes during this time frame.
E13Maintenance
Maintenance Propane Tank Changing Time
If using one of our Fuel-Saving Modes, be sure to adjust the dates When attaching the regulator knob to a tank after a tank change,
accordingly.
be sure to fully tighten the regulator knob onto the tank. No need
• 21 Day Maintenance Cycle to use tools, but do turn the knob as far as possible by hand. When
- Refill propane. (Propane lasts approximately 21 days with this is done, loosen the knob 1/4 turn, then re-tighten to maximize
24-hour/7-days operation.) seal.
- Replace co-formulant cartridge. The purpose for this is to fully engage the regulator onto the tank. If
See Mosquito Magnet® co-formulant label for instructions. the regulator is not fully engaged, the flow of gas may be restrict-
- Empty or replace bug bag. ed to the point where the trap will show a gas empty code. If this
• Periodically wipe down the outside of the trap occurs, press the off button, close the tank valve, and remove the
with a clean, water damp cloth. regulator from the tank. Re-attach the regulator and try again.
• Charge your battery for 24 hours at the beginning of the season.
E14Troubleshooting
Problem Possible Cause Solutions
Unit won’t start 1. Propane tank may be empty. 1. Weigh tank and check against “empty” weight.
Unit won’t stay running 2. If propane tank is new and has been newly filled 2. Bring tank to filling location. Air may be in
it must be purged. fuel line. Ask for tank to be purged.
3. There could be a loose connection. Hint: If you have another propane powered
LCD device operating on a standard, 20 lb propane
4. Fuel line may be blocked by propane tank, try hooking that tank up to the trap to
contaminants.
verify that the issue is with your tank.
LED - Red LED Flashing 5. Regulator is not fully engaged.
3. Verify all connections. Make sure propane tank
at 7 second intervals 6. Bug bag may be full or clogged. valve is fully open.
4. Replace the bug bag.
Unit won’t stay Running 1. Low Battery Voltage. 1. Charge the battery before the first use and at the
beginning of each season. The Charger LED will
be Green when the battery is fully charged.
LCD 2. Check battery connection, making sure it is fully
inserted and locked.
LED - Flashing Red/Orange 3. If a fully charge battery indicates Low Battery
at 7 second intervals Voltage during the cycle, recharge or replace the
battery.
Unit shut down 1. High Temperature. 1. Turn off trap and allow to cool for one hour, then
restart. If the code continues contact your Local
LCD Service Provider or call Customer Care on:-
+001-800-953-5737 (USA) or
+44 (0) 1572 722558 (UK).
LED - Flashing Red/Green
at 7 second intervals
Unit shut down 1. Thermistor Fault. 1. Contact your Local Service Provider or call
Customer Care on:-
LCD +001-800-953-5737 (USA) or
+44 (0) 1572 722558 (UK).
LED - Double Flashing Red
LED at 7 second intervals
Unit shut down 1. Electrical Fault. 1. Contact your Local Service Provider or call
LED - Solid Red Customer Care on:- +001-800-953-5737 (USA)
or +44 (0) 1572 722558 (UK).
1. Insects may not be out yet. 1. Verify temperature is consistently over 50º F (10ºC).
2. Trap placement issue. 2. Follow steps in the “Trap Placement” section of
3. Biting insect reproductive cycles have not yet your owner’s manual.
been broken. 3. Keep trap in constant operation 24 hours/day, 7
Low or no catch days per week for at least 4 weeks to reduce the
4. Counterflow may be disrupted.
mosquito population.
4. Air flow may be restricted. Contact your Local
Service Provider.
E15ES Manual de funcionamiento
Indice
Desconexión por baja temperatura             S3
Bienvenido                                   S4
Instrucciones de seguridad                   S5-6
Partes Principales                           S7
Instrucciones de ensamblaje                  S8
Instalación                                  S9-10
     lnstrucciones para cargar la batería
     Ubicación de la trampa
     lnstalación del tanque de butano
lnstrucciones                                S11
     lnstrucciones de inicio
     lnstrucciones de apagado
     Cuando no está en uso
     Almacenamiento al final de la temporada
     Para mejores resultados
Tecnología lnteligente                       S12             Tecnología patentada Counterflow Technology™
Mantenimiento                                S13
     Mantenimiento
     Consejos para cambiar el tanque de butano              Cómo funciona Mosquito Magnet ®
     Cronograma de mantenimiento                            Los mosquitos y otros insectos que pican utilizan el dióxido
Solución de problemas                        S14            de carbono (CO2) atrayente de largo alcance para ubicar a las
                                                            personas. Una vez cerca, los mosquitos utilizan atrayentes de
                                                            corto alcance como los olores que emite la piel, con el fin de
Preguntas o comentarios                                     determinar la persona a la que van a picar. Mosquito Magnet ®
Par favor, comuníquese con Woodstream™ Corporation          imita al ser humano mediante la conversión de gas butano en
si tiene preguntas o problemas con el producto              CO2, con su tecnología de conversión catalítica patentada, en
Mosquito Magnet®:                                           combinación con un cebo atrayente de corto alcance.
1-800-953-5737
                                                            Los mosquitos y otros insectos que pican, atraídos por el CO2 y
                                                            el cebo atrayente de corto alcance, se dirigen hacia la trampa
Woodstream™ Corporation                                     Mosquito Magnet®. Al llegar a la trampa, una bolsa para insectos
69 North Locust Street                                      los aspira utilizando la tecnología patentada Counterflow
Lititz, PA 17543                                            Technology™, en donde se deshidratan y mueren en 24 horas.
www.mosquitomagnet.com
                                                            La trampa Mosquito Magnet® es silenciosa, inodora y funciona
                                                            24 horas, 7 días a la semana. Si está ubicada en el lugar
                                                            apropiado en su patio o jardín, la trampa empieza a funcionar
                                                            inmediatamente. Pueden lograrse resultados visibles entre 7
                                                            y 10 días. Ty 10 días. Para reducir significativamente la población
Modelo No.:                 Executive                       de insectos que pican, permita que pasen entre 4 semanas. Para
No. de Derie:                                               controlar la población de mosquitos en su patio o jardín, deje
                                                            funcionando la trampa Mosquito Magnet® todo el verano.
Tipo de Gas:                Butano
Presión del distribuidor:   100 – 110 psi                   La trampa sólo atrapa insectos que pican tales como mosquitos,
Presión mínima del                                          zancudos, moscas negras y jejenes. La trampa no se dirige a
suministro de gas:          28 cm de columna de agua        insectos benéficos tales como mariposas, abejas o polillas.
Capacidad nominal
de entrada:                 759 Btu/Hr.
Espacios libres mínimos:    De 51 a 61 cm
Desconexión por baja
temperatura
La trampa dispone de un sensor de temperatura que se puede utilizar para colocar la trampa en la modalidad de espera
automáticamente cuando tanto la temperatura del aire exterior como la de la trampa sean inferiores a un punto de
configuración seleccionable por el usuario. La investigación ha demostrado que se produce muy poca actividad de
mosquitos cuando la temperatura del aire es inferior a 10 °C (50 °F). Sin embargo, en algunos lugares y dependiendo de la
especie del mosquito, la actividad puede continuar en temperaturas inferiores a los 10 °C (50 °F). La trampa tiene un punto de
desconexión por baja temperatura seleccionable por el usuario que comienza en los 10 °C (50 °F) y continúa en
incrementos descendentes de 2,8 °C (5 °F) hasta una temperatura mínima de -1°C (30 °F). La configuración
predeterminada de la trampa no incluye la desconexión por baja temperatura.
Para acceder a los parámetros de desconexión por baja temperatura, presione y sostenga el botón de modalidad durante 3
segundos al menos hasta que aparezca el menú de desconexión por baja temperatura. Desplácese a través de las opciones
de temperatura presionando el botón de modalidad, comenzando con Off (desconectado) y luego a -1, 1,7, 4,4, 7,2 y 10 °C
(30, 35, 40, 45 y 50 °F). Continuar alternando el botón de modalidad después de 10 °C (50 °F) hará que regrese a Off
(desconectado) y luego se repite el ciclo. Una vez que haya escogido la temperatura, deje de presionar el botón de modalidad;
espere aproximadamente 3 segundos y la opción de temperatura elegida se guardará automáticamente.
Si la trampa está activada (la palabra RUN [Funcionando] está visible y la luz verde del LED está encendida) y si ha
seleccionado un valor de desconexión por baja temperatura, la trampa se desactivará cuando la temperatura del aire y de la
trampa haya descendido por debajo del punto configurado. Cuando la trampa está en la modalidad de desconexión por baja
temperatura, la palabra COOL [Frío] y el icono del termómetro destellarán. La trampa volverá a funcionar cuando el sensor de
temperatura indique que la temperatura tanto del aire como de la trampa estén aproximadamente 2,8 °C (5 °F) por encima
del valor de desconexión por baja temperatura que haya seleccionado.
Si la trampa se encuentra en el modo de preparación cuando la temperatura descienda por debajo del punto de configuración
seleccionado se desconectará, pero no se reiniciará automáticamente.
Woodstream Corporation
69 North Locust Street
Lititz, PA 17543
United States
www.mosqitomagnet.com 432-452
S3Bienvenido
Felicitaciones por la compra de su equipo Mosquito Magnet ®. Ahora puede empezar a gozar nuevamente del espacio
al aire libre.
Mosquito Magnet® es la primera trampa para mosquitos en Norteamérica. Con el apoyo de 18 años de investigación
y pruebas independiente, la trampa Mosquito Magnet® está científicamente probada para reducir los mosquitos y
otros insectos que pican en su patio o jardín.
Mosquito Magnet® es fácil de usar. El www.mosquitomagnet.com/videos enlace proporciona información clave
para empezar. En este manual, usted obtendrá la información que necesita para saber cómo funciona, la ubicación
óptima de la trampa, mantenimiento, almacenamiento y garantía. Las claves del éxito son la ubicación de la trampa,
la utilización del cebo atrayente correcto para su área y el mantenimiento de rutina. Para lograr la caza óptima de
mosquitos, deberá cambiar el tanque de butano y el cebo atrayente cada 21 días.
Visítenos en www.mosquitomagnet.com para obtener información adicional sobre Mosquito Magnet®, consejos,
testimonios y ofertas de productos adicionales.
Woodstream™ Corporation
69 North Locust Street
Lititz, PA 17543
1-800-953-5737
www.mosquitomagnet.com
Las trampas Mosquito Magnet ® están cubiertos
por una o más de las siguientes patentes: PARA SU SEGURIDAD
US & Canada
US Patents: Nos. 5,813,166; 6,655,080; 6,662,489; 6,817,140; 6,840,005; Si siente olor a gas:
6,848,466; 6,892,492; 7,074,830; 7,181,885; 7,281,351; 7,293,387;
7,536,824; 7,614,180; 7,910,091; 7,987,631; 8,006,432; 8,067,469;
1. Cierre la entrada de gas al aparato.
8,141,291; 8,347,549; 8,470,881; 8,753,110; 8,973,299; 9,949,471 2. Apague cualquier llama expuesta.
Canada Patents: Nos. 2322038; 2460876; 2558775; 2569737; 266346 3. Abra la tapa.
All Other Countries 4. Si el olor continúa, llame inmediatamente
Australia: 735984; 2002356537; 2005226680; 2005251813; 2007258277;
2008246208; 2012202864 Brazil: 9908104-0; PI0213059-9; PI0508967-0
a su proveedor de gas o a los bomberos.
China: ZL0281957.X; ZL20058000881.0; ZL200580025316.5;
ZL200580046646.2; ZL200780029874.8; ZL200910254151.9
Denmark: 1432304
Europe: 1049373; 1432304; 1537780; 1827093; EP1725094B; EP1765068B
Finland: 1432304; 1827093; EP1725094B PARA SU SEGURIDAD
France: 1049373; 1432304; 1537780; 1765068; 1827093; EP1725094B
Germany: 1049373; 1725094; 60211538.8 1. No almacene ni utilice gasolina ni otros
Hong Kong: HK1107743; HK1112810; HK1148207 Italy: 1049373; vapores y líquidos inflamables en las
1432304; 1537780; 1725094; 1765068; 1827093 proximidades de éste o cualquier otro aparato.
Japan: 4317748; 4741578; 5444525
2. Un tanque LP que no esté conectado no
Mexico: 314022
New Zealand: 506403; 542745
deberá almacenarse en las proximidades
Portugal: 1765068 de este o cualquier otro aparato.
Sweden: 1432304; 1537780; 1765068; 1827093; EP1725094B
United Kingdom: 1049373; 1432304; 1537780; 1725094; 1765068; 1827093
Hecho en China
S4lnstrucciones de seguridad
Por favor, lea y siga las instrucciones Nota: Algunas o todas las siguientes instrucciones de
seguridadpara dispositivos activados con gas butano
y advertencias de seguridad. pueden aplicarse a su trampa. Deje que la trampa se enfrie
durante 5 minutos antes de volver a encenderla.
Se debe alertar a los niños y adultos de Advertencia: La instalación, ajuste, alteración, servicio o
mantenimiento inadecuados pueden causar lesiones personales
los peligros de las temperaturas elevadas o daños materiales. Lea atentamente las instrucciones de
de las superficies y deberán mantenerse instalación, operación y mantenimiento antes de instalar o de
alejados para evitar quemaduras o que la dar mantenimiento a la trampa.
ropa se incendie. Precaución: Debe utilizar el regulador de presión de gas
que viene con este artefacto. Este regulador está fijado para una
presión de salida de 28 cm de columna de agua. La presión
Los niños pequeños deberán estar bajo mínima del suministro de gas de entrada es para 28 cm de
columna de agua del regulador.
supervisión cuando estén alrededor del
• Esta unidad no está diseñada para instalarse en vehículos
área del calentador. Manténgase el recreacionales ni en botes.
equipo fuera del alcance de las niños. • Cuando este artefacto no esté en uso, debe apagar el suministro de
gas en el tanque de suministro de gas butano.
No debe colgar ropa ni materiales • La instalacion debe hacerse en confonnidad con las códigos locales o,
inflamables en el calentador, ni en ausencia de códigos locales, de acuerdo con el Código Nacional de
Gas Combustible, ANSI Z223. 1-1998 para EE.UU., y de acuerdo con
colocarlos encima o cerca del mismo. CAN1-B149para Canadá.
• Para determinar si hay fuga de gas, coloque agua jabonosa alrededor
del ensamblaje del conector, regulador y manguera de gas. Si
aparecen burbujas, significa que hay una fuga de gas.
• Revise la manguera antes de utilizar la unidad. Si es evidente que
hay abrasión o desgaste excesivos, o si la manguera tiene un corte,
debe cambiarse antes de hacer funcionar la unidad. La manguera de
repuesto debe ser la que especifica el fabricante.
• La trampa está equipada con un mecanismo de chispa interno. El no
seguir el procedimiento de arranque puede causar que la trampa no
arranque.
• La instalación y la reparacion deben hacerlas el personal de
mantenimiento calificado (puede encontrar centros de mantenimiento
en www.mosquitomagnet.com). Personal de mantenimiento calificado
debe inspeccionar el calentador antes de usarlo par lo menos una vez
al año. Puede requerirse limpieza con más frecuencia, si es necesario.
S5lnstrucciones de seguridad
• Mantenga espacios libres adecuados de 51 a 61 cm • Los tanques desconectados deben tener tapones de válvula
alrededorde las aberturas de aires que van hacia la cámara roscados instalados y no deben almacenarse en un edificio,
de combustión; mantenga lejos los materiales combustibles; garaje ni en áreas cerradas.
deje espacio libre para facilitar el accesoy para que haya
• Debe utilizarse el regulador de presion y el ensamblaje de
suficiente aire para combustión y ventilación. Mantenga el
manguera suministrados con este artefacto para la conexion
área de la trampa libre de materiales combustibles, gasolina
del tanque de gas butano. Los reguladores de presion y
y otros vaporesy Iíquidos inflamables. No debe utilizarse
el ensamblaje de manguera de reemplazo deb en ser las
este artefacto en lugares donde probablemente exista vapor
que especifica el fabricante.
combustible o polvos explosivos.
• Evite el uso inapropiado de cordones de extensión.
• No obstruya el flujo de aire de combustión y ventilación. Mantenga las conexiones alejadas de humedad y evite el
daño del cordón.
• Mantenga libres y sin residuos as aberturas de ventilación
del recinto del tanque. • Si se daña del cordón de suministro, debe ser reemplazado
par elfabricante o su agente de servicio o por una persona
• Limpie la trampa con un trapo húmedo, si es necesario.
calificada similar con el fin de evitar peligros.
• Debe utilizar un tanque de gas butano de un maxima de
20 lb (9 kg).
• El tanque de gas butano debe tener una válvula de cierre Si tiene preguntas, por favor, comuníquese con el
que termina en una salida de válvula de tanque de gas Servicio de Atención al Cliente llamando al número:
butano especificada para Conexión No. 510 conforme al 1-800-953-5737
estándar de EE.UU. "Standard for Compressed Gas Cylinder o visite www.mosquitomagnet.com
Valve Outlet and Inlet Connections" (Estándar para
Conexiones de Salida y Entrada de Válvula de Tanque de Gas
Comprimido), ANSI/CGA-V-1-1977.
• El sistema de suministro deltanque de gas butano debe
estar diseñado para la extracción de vapor eltanque debe
venir con un cuello para proteger la válvula deltanque.
• El tanque de gas butano que se use debe estar construido
y marcado de acuerdo con las especificaciones de tanques
de gas del Departamento de Transporte de los EE.UU. o el
Estándar Nacional de Canadá CAN/CSA-B339.
• La trampa debe utilizarse en exteriores solamente, en un
área con buena ventilación y no debe utilizase en un edificio,
garaje ni en ningún otro lugar cerrado.
• Si se almacena el artefacto en interiores, debe desconectar
el tanque de gas butano y retirarlo del artefacto.
• Los tanques de gas butano deben almacenarse en
exteriores en un área con buena ventilación y fuera
del alcance de las niños.
S6Partes principales
OFF MO
DE
ATTENT
ION
MODE
Cabezal de
alimentación
COOL
WARM
RUN
eléctrica (1)
Artefacto Executive
autónomo Trompeta (1)
Manguera del
regulador (1)
Poste de soporte (1)
Soporte de la base (1)
Partes incluidas
Bolsa para Cargador de batería remoto Batería recargable
insectos
S7lnstrucciones de ensamblaje
Ensamblaje de la trampa:
Paso 1 Paso 3
Coloque la base en una posición invertida sobre una Coloque el cabezal de alimentación eléctric a de
superficie plana, despliegue la pata de apoyo en la trampa en el poste. Presione firmemente hacia
forma de U hasta que encaje en su lugar. abajo con ambas manos hasta que esté asegurado.
Paso 2 Una vez ensamblada la trampa, la parte frontal del
cabezal de alimentación eléctrica/trompeta debe
estar lo más lejos posible de las ruedas en la misma
dirección que las patas en forma de U de la base.
Paso 4
La batería no viene completamente cargada de la
fábrica; cargue la batería antes del primer uso. Si
se usa de manera adecuada, una carga durará toda
la temporada. Vea la paágina 6e para obtener más
detalles.
Voltee la base y el ensamblaje de la pata a su
posición normal y coloque el poste de soporte
dentro de la cavidad de la base.
lnstalación de la bolsa para insectos:
Para insertar la bolsa para insectos, primero
enganche la sección frontal/abierta y luego jale
suavemente el extrema posterior hacia abajo para
colocarla en su lugar.
1
2
MODE
N!
NTIO
ATTE
MODE
OFF
L
COO M
RUN
WAR
S8Instalación
lnstrucciones para cargar la bateria Extraiga el panel posterior
1. Retire de la parte trasera de la unidad del cabezal de alimentación
eléctrica el panel de la cubierta (el panel se desencaja). Presione
el seguro de la batería y jálela hacia afuera de la trampa para
desconectarla. Extraiga la batería jalando hacia arriba desde la
parte inferior y girando la batería fuera de su posición.
2. El cargador de la batería no es apto para uso en exteriores. La
batería debe cargarse en interiores.
3. Enchufe el cargador de la batería en un tomacorriente de interiores.
4. Conecte la batería recargable al cargador de batería.
5. El indicador LED del cargador de la batería se encenderá de
color rojo cuando la batería esté cargándose. Cuando la batería
esté totalmente cargadda, el indicador LED cambiará a verde. El
tiempo de carga típico es menos de dos horas. Inserte y conecte la batería
6. El cargador de la batería es automático y surtirá una corriente
segura de carda de mantenimiento cuando la batería esté
totalmente cargada. No sobrecargará la batería. Para lograr
la máxima vida útil de la batería, no la deje en el cargador por
largos períodos de tiempo.
7. Cuando la batería esté totalmente cargada, desconecte la batería
del cargador de batería y vuelva a colocarla en la unidad Mosquito
Magnet Executive.
8. lnserte y conecte la batería recargable.
9. Vuelva a colocar el panel de la cubierta en la parte trasera de la
unidad del cabezal de alimentación eléctrica.
Ubicacion de la trampa NOTA: Cerciórese de haber colocado el panel de la
cubierto; la trampa no será impermeable sin el panel de
1. Determine la dirección del viento predominante. Consulte los la cubierto.
patrones del tiempo local si no esta seguro.
2. Párese en el centro del área que intenta proteger y mire en
dirección hacia el viento predominante.
3. La ubicación apropiada de la trampa será entre 9 y 12 m en frente
de usted, con una cobertura de terreno de entre 1,5 y 1,8 m
(es decir, arbustos, cantero de flores, líneas de árboles, pantano).
Asegúrese que la trampa no esté ubicada contra objetos de
bloqueo coma edificios, cercas, etc.
4. Se recomienda ubicar la trampa en la sombra.
5. No coloque la trampa directamente debajo de una fuente de agua
(rociadores, manguera, etc.).
6. La trampa debe colocarse sabre un piso piano para evitar que se
voltee o que haya una distribución desigual del gas butano.
7. Para lograr una ubicación óptima de la trampa en su patio o
jardin, consulte www.mosquitomagnet.com/videos para crear su
propio diagrama de patio para una correcta ubicación de la
trampa.
S9Instalación
lnstalación del tanque de butano
1. Después de colocar la trampa en su ubicación ideal, coloque el Paso 1 - Ubicacion del tanque de butano
tanque de butano en el receptaculo moldeado.
2. Asegúrese que el tanque de butano esté completamente
cerrado. Conecte la manguera del regulador de butano al tanque
de butano. Asegure firmemente con la mano.
No utilice herramientas.
3. Active el gas butano girando lentamente la válvula en sentido
contrario a las manecillas del reloj. Tenga cuidado de no voltear
muy rápidamente para evitar que se active la válvula de seguridad.
¡NO MUEVA LA TRAMPA CON EL TANQUE INSTALADO!
DEBE DESCONECTAR EL TANQUE DEL REGULADOR
ANTES DE REUBICAR LA TRAMPA PARA EVITAR DAÑAR
EL REGULADOR Y/0 LA TRAMPA. TENGA PRESENTE
QUE EL DAÑO CAUSADO POR NO CUMPLIR CON ESTA Paso 2 - Colocar el regulador
INSTRUCCION NO ESTÁ CUBIERTO POR LA GARANTIA.
Paso 3 - Abrir la válvula lentamente
S10Vous pouvez aussi lire