EASYLED IKONE white / color - NOTICE D'UTILISATION - acis France
←
→
Transcription du contenu de la page
Si votre navigateur ne rend pas la page correctement, lisez s'il vous plaît le contenu de la page ci-dessous
N65060LB/ N65060LC Photos non contractuelles. Non-contract photo.
ACIS
2 ANS
GARANTIE
NOTICE D’UTILISATION
white / color
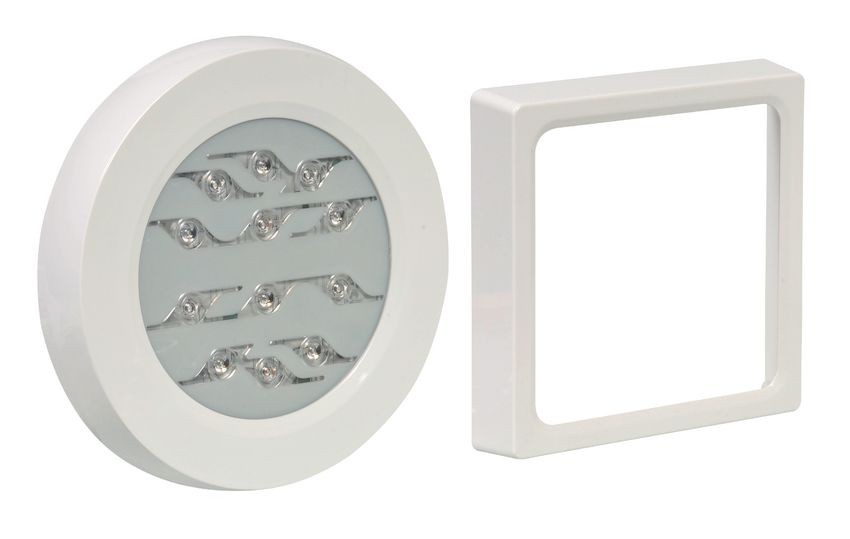
EASYLED IKONE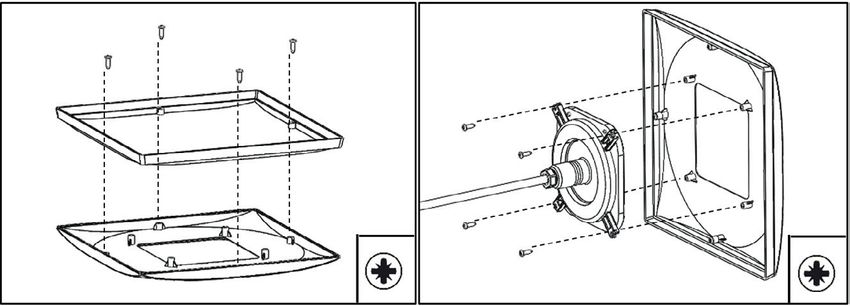
EASYLED IKONE
     COLOR / WHITE

     Sommaire / Contents
        FR........................................ 4
        EN........................................ 7
        PT......................................... 10
        DE........................................ 13
        IT.......................................... 16
        ES......................................... 19

                                                                                         SOCIÉTÉ ACIS
                                                                                   15, rue des Marais BP 3
                                                          44310 ST PHILBERT DE GRAND LIEU - FRANCE
                                                                             Web : www.acis-france.com
                                                                    E-mail : client.acis@acis-france.com

easyled ikone tunable - 04/2021 2 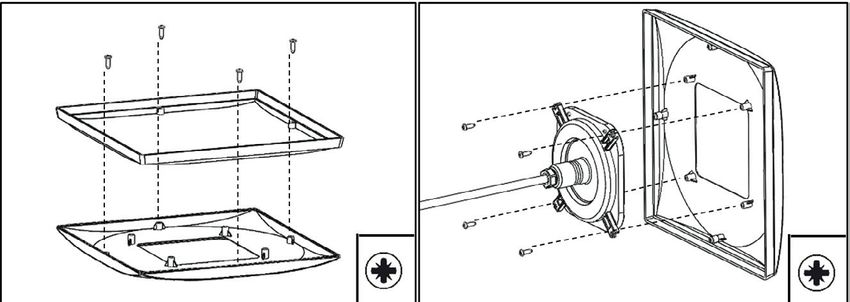
Spécifications techniques :                             Technische Daten:
Technical specifications:                               Especificações técnicas:
Especificaciones técnicas:                              Technische eigenschappen:
Specifiche tecniche:                                    Τεχνικά χαρακτηριστικά:

                                                            65060LB15/ 65060LB30
                                                                                                    65060LC15
                                                                white   / blanc
                 LEDs                                                                            color   / couleur
                                                                                                      12 LEDs
                                                       6LEDs                        12LEDs

  Puissance                  V.A.                         36                            52               45
  absorbée             WATT +/- 10%                     26W                             42W              36W
     Température de couleur                         6500 Kelvin                   6500 Kelvin            RGB
            KwH/1000h                                     26                            42               36
       Tension / Fréquence                         12V ~ / 50Hz                   12V ~ / 50Hz    12V ~ / 50-60Hz

                                                  0s + 100% light             0s + 100% light      0s + 100% light

                                                     > 100 000                     > 100 000         > 100 000

                                                      10 000 h                     10 000 h           10 000 h

                   +/- 10%                         1800 Lumens                 2500 Lumens         1200 Lumens

                  HG                                   0.0 mg                       0.0 mg            0.0 mg
       Indice de protection                         IP68/1.0m                     IP68/1.0m          IP68/1.0m

                                         A utiliser uniquement en cas d’immersion dans l’eau.
                                                    Use only when immersed in water.

    cette ampoule                      cette ampoule                    cette ampoule
    comporte des                       comporte des                     comporte des
    lampes à LED                       lampes à LED                     lampes à LED
      intégrées                          intégrées                        intégrées
                                              easlyled ikone
 WELTICO   PAR 56 TUNABLE           WELTICO    PAR 56 TUNABLE       WELTICO easlyled  ikone
                                                                              PAR 56 TUNABLE
            WHITE 6LEDS                         WHITE 12LEDS                   COLOR 12LEDS

               LED                                 LED                              LED
                 A                                   A
                                                                                        B

    23
    26                                23
                                      42                                44
                                                                        36

                                                                              3                    easyled ikone tunable - 04/2021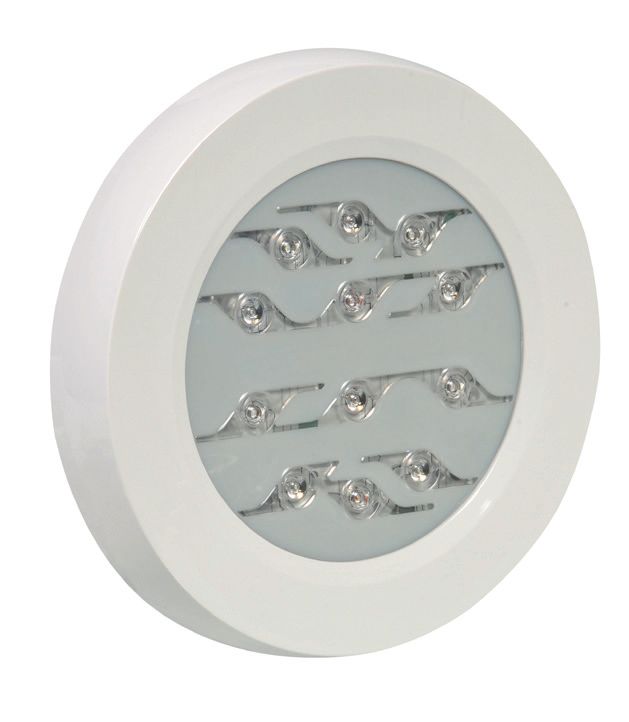
FR
1. RECOMMANDATION
PROJECTEURS LED / 12V ~ - Fabriqués en ABS - L’optique clipsable facilement démontable.
L’installation de ce projecteur nécessite l’intervention de personnes qualifiées. A utiliser uniquement en cas d’immersion
dans l’eau.

IMPORTANT : Cette notice contient des informations de première importance sur les mesures de sécurité à adopter au
moment de l’installation et de la mise en service. Il est par conséquent indispensable que l’installateur et l’utilisateur lisent
attentivement ces instructions avant de commencer le montage et la mise en marche.

NOTE DE SECURITE IMPORTANTE : Les installations électriques pour piscines doivent être conformes aux exigences de la
normes NF C 15-100 et à la réglementation en vigueur (réseau électrique domestique).

NOTE : Le projecteur alimentée par un transformateur électronique risque de ne pas fonctionner (renseignez-vous auprès
de votre revendeur).
Fonctionne uniquement avec un transformateur de sécurité (transformateur torique) de classe III, 230V~ / 12V ~.
Prévoir une alimentation d’une puissance supérieure de 10% à la puissance absorbée par projecteur.
Un transformateur de 100 V.A. permet d’alimenter 2 projecteurs (12 leds couleurs) : 2 x 45 = 90 VA

Reportez-vous au tableau ci-dessous pour définir la section de câble en fonction de la longueur et de la puissance.
                     6 Leds White         26 W          12 Leds White         42 W          12 Leds Color         36 W

                                      Eloignement                         Eloignement                         Eloignement
                    Section Câble     Max Coffret /     Section Câble     Max Coffret /     Section Câble     Max Coffret /
                                       Projecteur                          Projecteur                          Projecteur

                     2 x 1,5 mm2          11 ml          2 x 1,5 mm2           7 ml          2 x 1,5 mm2           8 ml
    Standard
                     2 x 2,5 mm2          19 ml          2 x 2,5 mm2          11 ml          2 x 2,5 mm2          13 ml

                      2 x 4 mm2           29 ml           2 x 4 mm2           18 ml           2 x 4 mm2           21 ml

                      2 x 6 mm2           44 ml           2 x 6 mm2           27 ml           2 x 6 mm2           31 ml

                      2 x 10 mm2          72 ml          2 x 10 mm2           45 ml          2 x 10 mm2           52 ml

Si le câble extérieur souple ou le cordon de ce luminaire est endommagé, il doit être remplacé exclusivement
par le fabricant, son service de maintenance ou toute personne de qualification équivalente, cela afin d’éviter
tous risques.Introduire le câble dans le presse-étoupe au fond de la niche en laissant suffisamment de longueur afin
depouvoir poser le projecteur sur la margelle. Serrez le presse étoupe, il ne reste plus qu’à introduire le projecteur
dans la niche. Pour un éclairage optimum dans votre piscine, toujours orienter l’ampoule comme indiqué :

PROJECTEUR LEDs COULEURS
- 10 couleurs / 5 séquences de couleurs enchaînées.
- Changement des couleurs ou des séquences (en standard) par coupure sur l’interrupteur d’alimentation «MARCHE/ARRET».
- En option : changement des couleurs ou des séquences par l’intermédiaire du KIT Récepteur Contrôleur-Modulateur avec
télécommande sans fil.
- Garde en mémoire après extinction de l’ampoule la couleur ou la séquence pré-définie.

easyled ikone tunable - 04/2021                               4    FR
2. CONTENU

                                                          64194LB15
             /   AMPOULE AVEC CABLE 2,5m                  64194LB30
                                                          64194LC15

             1   ENJOLIVEUR ROND                           64209

             2   ENJOLIVEUR CARRE                           64210

             3   BAGUE A CLIPER                            64267

             4   GAINE THERMORECTRACTABLE                  500458

             5   EMBOUT DE CONNEXION BLEU (x2)             64335

             6   SACHET DE VIS (4 vis)                      65100

                                                  3
             1

      2
                                                               5
                                                      6                    4

                                         5   FR                     easyled ikone tunable - 04/2021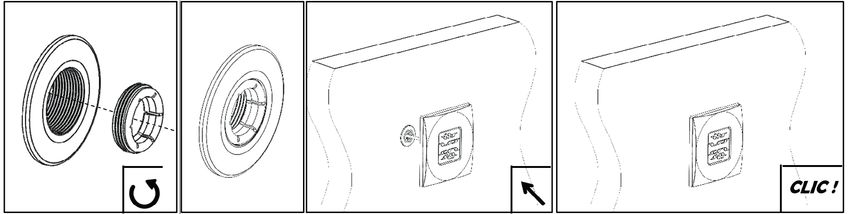
3. INSTALLATION
Pièce à scellée avec filetage 1.5’’ (BSP) installé dans le bassin.
Boîte de connexion raccordée via des tuyaux PVC étanches à moins de 2 m de la pièce à sceller.
Câble d’alimentation dans la boîte de connexion.

Préparation de l’enjoliveur au choix ROND OU CARRE :

Mise en place dans le bassin :

Raccordement électrique :                                          NE PAS ETRE TROP PRES DE LA GAINE AVEC LE DECAPEUR
                                                                   THERMIQUE POUR NE PAS LA BRULER
1. Vérifier la présence des cosses manchons et de la gaine
thermo-rétractable résinée.
2. Insérer la gaine thermo-rétractable résinée sur un des
deux câbles puis raccorder les 2 câbles au moyen des
cosses manchons qui doivent être serties de chaque côté au
moyen d’une pince adaptée

                                                                   5. L’opération est terminée une fois la gaine retractée sur
                                                                   toute sa longueur. Vous apercevrez la résine déborder très
                                                                   légèrement à chaque extrémité.
                                                                   Le but de cette étanchéité est d’empêcher l’infiltration
                                                                   d’eau jusqu’au projecteur via les brins de cuivre du câble.
                                                                   Le constat de ce phénomène d’infiltration par notre service
                                                                   S.A.V. engendrera un refus de prise en garantie de ces
                                                                   projecteurs.
3. Faire un test électrique avant le collage de la gaine

4. Faire coulisser la gaine et la positionner de manière à avoir
la cosse manchon au milieu et une même longueur de gaine
sur chacun des 2 câbles.

Chauffer la gaine à l’aide d’un décapeur thermique en allant
du centre de la gaine vers ses extrémités pour éviter la
                                                                         LA CONNEXION DOIT TOUJOURS ÊTRE AU-DESSUS DU NIVEAU D’EAU
formation d’une poche d’air au milieu.

easyled ikone tunable - 04/2021                                6   FR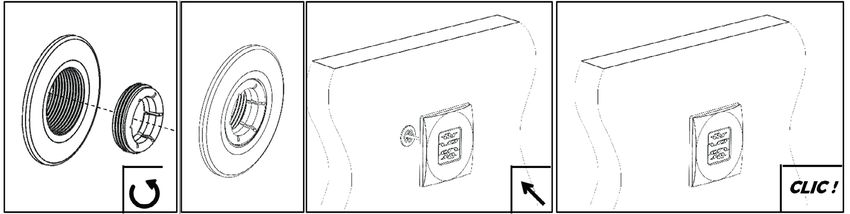
EN
1. RECOMMENDATION
LED PROJECTORS 12V ~
-Manufactured in ABS - optical medium that can be easily dismantled. Qualified people are needed to install this projector.
To only be used in the event of water immersion.

IMPORTANT: this manual contains information of prime importance regarding safety measures to adopt when installing and
commissioning. It is consequently essential that the installer and the user read these instructions carefully before starting
to assemble and start up.
IMPORTANT SAFETY NOTICE: Electrical installations for swimming pools must comply with requirements of standard NF C
15-100 and regulations in force (domestic power grid).
NOTE : If the SPOTLIGHT bulb’s power is supplied by an electronic transformer there is a risk it may not work (contact your
retailer for details).
Works only with a safety transformer (toroidal transformer) Class III 230V / 12V ~.
Provide a power supply 10% higher than the power absorbed by the spotlight.
A 100 V.A. transformer can power 2 projectors (12 color LEDs) : 2x 45 = 90 VA
                     6 Leds White           26 W           12 Leds White         42 W          12 Leds Color         36 W

                                      Distance Max                            Distance                          Distance Max
                   Cable section          Box/            Cable section       Max Box /       Cable section         Box/
                                        Projector                             Projector                           Projector

    Standard         2 x 1,5 mm2            11 ml           2 x 1,5 mm2           7 ml          2 x 1,5 mm2           8 ml

                     2 x 2,5 mm2            19 ml           2 x 2,5 mm2          11 ml          2 x 2,5 mm2          13 ml

                      2 x 4 mm2             29 ml            2 x 4 mm2           18 ml           2 x 4 mm2           21 ml

                      2 x 6 mm2            44 ml             2 x 6 mm2           27 ml           2 x 6 mm2           31 ml

                     2 x 10 mm2             72 ml           2 x 10 mm2           45 ml          2 x 10 mm2           52 ml

See the table below to identify the section of cable depending on the length and power. For low currents and short son,
please be very superfluous. Remember that falls can be very high on bad connections, lugs and son Loose oxidized.
If the external flexible cable or cord of this luminaire is damaged, it must only be replaced by the manufacturer, its service
agent or similarly qualified person, in order to avoid all risks. Insert the cable in the grommet at the recess’s bottom and leave
a sufficient length to be able to pose the spotlight on the pool edge, since the grommet is tightened, the only thing to do now
is to insert the spotlight in its recess. For optimum light in your pool, always keep the bulb as below:

COLOR LEDS FOR HEADLAMPS
10 colours/5 continual colour sequences.
- Change colours or sequences (standard) by turning off the power button “ON/OFF».
- Optional: colour or sequence changes using the Monitor-Modulator Receptor KIT with
wireless remote control.
- Remember the bulb colour or pre-defined sequence after switching off the power.

                                                             7   EN                                easyled ikone tunable - 04/2021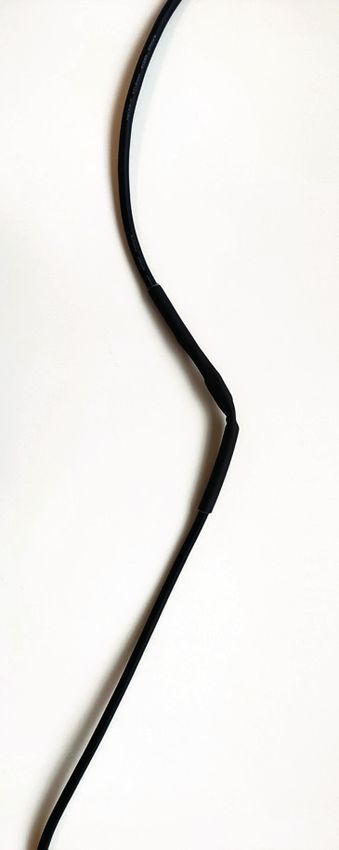
2. CONTENTS

                                  BULB WITH 2.5 m CABLE                    64194LB15
                            /                                              64194LB30
                                                                           64194LC15

                            1     ROUND COVER                               64209

                           2      SQUARE COVER                               64210

                           3      SNAP-IN RING                              64267

                           4      HEATSHRINK SLEEVING                       500458

                           5      BLUE CONNECTION END PIECE (x2)            64335

                           6      BAG OF SCREWS(8 SCREWS)                  8x 65100

                                                                   3
                             1

             2
                                                                                 5
                                                                       6               4

easyled ikone tunable - 04/2021                           8   EN
3. INSTRUCTIONS
Sealing piece with 1.5’’ thread (BSP) installed in the basin.
Connection box connected via watertight PVC pipes within 2 m of the sealing piece.
Power cable in the connection box.

Preparation of the hubcap in the choice ROUND OR SQUARE :

Installing in the pool:

Electrical connection :                                         of the sheath outward, to prevent the formation of any air
1. Verify that the sleeve lugs and the resin-coated, heat-      pockets in the middle.
retractable sheath are in place.                                TO AVOID BURNING THE SHEATH, DO NOT HOLD THE HEAT GUN
2. Insert the resin-coated, heat-retractable sheath into one    TOO CLOSE TO IT.
of the tow cables, and then connect the two cables together
using the sleeve lugs, which must be mounted on either
side by means of an appropriate clamp.

                                                                5.You will be done once the entire length of the sheath has
                                                                retracted.You will see a little resin seeping out at both ends.

                                                                The purpose of this sealing process is to prevent the
                                                                infiltration of water into the projectors via the copper strands
                                                                in the cables. If our after-sales service observes any such
                                                                infiltration, this will void the warranty on those projectors. “
3. Do an electrical test before gluing the sheath.

4. Faire coulisser la gaine et la positionner de manière à
avoir la cosse manchon au milieu et une même longueur
de gaine sur chacun des 2 câbles.

5.Slide the sheath into position, so the sleeve lug is in the
middle and there is the same length of sheath over both
cables.
Heat the sheath with a heat gun, moving from the center                                                                 .
                                                                            THE CONNECTION MUST ALWAYS BE ABOVE THE WATER

                                                            9   EN                               easyled ikone tunable - 04/2021
PT
1. INSTALAÇÃO
PROJECTORES LED 12V ~
- Fabricados em ABS – Suporte óptico facilmente desmontável
A instalação deste projector exige a intervenção de pessoas com as qualificações necessárias.
Utilizar exclusivamente em caso de imersão em água.

IMPORTANTE: estas instruções de utilização contêm informações extremamente importantes sobre as medidas de segurança
a adoptar no momento da instalação e colocação em funcionamento do projector. É, por isso, indispensável que o instalador e
o utilizador leiam atentamente estas instruções antes de iniciarem a montagem e utilização.

AVISO DE SEGURANÇA IMPORTANTE: as instalações eléctricas para piscinas devem cumprir as exigências da norma NF C
15-100 e a regulamentação em vigor (rede eléctrica doméstica).
ATENÇÃO: A lâmpada, alimentada por um transformador electrónico, corre o risco de deixar de funcionar (consulte o seu
revendedor).
Trabalha apenas com um transformador de segurança (transformador toroidal) Classe III 230V / 12V ~.
Disponha de uma alimentação de potência 10% superior à potência absorvida pela lâmpada.
Um transformador de 100 V.A. pode alimentar 2 projetores (12 LEDs color) : 2 x 45 VA = 90 VA

                     6 Leds White        26 W           12 Leds White        42 W         12 Leds Color        36 W

                     Secção do      Distância Max        Secção do        Distância        Secção do        Distância
                       cabo         Caixa /Projetor        cabo          Max Caixa /         cabo          Max Caixa /
                                                                          Projetor                          Projetor

    Standard         2 x 1,5 mm2          11 ml          2 x 1,5 mm2         7 ml          2 x 1,5 mm2         8 ml

                     2 x 2,5 mm2         19 ml           2 x 2,5 mm2         11 ml         2 x 2,5 mm2         13 ml

                      2 x 4 mm2          29 ml           2 x 4 mm2           18 ml          2 x 4 mm2          21 ml

                      2 x 6 mm2          44 ml           2 x 6 mm2           27 ml          2 x 6 mm2          31 ml

                      2 x 10 mm2         72 ml           2 x 10 mm2          45 ml         2 x 10 mm2          52 ml

Veja a tabela abaixo para identificar a seção do cabo, dependendo do comprimento e poder. Para correntes de baixa e filho
pequeno, por favor, muito supérflua. Lembre-se que as quedas podem ser muito elevados em conexões ruins, talões e filho
Insira o cabo na glândula situada na parte inferior do nicho, deixando comprimento suficiente para ser capaz de perguntar
o projetor na borda, aperte a glândula, só nos resta apresentar o projector no nicho.
Se o cabo flexível externo ou o cabo desta luminária estiver danificado, ele só deve ser substituído pelo fabricante, pelo
agente autorizado ou pessoa qualificada, a fim de evitar todos os riscos.
Para a luz ideal em sua piscina, mantenha sempre a lâmpada como o esboço :

easyled ikone tunable - 04/2021                            10   PT
LEDS DE COR PARA FARÓIS
10 cores/5 sequências de cores contínuas.
- Mude as cores ou sequências (standard) desligando o botão de alimentação «ON/OFF».
- Opcional: alterações de cor ou sequência utilizando o Kit recetor monitor-modulador com
controlo remoto sem fios.
- Lembre-se da cor da lâmpada ou da sequência pré-definida depois de desligar a alimentação.
2. CONTENU
LÂMPADA COM CABO DE 2,5 M 64194LB15
/ 64194LB30
64194LC15
1 TAMPÃO REDONDO 64209
2 TAMPÃO QUADRADO 64210
3 ANILHA DE MOLA 64267
4 TUBO TERMORRETRÁCTIL 500458
5 ADAPTADOR DE LIGAÇÃO AZUL (x2) 64335
SAQUETA DE PARAFUSOS 8x 65100
6
(8 PARAFUSOS)
3
1
2
5
6 4
11 PT easyled ikone tunable - 04/20213. INSTALLATION
Peça para selar com rosca de 1,5’’ (BSP) instalada na piscina.
Caixa de conexões ligada através de tubos de PVC estanques a menos de 2 m da peça para selar.
Cabo de alimentação na caixa de conexões.
Preparação do tampão À ESCOLHA – REDONDO OU QUADRADO:
Colocação na piscina:
Ligação elétrica:
1. Verifique a presença dos terminais e de um tubo resinado
termoretráctil
2. Insira um tubo resinado termoretráctil num dos dois
terminais e, em seguida, ligue os dois cabos com os terminais
que devem ser cravados em cada lado com uma pinça
adequada.
5. A operação é concluída assim que o tubo estiver retraído
em todo o seu comprimento. Um pouco de resina irá
transbordar muito ligeiramente em cada extremidade.
O objetivo desta estanquecidade é evitar infiltração de água
no projetor através dos fios de cobre do cabo.
A observação deste fenómeno de infiltração pelo nosso
serviço Pos-venda levará à não consideração em garantia
3. Realize um teste elétrico antes de colar a tubo. destes projetores.
4.Deslize o tubo que deve ser posicionado de modo a que o
terminal fique no meio e tenha o mesmo comprimento de
tubo em cada um dos 2 cabos.
Aqueça o tubo com um decapador de ar quente indo do centro
do tubo até às extremidades evitando a formação de uma
bolha de ar no meio.
NÃO ESTEJA MUITO PERTO DO TUBO COM O DECAPADOR PARA
NÃO QUEIMÁ-LO A LIGAÇÃO DEVE ESTAR SEMPRE ACIMA DO NÍVEL DE ÁGUA
easyled ikone tunable - 04/2021 12 PTDE
1. RECOMMANDATION
LED-PROJEKTOREN 12V ~
-Aus ABS hergestellt -Leicht demontierbare Lampenfassung
Die Installation dieses Projektors muss von qualifiziertem Personal durchgeführt werden.
Der Projektor ist nur für die Unterwassernutzung geeignet.
WICHTIG: Diese Anleitung enthält wichtige Informationen über die einzuhaltenden Sicherheitsmaßnahmen bei der
Installation und Inbetriebnahme. Es ist daher unbedingt notwendig, dass Installateur und Nutzer diese Anweisungen
aufmerksam durchlesen, bevor mit der Montage und Ingangsetzung begonnen wird.
WICHTIGER SICHERHEITSHINWEIS: Die elektrischen Installationen für Schwimmbäder müssen den Anforderungen der
Norm NF C 15-100 und den geltenden Rechtsvorschriften (Hausstromnetz) entsprechen.
ACHTUNG: Wird die Lampe von einem elektronischen Transformator gespeist, so könnte sie nicht funktionieren (erkundigen
Sie sich bei Ihrem Händler).
Funktioniert nur mit einem Sicherheitstrafo (Ringkerntrafo) Klasse III 230V / 12V ~.
Sehen Sie eine über 10% höhere Versorgung als die von der Lampe aufgenommene Leistung vor.
Ein Transformator mit 100 V.A. ermöglicht die Stromversorgung von 2 Scheinwerfern (12 color LEDs) : 2 x 45 = 90 VA
Siehe die Tabelle unten, um den Abschnitt der Kabel je nach Länge und Leistung zu identifizieren. Für niedrige Ströme und
kurze Sohn, bitte sehr überflüssig. Beachten Sie, dass fällt sehr hoch sein können auf schlechte Verbindungen, Stollen und
Sohn Loose oxidiert.
6 Leds White 26 W 12 Leds White 42 W 12 Leds Color 36 W
Distance Max Distance Distance Max
Cable section Box/ Cable section Max Box / Cable section Box/
Projector Projector Projector
Standard 2 x 1,5 mm2 11 ml 2 x 1,5 mm2 7 ml 2 x 1,5 mm2 8 ml
2 x 2,5 mm2 19 ml 2 x 2,5 mm2 11 ml 2 x 2,5 mm2 13 ml
2 x 4 mm2 29 ml 2 x 4 mm2 18 ml 2 x 4 mm2 21 ml
2 x 6 mm2 44 ml 2 x 6 mm2 27 ml 2 x 6 mm2 31 ml
2 x 10 mm2 72 ml 2 x 10 mm2 45 ml 2 x 10 mm2 52 ml
Stecken Sie das Kabel in die Verschraubung am Boden der Nische, so dass genug Länge zu können, um den Projektor auf
den Rand stellen, ziehen Sie die Drüse, es bleibt nur noch, um den Projektor in der Nische einzuführen.
Wenn die externe beweglichen Leitung dieser Leuchte beschädigt ist, muss es nur durch den Hersteller, seinen Kundendienst
oder eine ähnlich qualifizierte Person ersetzt werden, um alle Risiken zu vermeiden.
Für optimale Licht in Ihrem Pool, immer halten Sie die Lampe wie unten:
13 DE easyled ikone tunable - 04/2021Color-LEDs für Scheinwerfer
10 Farben / 5 aufeinanderfolgende Farbsequenzen.
- Ändern der Farben oder Sequenzen (standardmäßig) über Abschaltung mittels Versorgungsschalter «Ein/Aus».
Optional: Ändern der Farben oder Sequenzen durch Zwischenschalten eines Bausatzes mit Empfänger, Steuerung und
Modulator, welcher über eine
kabellose Fernbedienung verfügt.
- Speichern einer voreingestellten Farbe oder Farbsequenz des Scheinwerfers auch nach dem Abschalten.
2. INHALT:
64194LB15
/ LEUCHTE MIT 2,5m KABEL 64194LB30
64194LC15
1 RUNDE ZIERBLENDE 64209
2 QUADRATISCHE ZIERBLENDE 64210
3 CLIP-RING 64267
4 SCHRUMPFSCHLAUCH 500458
5 ANSCHLUSSSTUTZEN BLAU (x2) 64335
6 SCHRAUBENBEUTEL (8 SCHRAUBEN) 8x 65100
3
1
2
5
6 4
easyled ikone tunable - 04/2021 14 DE3. GRUNDVORAUSSETZUNGEN:
Einbauteil mit 1.5’’ BSP im Becken installiert.
Die Anschlussdose ist mit den dichten PVC-Schläuchen weniger als 2m von dem Einbauteil entfernt angeschlossen.
Versorgungskabel aus dem Technikraum in die Anschlussdose geführt.
Vorbereiten der Zierblende ZUR AUSWAHL RUND ODER QUADRATISCH:
Einbau in das Becken:
Elektrischer Anschluss: NÄHERN SIE DIE HEISSLUFTPISTOLE DEM SCHLAUCH NICHT
ZU SEHR, UM DIESEN NICHT ZU VERBRENNEN
1.Prüfen Sie, ob Kabelschuhe und der Schrumpfschlauch
vorhanden sind.
2.Schieben Sie den Schrumpfschlauch auf eines der
beiden Kabel und verbinden Sie anschließend die beiden
Kabel mithilfe der Kabelschuhe, die auf beiden Seiten
mithilfe einer geeigneten Zange verpresst werden müssen.
5. Der Vorgang ist abgeschlossen, wenn sich der
Schrumpfschlauch über seine gesamte Länge
zusammengezogen hat.Sie werden feststellen, dass das
Harz an den beiden Enden leicht überläuft.
Ziel dieser Dichtheit ist es, zu verhindern, dass Wasser über
die Kupferdrähte des Kabels bis zum Scheinwerfer vordringt.
Wenn unser Kundendienst feststellt, dass Wasser in die
Scheinwerfer eingedrungen ist, erlischt Ihr Garantieanspruch
für die Scheinwerfer.
3. Führen Sie einen elektrischen Test durch, bevor Sie die
Hülle kleben
4. Schieben Sie den Schrumpfschlauch auf die
Verbindungsstelle, sodass der Kabelschuh in der Mitte der
Schrumpfschlauchs liegt und dieser die beiden Kabel auf
gleicher Länge umhüllt.
Erhitzen Sie den Schrumpfschlauch mithilfe einer
Heißluftpistole, wobei Sie den Schlauch von der Mitte
zu den Enden erhitzen, um zu vermeiden, dass sich eine DER ANSCHLUSS HAT STETS ÜBER DER WASSEROBERFLÄCHE ZU ERFOLG
Luftblase in der Mitte bildet.
15 DE easyled ikone tunable - 04/2021IT
1. RECOMMANDATION
PROIETTORI LED 12V ~
-Fabbricati in ABS -Supporto ottico facilmente smontabile
L’installazione di questo proiettore richiede l’intervento di personale qualificato.
Da utilizzare esclusivamente in caso di immersione nell’acqua.
IMPORTANTE: il presente manuale d’istruzioni contiene informazioni molto importanti sulle misure di sicurezza da adottare
al momento dell’installazione e della messa in servizio. Di conseguenza, è indispensabile che l’installatore e l’utente leggano
attentamente queste istruzioni prima di cominciare il montaggio e la messa in funzione.
NOTA DI SICUREZZA IMPORTANTE: Gli impianti elettrici per piscine devono essere conformi ai requisiti della norma NF C 15-
100 e alla regolamentazione vigente (rete elettrica domestica).
NOTA : PROIETTORI alimentata da un trasformatore elettronico rischia di non funzionare (rivolgetevi al vostro rivenditore per
ulteriori informazioni).
Funziona solo con un trasformatore di sicurezza (trasformatore toroidale) Classe III 230V / 12V ~.
Prevedere un’alimentazione elettrica dotata di una potenza superiore al 10% della potenza assorbita proiettore.
Un trasformatore da 100 V.A. può alimentare 2 proiettori (12 LED color) : 2 x 45 = 90 VA
Vedere la tabella seguente per identificare la sezione del cavo a seconda della lunghezza e della potenza. Per le basse
correnti e figlio a breve, si prega di essere molto superfluo. Ricorda che cade può essere molto elevato in cattive connessioni,
congiunzioni e figlio Loose ossidato.
6 Leds White 26 W 12 Leds White 42 W 12 Leds Color 36 W
Sezione cavo Distanza Sezione cavo Distanza Sezione cavo Distanza
max Casella/ max Casella/ max Casella/
Proiettore Proiettore Proiettore
Standard 2 x 1,5 mm2 11 ml 2 x 1,5 mm2 7 ml 2 x 1,5 mm2 8 ml
2 x 2,5 mm2 19 ml 2 x 2,5 mm2 11 ml 2 x 2,5 mm2 13 ml
2 x 4 mm2 29 ml 2 x 4 mm2 18 ml 2 x 4 mm2 21 ml
2 x 6 mm2 44 ml 2 x 6 mm2 27 ml 2 x 6 mm2 31 ml
2 x 10 mm2 72 ml 2 x 10 mm2 45 ml 2 x 10 mm2 52 ml
Introdurre il cavo nel premistoppa sul fondo della nicchia, lasciando una lunghezza sufficiente per poter posare il proiettore
sulla ghiera; dopo aver serrato il premistoppa, sarà sufficiente introdurre il proiettore nella relativa nicchia.
Se il cavo flessibile esterno o il cavo di questo apparecchio è danneggiato, deve essere sostituito solo dal costruttore o dal
suo servizio o persona qualificata, in modo da evitare ogni rischio.
Per una luce ottimale nella vostra piscina, tenere sempre la lampadina come il disegno:
easyled ikone tunable - 04/2021 16 ITLED DI COLORE PER I PROIETTORI
10 colori / 5 sequenze di colori in successione.
- Cambio dei colori o delle sequenze (standard) tramite l’interruttore d’alimentazione “ACCESO / SPENTO”
- Optional: cambio dei colori o delle sequenze tramite il KIT di Ricezione Controllore-Modulatore con telecomando senza fili.
- Memorizzazione del colore o della sequenza predefinita dopo lo spegnimento della lampada.
2. CONTENUTO
FARO CON CAVO 2,5m 64194LB15
/ 64194LB30
64194LC15
1 CALOTTA ROTONDA 64209
2 CALOTTA QUADRATA 64210
3 ANELLO DA AGGANCIARE 64267
4 GUAINA TERMORETRAIBILE 500458
5 ATTACCO DI COLLEGAMENTO BLU (x2) 64335
6 SACCHETTO DI VITI (8 VITI) 8x 65100
3
1
2
5
6 4
17 IT easyled ikone tunable - 04/20213. PREREQUISITI
Pezzo di tenuta con filettatura da 1,5’’’ (BSP) installato nella vasca.
Scatola di connessione collegata tramite tubi in PVC a tenuta stagna entro 2 m dal pezzo di tenuta.
Cavo di alimentazione nella scatola di connessione.
Preparazione dell’interruttore a scelta ROTONDO O QUADRATO
Installazione nella vasca:
Collegamento elettrico
1. Verificare la presenza dei terminali dei manicotti e della TROPPO VICINO CON LA PISTOLA AD ARIA CALDA
guaina termoretraibile in resina.
2. Inserire la guaina termoretraibile in resina su uno dei due
cavi e poi collegarli mediante i terminali dei manicotti che
devono essere crimpati su ciascun lato per mezzo di apposita
pinza.
5. L’operazione si conclude una volta che la guaina si
è ritratta su tutta la sua lunghezza. Vedrete la resina
traboccare molto lievemente in ciascuna estremità.
La finalità della tenuta è quella di impedire infiltrazioni
d’acqua fino al proiettore, mediante i filamenti di rame del
cavo.
Se i nostri servizi post vendita dovessero constatare questo
fenomeno d’infiltrazione, verrà rifiutata la presa in garanzia
3. Eseguire un test elettrico prima di incollare la guaina dei proiettori interessati.
4. Fare scorrere la guaina e posizionarla in modo da avere
il terminale del manicotto in mezzo e la stessa sezione di
guaina su ciascuno dei 2 cavi.
Riscaldare la guaina mediante pistola ad aria calda, andando
dal centro verso le estremità, per evitare la formazione di una
sacca d’aria in mezzo.
PER EVITARE DI BRUCIARE LA GUAINA, NON POSIZIONARSI
IL COLLEGAMENTO VA FATTO SEMPRE SOPRA IL LIVELLO DELL’ACQUA
easyled ikone tunable - 04/2021 18 ITES
1. RECOMENDACIONES
PROYECTORES LED 12V ~
-Fabricados en ABS -Soporte óptico fácilmente desmontable
La instalación de este proyector requiere la intervención de personas cualificadas.
Debe emplearse únicamente en caso de inmersión en agua.
IMPORTANTE: este manual contiene informaciones muy importantes sobre las medidas de seguridad que se deben tener en
cuenta en el momento de la instalación y de la puesta en servicio. Es por tanto indispensable que el instalador y el usuario
lean con atención dichas instrucciones antes de comenzar el montaje y la puesta en marcha.
NOTA DE SEGURIDAD IMPORTANTE: Las instalaciones eléctricas para piscinas deben ser conformes con los requisitos de la
norma NF C 15-100 y con la reglamentación en vigor (red eléctrica doméstica).
ATENCIÓN: El PROYECTORE alimentada por un transformador electrónico puede que no funcione (infórmese en su lugar de
compra).
Sólo funciona con un transformador de seguridad (transformador toroidal) Clase III 230V / 12V ~.
Prevea una alimentación de una potencia superior al 10% de la potencia absorbida par proyectore.
Un transformador de 100 V.A. puede alimentar 2 proyectores (12 LED color) : 2 x 45 = 90VA
Consulte la tabla siguiente para identificar la sección del cable en función de la longitud y el poder. Para las corrientes de
baja y su hijo de corta, por favor, ser muy superfluo. Recuerde que las caídas pueden ser muy altos en malas conexiones,
terminales e hijo sueltas oxidado.
6 Leds White 26 W 12 Leds White 42 W 12 Leds Color 36 W
Sección de Distancia Max Sección de Distancia Sección de Distancia
cable Box / Proyector cable Max Box / cable Max Box /
Proyector Proyector
Standard 2 x 1,5 mm2 11 ml 2 x 1,5 mm2 7 ml 2 x 1,5 mm2 8 ml
2 x 2,5 mm2 19 ml 2 x 2,5 mm2 11 ml 2 x 2,5 mm2 13 ml
2 x 4 mm2 29 ml 2 x 4 mm2 18 ml 2 x 4 mm2 21 ml
2 x 6 mm2 44 ml 2 x 6 mm2 27 ml 2 x 6 mm2 31 ml
2 x 10 mm2 72 ml 2 x 10 mm2 45 ml 2 x 10 mm2 52 ml
Introducir el cable en el prensaestopas del fondo del nicho, dejando suficiente longitud para poder colocar el proyector en el
brocal una vez apretado el prensaestopas, sólo queda introducir el proyector en el nicho.
Si el cable flexible externo o cordón de esta luminaria está dañado, sólo debe ser reemplazado por el fabricante, su agente
de servicio o por personal calificado, a fin de evitar cualquier riesgo.
Para un alumbrado óptimo en su piscina, mantener siempre el foco como el dibujo:
19 ES easyled ikone tunable - 04/2021PARA LOS PROYESTORES LED COLOR
10 colores / 5 secuencias de colores encadenadas.
- Cambio de los colores o las secuencias (de fábrica) mediante corte en el interruptor de alimentación “ENCENDIDO/
APAGADO”.
- Opcional: cambio de los colores o las secuencias mediante el kit de receptor y controlador-modulador con mando a
distancia inalámbrico.
- Tras el apagado de la lámpara, guarda en la memoria el color o la secuencia predefinidos.
2. CONTENIDO
BOMBILLA CON CABLE 2,5 m 64194LB15
/ 64194LB30
64194LC15
1 EMBELLECEDOR REDONDO 64209
2 EMBELLECEDOR CUADRADO 64210
3 ANILLO A ACOPLAR 64267
4 FUNDA TERMORRETRÁCTIL 500458
5 CASQUILLO DE CONEXIÓN AZUL (x2) 64335
6 BOLSA DE TORNILLOS (8 TORNILLOS) 8x 65100
3
1
2
5
6 4
easyled ikone tunable - 04/2021 20 ES3. INSTRUCTIONS REQUISITOS BÁSICOS
Parte de la instalación con 1.5’’ BSP instalado en la piscina.
La caja de conexiones se conecta con las mangueras de PVC apretadas a menos de 2m de la parte de la instalación.
El cable de suministro se lleva desde la sala técnica a la caja de conexiones.
Preparación del panel decorativo para la selección de redondos o cuadrados
Instalación en el vaso:
Conexión eléctrica:
1. Comprobar la presencia de terminales y de tubo resinado
termoretráctil.
2. Introducir el tubo resinado termoretráctil en uno de los
dos cables y, a continuación, conectar los dos cables con
los terminales que deben colocarse a cada lado con una
pinza adecuada.
4. La operación se completa una vez que el tubo se retrae en
toda su longitud.
La resina podrá desbordar muy ligeramente en cada extremo.
El propósito de esta estanqueidad es evitar que el agua entre
en el proyector a través de los hilos de cobre del cable.
La observación de este fenómeno de infiltración por parte de
nuestro servicio Pos-venta no cubrirá la garantía de estos
3. Realice una prueba eléctrica antes de pegar la funda. proyectores.
4. Deslizar el tubo y colocarlo de modo a tener el terminal
en el centro y que tenga el mismo tamaño de tubo en cada
uno de los 2 cables.
Calentar el tubo con una pistola de aire caliente desde el
centro del tubo hasta sus extremos para evitar la formación
de una bolsa de aire en el medio.
NO ESTAR DEMASIADO CERCA DEL TUBO CON LA PISTOLA DE
AIRE CALIENTE PARA NO QUEMARLO
.
LA CONEXIÓN SIEMPRE DEBE ESTAR POR ENCIMA DEL NIVEL DEL AGUA
21 ES easyled ikone tunable - 04/2021easyled ikone tunable - 04/2021 22 ES
23 ES easyled ikone tunable - 04/2021
Équipements du bassin

               SOCIÉTÉ ACIS
            15, rue des Marais BP 3
44310 ST PHILBERT DE GRAND LIEU - FRANCE
           www.acis-france.com
       client.acis@acis-france.com
Vous pouvez aussi lire