Ibis - Lifestyle & Mobility
←
→
Transcription du contenu de la page
Si votre navigateur ne rend pas la page correctement, lisez s'il vous plaît le contenu de la page ci-dessous
Handbewogen rolstoel
Manual wheelchair
Fauteuil roulant manuel
Manuelle rollstuhl

                          GEBRUIKERSHANDLEIDING   NL
                          USER MANUAL             EN

Ibis
                          NOTICE D’UTILISATION    FR
                          BEDIENUNGSANLEITUNG     DE

                                    1015098D
2                                                                 Ibis

Nederlands.......................................................3

English............................................................27

Français..........................................................51

Deutsch..........................................................75

Ibis                                                                                                  3

                    Nederlands

© 2016 Sunrise Medical

Alle rechten voorbehouden.

De verstrekte informatie mag geenszins worden verveelvoudigd en/of openbaar gemaakt op
welke wijze en met welke middelen dan ook (elektronisch of mechanisch), zonder voorafgaande,
uitdrukkelijke en schriftelijke toestemming van Sunrise Medical.

De verstrekte informatie is gebaseerd op algemene gegevens aangaande de ten tijde van verschijnen
bekende constructies. Sunrise Medical voert een beleid van continue product verbetering, wijzigingen
zijn derhalve voorbehouden.

De verstrekte informatie is geldig voor het product in standaard uitvoering. Sunrise Medical kan
derhalve niet aansprakelijk worden gesteld voor eventuele schade voortvloeiend uit de van de
standaard uitvoering afwijkende specificaties van het product. Derhalve kunnen de getoonde
afbeeldingen afwijken van uw configuratie.

De beschikbare informatie is met alle mogelijke zorg samengesteld, maar Sunrise Medical kan niet
aansprakelijk worden gesteld voor eventuele fouten in de informatie of voor de gevolgen daarvan.
Sunrise Medical kan niet aansprakelijk gesteld worden voor schade voortvloeiend uit werkzaamheden
die door derden zijn uitgevoerd.

De door Sunrise Medical gehanteerde gebruiksnamen, handelsnamen, handelsmerken, etc. mogen
krachtens de wetgeving inzake de bescherming van handelsmerken niet als vrij worden beschouwd.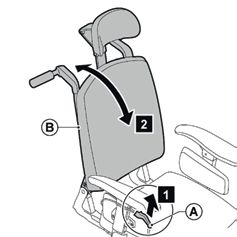
4    Inhoudsopgave                                                                                                                                Ibis

Inhoudsopgave
1    Voorwoord......................................................................................................................................5
     1.1 Deze handleiding                                                                                                                           5
     1.2 Voor meer informatie                                                                                                                       5
     1.3 Gebruikte symbolen in deze handleiding                                                                                                     5

2    Veiligheid........................................................................................................................................6
     2.1 Temperatuur                                                                                                                                   6
     2.2 De symbolen en labels op het product                                                                                                          6
     2.3 Bewegende onderdelen                                                                                                                          6
     2.4 Algemene veiligheidsregels en -voorschriften                                                                                                  6

3    Product beschrijving.......................................................................................................................7
     3.1 Hoofdcomponenten                                                                                                                       7

4    Gebruik ..........................................................................................................................................8
     4.1 Verstelmogelijkheden                                                                                                                          8
     4.2 Controle voor het rijden                                                                                                                      9
     4.3 Instappen en uitstappen                                                                                                                       9
     4.4 Parkeren                                                                                                                                    10
     4.5 Rijden                                                                                                                                      10
     4.6 Trottoirs                                                                                                                                   11
     4.7 Hellingen                                                                                                                                   12

5    Instellen (door een professional)..................................................................................................13

6    Transport......................................................................................................................................16
     6.1 Transport van de rolstoel (zonder rolstoelgebruiker)                                                                                       16
     6.2 De rolstoel als passagiersstoel in een auto                                                                                                16
     6.3 De veiligheidsgordel vastmaken                                                                                                             17

7    Onderhoud...................................................................................................................................19
     7.1 Onderhoudstabel                                                                                                                         19
     7.2 Banden controleren en oppompen                                                                                                          19
     7.3 Rolstoel reinigen                                                                                                                       19

8    Storingen......................................................................................................................................20

9    Technische specificaties...............................................................................................................21
     9.1 CE verklaring en normen                                                                                                            21
     9.2 Technische gegevens                                                                                                                21

10   Garantie.......................................................................................................................................23
     10.1 Definities van termen                                                                                                                     23
     10.2 Tabel garantieperiode                                                                                                                     24

11   Labels...........................................................................................................................................25
     11.1 Markeringen op de rolstoel                                                                                                                  25

12   Accessoires..................................................................................................................................26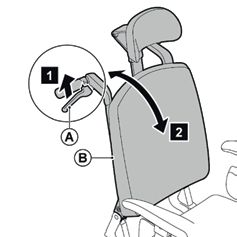
Ibis                                                                                 Voorwoord          5

1      Voorwoord                                     1.3 Gebruikte symbolen in deze
                                                         handleiding
Gefeliciteerd met de keuze van uw
Ibis kantelrolstoel. De hoogwaardige
                                                      Let op!
mobiliteitsproducten van Sunrise Medical
                                                      Gebruiker attent maken op mogelijke
dragen bij aan een grotere onafhankelijkheid en
                                                      problemen.
maken het dagelijkse leven gemakkelijker.

1.1 Deze handleiding                                     Voorzichtig!
                                                      Adviezen voor gebruiker ter voorkoming van
Met deze gebruikershandleiding kunt u
                                                      beschadigingen aan het product.
de rolstoel op veilige wijze gebruiken en
onderhouden. Deze gebruikershandleiding
verwijst daar waar nodig naar andere                     Waarschuwing!
handleidingen zoals hieronder aangegeven:             Waarschuwingen voor gebruiker ter
& Zitsysteem: Verwijst naar de 		                     voorkoming van persoonlijk letsel.
     gebruikershandleiding van het zitsysteem

Lees deze gebruikershandleiding en de                Het niet met de nodige voorzichtigheid
andere handleidingen waar naar verwezen              opvolgen van deze instructies kan leiden tot
wordt zorgvuldig door, voordat u het                 lichamelijk letsel of tot schade aan het product
product in gebruik neemt. Indien één van             of het milieu!
de handleidingen niet met het product
meegeleverd is, neem dan direct contact op
met uw dealer.                                       Symbolen in illustraties
Naast deze gebruikershandleiding is er ook           In illustraties kan met iconen en een nummering
een servicehandleiding voor de gekwalificeerde       aangegeven worden wat u in welke volgorde
specialist beschikbaar.                              moet doen.

Als u visueel gehandicapt bent kan dit                        Draai 1 slag los met torx
document ook worden gelezen in pdf-
formaat op www.SunriseMedical.eu en is
ook beschikbaar in grote tekst formaat op                     Draai 1 slag vast met torx
aanvraag.

                                                               Actie 1, 2 enz.
1.2 Voor meer informatie
                                                     Pijlen in illustraties geven aan dat het
Neem contact op met uw plaatselijke, erkende         betreffende onderdeel in de aangegeven
Sunrise Medical dealer als u vragen hebt over        richting beweegt of bewogen moet worden.
het gebruik, het onderhoud of de veiligheid van
uw rolstoel. Vermeld dan altijd het type, het
bouwjaar en het identificatienummer, die op het
identificatieplaatje van de rolstoel staan. In het
geval dat er geen erkende dealer in uw buurt
of u nog vragen heeft, neem dan schriftelijk of
telefonisch contact op met Sunrise Medical.

Voor informatie over productveiligheidsberichten
en terughaalacties, gaat u naar
www.SunriseMedical.eu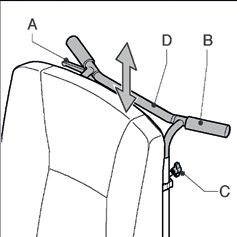
6    Veiligheid                                                                                 Ibis

2     Veiligheid                                   2.3 Bewegende onderdelen
Neem alle veiligheidsinstructies in acht voordat
u de rolstoel gebruikt.                                 Waarschuwing!
                                                    Een rolstoel is uitgerust met bewegende
                                                    en roterende onderdelen. Let op: contact
    Waarschuwing!
                                                    met bewegende onderdelen kan ernstige
 Volg altijd de instructies op bij de
                                                    lichamelijke letsels of schade aan de rolstoel
 waarschuwingen! Als de instructies niet
                                                    tot gevolg hebben.
 worden opgevolgd, kan dit lichamelijk letsel,
 schade aan de rolstoel of aan het milieu tot
 gevolg hebben. Daar waar mogelijk zijn de
 waarschuwingen geplaatst in de relevante
 hoofdstukken.

2.1 Temperatuur
Indien u geen gebruik maakt van het rolstoel,
zorg dan dat deze niet voor lange tijd aan
direct zonlicht wordt blootgesteld. Sommige
onderdelen van het rolstoel zoals het zitkussen,
de rugleuning en de armleggers kunnen erg
heet worden als ze voor te lange tijd aan
direct zonlicht worden blootgesteld. Dit kan
brandvlekken of een allergische reactie geven
aan de huid.                                       2.4 Algemene veiligheidsregels en
                                                       -voorschriften
2.2 De symbolen en labels op het
                                                   Sunrise Medical kan op geen enkele manier
    product
                                                   aansprakelijk worden gesteld voor schade
De tekens, symbolen en instructies die op de       of letsels wanneer de veiligheidsregels en
rolstoel zijn bevestigd, maken deel uit van        -voorschriften niet (strikt) worden nageleefd
de veiligheidsvoorzieningen. Ze mogen nooit        of wanneer deze schade of letsels te wijten
worden bedekt of verwijderd. Ze moeten tijdens     zijn aan nalatigheid tijdens gebruik, service en
de hele levensduur van de rolstoel aanwezig en     reiniging van de rolstoel. Afhankelijk van de
duidelijk leesbaar zijn.                           specifieke gebruiksomstandigheden kunnen
Vervang of repareer direct alle onleesbare         bijkomende veiligheidsvoorschriften vereist zijn.
of beschadigde tekens, symbolen en                 Neem onmiddellijk contact op met uw dealer
aanwijzingen. Neem contact op met uw dealer        als u tijdens het gebruik van het product een
als u hulp nodig hebt.                             potentieel gevaar vaststelt.

                                                        Waarschuwing!
                                                    Gebruik het rolstoel alleen voor het
                                                    vooropgestelde doel en zoals beschreven in
                                                    deze handleiding. Breng geen wijzigingen
                                                    aan het product aan wanneer deze niet
                                                    beschreven zijn. Gebruik geen onderdelen of
                                                    toevoegingen die niet duidelijk gemarkeerd
                                                    zijn als geschikt voor de rolstoel.

                                                   Als er een technisch probleem is, kunt u contact
                                                   opnemen met uw dealer.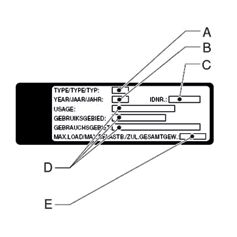
Ibis Product beschrijving 7
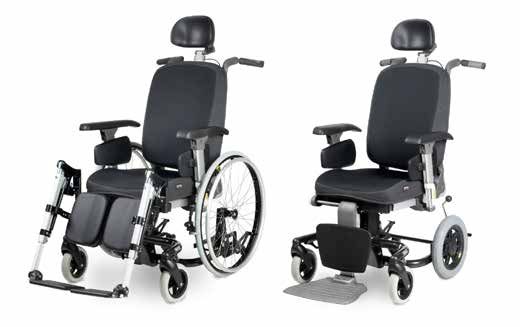
3 Product beschrijving 1
De Ibis is een rolstoel voor gebruikers die
met name goede zitondersteuning zoeken.
Deze productlijn is altijd uitgerust met een
kantelverstelling, om ook te kunnen rusten in
de stoel.
Ibis is er in verschillende uitvoeringen:
een duwrolstoel met 12”/16” achterwielen
en zelfrijder of trippelstoel met 20”/22”/24”
achterwielen voor in en om het huis. In iedere
situatie heeft u zo een rolstoel die alle comfort
en veiligheid biedt. Afhankelijk van het type
rolstoel kunt u de stoel zelf voortbewegen of
is er een begeleider nodig om de rolstoel te
duwen en te bedienen.
2
Het frame van de stoel is eenvoudig in hoogte
instelbaar, zodat altijd de ideale zithoogte
gevonden kan worden. Het zitsysteem is
bovendien volledig op uw persoonlijke wensen
in te stellen.
De rolstoel is ontworpen voor:
• personen tot een gewicht van maximaal 160
kg;
• gebruik op geplaveide wegen, trottoirs, voet-
en fietspaden;
• gebruik in en om het huis.
Sunrise Medical aanvaardt geen enkele
verantwoording voor schade of letsel
voortvloeiend uit een ander gebruik dan
waarvoor de rolstoel is ontwikkeld en
ontworpen. 3.1 Hoofdcomponenten
A Zitting
Voorzichtig! B Rugleuning
U behoort goed op de hoogte te zijn van de C Kantelverstelling
inhoud van deze handleiding voordat u de D Armsteun
rolstoel in gebruik neemt. E Beensteun
F Duwbeugel
G Rem
H Zwenkwielen
I Achterwielen
J Anti tip
K Hoofdsteun (optie)
L Heupgordel, aan te brengen door de
dealer (optie)8 Gebruik Ibis
3
4 Gebruik
4.1 Verstelmogelijkheden
Kantelverstelling
1. Zet de rolstoel op de rem.
2. Pak de handvatten van de duwbeugel vast
en knijp de hendel (A) in.
3. Duw de handvatten omlaag tot de gewenste
hoek bereikt is.
Rughoekverstelling met gasveer (door 4
begeleider)
1. Knijp (A) in.
2. Stel (B) in de gewenste stand. Houd daarbij
(A) ingeknepen.
3. Laat (A) los.
Rughoekverstelling met gasveer (door 5
gebruiker)
1. Knijp (A) in.
2. Leun voor- of achterover om (B) in te stellen.
Houd daarbij (A) ingeknepen.
3. Laat (A) los.Ibis Gebruik 9
Duwbeugelhoogte 8
1. Draai (A) 1 slag los.
2. Schuif (B) in de gewenste stand.
3. Draai (A) vast.
Let op!
De kabel van de kantelverstelling mag niet
strak komen te staan.
4.2 Controle voor het rijden
Controleer voordat u wegrijdt met de rolstoel of
de banden voldoende zijn opgepompt.
4.3 Instappen en uitstappen
6
Voorwaartse transfer
• Voetplaat centrale beensteun opklappen
• Klap (A) omhoog.
Waarschuwing!
Ga niet op de voetsteunen staan. Als u met
het volle gewicht op de steunen gaat staan,
kan dit tot schade en gevaarlijke situaties
leiden. De stoel kan onder andere kantelen.
Zijwaartse transfer
• Armsteun wegklappen
• Druk (A) in en klap (B) achterover.
Waarschuwing!
Verwijder eerst het werkblad voordat de
armsteun wordt weggeklapt. 7
Leun niet op de armsteun terwijl deze
opgeklapt is.
Let op!
Afhankelijk van de uitvoering van de
bedieningskast, kan het nodig zijn om dit
weg te zwenken.10 Gebruik Ibis
10
4.4 Parkeren
12”/16” achterwielen
Zet de rolstoel op de rem door de voetrem (A)
omlaag te trappen, of hendel (B) naar achter te
bewegen.
20”/22”/24” achterwielen
Zet de rolstoel op de rem door de hendel (B)
naar beneden te drukken.
Waarschuwing!
Zorg ervoor dat de hendel van de rem tijdens
het rijden in de uiterste stand staat, zodat de
rem niet terug kan schieten.
Als de rolstoel op een helling stilstaat, moet 9
de rem gebruikt worden om wegrijden te
voorkomen.
4.5 Rijden
Waarschuwing!
In het verkeer bent u als rolstoel-gebruiker
kwetsbaar. Houd er rekening mee dat u
niet altijd door andere verkeersdeelnemers
wordt opgemerkt. Houd u aan de geldende
verkeersregels.
Vermijd eenzame routes, zodat er in geval
van nood snel voor hulp gezorgd kan
worden.
Duwen van de rolstoel (12”/16”)
4. Stel de duwhandvatten in op de juiste
hoogte.
5. Haal de rem van de achterwielen.
6. De rolstoel kan nu geduwd worden.
Zelfrijden/trippelen met de rolstoel
(20”/22”/24”)
1. Haal de rem van de achterwielen.
2. Pak de hoepels van de achterwielen vast
en duw met de handen naar voren of naar
achteren.
3. U kunt de rolstoel ook voortbewegen door
met uw voeten te trippelen.Ibis Gebruik 11
Afremmen (20”/22”/24”)
Pak de beide hoepels knijpend vast. 4.6 Trottoirs
Waarschuwing! De onderstaande methode is bedoeld voor als
de rolstoel geduwd wordt door een begeleider
Door het afremmen ontstaat er wrijving
en geeft de rolstoelgebruiker een veilig gevoel.
tussen uw handen en de hoepels, hetgeen
warmte veroorzaakt. Bij te sterk afremmen
Oprijden van trottoirs
kan dit te heet worden voor uw handen.
1. Trap de trapdop naar beneden en trek
de rolstoel iets achterover zodat de
zwenkwielen vrij komen van de grond.
Overig 2. Duw de rolstoel op de verhoging en laat de
trapdop los.
Waarschuwing! 3. Duw de rolstoel verder en til de achterwielen
Rijd voorzichtig op gladde wegen, als gevolg aan de duwbeugel over de hindernis.
van regen, ijsvorming of sneeuw!
Voorkom dat de rolstoel in contact komt met Waarschuwing!
zeewater: zeewater is agressief en tast de Ga altijd achteruit een stoep af, zodat de
rolstoel aan. rolstoel niet voorover kan hellen waardoor de
Voorkom dat de rolstoel in contact komt gebruiker uit de stoel zou kunnen vallen.
met zand: zand kan doordringen tot in de Rijd nooit met de rolstoel van een trap af.
draaiende delen van de rolstoel, waardoor
onnodig snelle slijtage optreedt.
Zet de rolstoel niet in direct zonlicht: de
bekleding kan te warm worden waardoor
verbranding of overgevoeligheid van de huid
kan plaatsvinden.
Als u onder invloed bent van middelen die de
rijvaardigheid kunnen beïnvloeden, mag u
niet met de rolstoel rijden.
U dient voldoende gezichts-vermogen te
hebben om in de betreffende gebruikssituatie
veilig met de rolstoel te kunnen rijden.
Pas op dat er geen kledingstukken
loshangen. Deze zouden tussen de wielen
kunnen komen.12 Gebruik Ibis
11
4.7 Hellingen
Helling oprijden
Waarschuwing!
Rijd nooit een helling op met een
hellingshoek van meer dan 5°.
Als u de rolstoel zelf voortbeweegt, houd dan
altijd de hoepels vast, zodat de rolstoel niet
uit eigen beweging gaat rijden.
De rolstoel is op een helling minder stabiel.
Rijd niet op hellingen als de zitting gekanteld
is.
De begeleider die de rolstoel voortbeweegt,
moet blijven duwen om te voorkomen dat de
rolstoel uit eigen beweging gaat rijden.
Zet de rolstoel op de rem als er niet of
onvoldoende wordt geduwd.
Helling afrijden
Waarschuwing!
De rolstoel zal uit zichzelf naar beneden
rijden.
Als u de rolstoel zelf voortbeweegt, regel
dan met beide handen de snelheid van de
hoepels.
De begeleider die de rolstoel voortbeweegt,
moet de rolstoel afremmen aan de
duwhandvatten.
Voorkom dat de rolstoel een te hoge snelheid
behaalt.Ibis Instellen (door een professional) 13
13
5 Instellen (door een
professional)
Voorzichtig!
Het kantelbereik kan variëren afhankelijk van
de instellingen van de stoel.
Zithoogte
Demonteer bij het wijzigen van de zithoogte
zoveel mogelijk zware delen van het
stoelgedeelte (zitting, rug, enz) zodat het te
tillen gewicht beperkt blijft.
1. Draai de 4 bouten (A) los en eruit met
steeksleutel 13.
2. Til de stoelmast van haak (B) af en plaats 14
deze op de gewenste hoogte terug op deze
haak.
3. Draai de bouten (A) vast.
Zithoek
1. Kantel de zitting met behulp van de
kantelverstelling zodat het stelplaatje
vrijkomt.
2. Draai de bout (A) los en eruit met inbus 4.
3. Draai de bout (B) enkele slagen los.
4. Draai plaatje (C) in de gewenste hoek.
5. Draai beide bouten (A en B) vast.
Framebreedte (20”/22”/24”) 15
1. Draai de bouten (A) los en eruit met
steeksleutel 13.
2. Plaats de framebuis (B) in de gewenste
stand zodat de gaten in lijn liggen met het
frame.
3. Draai de bouten (A) vast.14 Instellen (door een professional) Ibis
Wielpositie 16
Waarschuwing!
Het wijzigen van de wielpositie kan de
stabiliteit van de rolstoel beïnvloeden.
Controleer de stabiliteit van de rolstoel en
stel de anti-kantelsteunen goed in.
Controleer de remwerking.
12”/16” achterwielen 17
1. Plaats het frame op een stevige ondergrond
zodat de wielen los van de grond zijn.
2. Haal de handbediening (A) eruit.
3. Haal de voetbeugel (B) weg.
4. Draai de moer (C) los met steeksleutel 19.
5. Verplaats het wiel naar de gewenste positie.
6. Draai de moer (C) vast.
20”/22”/24” achterwielen 18
1. Plaats het frame op een stevige ondergrond
zodat de wielen los van de grond zijn.
2. Draai de bouten (A) los en eruit met
steeksleutel 19.
3. Verplaats de wielplaat (B) naar de gewenste
positie.
4. Draai de bouten (A) vast.Ibis Instellen (door een professional) 15
Anti-kantelsteunen 19
1. Draai de bouten (B) los.
2. Plaats de anti-kantelsteunen op de
gewenste positie.
3. Draai de bouten (B) vast.
Waarschuwing!
Controleer de werking van de anti-
kantelsteunen.
Rem 20
Voor de verschillende wielmaten zijn er
verschillende gaten.
1. Draai inbus (D) een paar slagen los met
inbus 5.
2. Plaats de rem op de gewenste positie.
3. Draai inbus (D) vast.
Waarschuwing!
Controleer de remwerking.
Stel de rem opnieuw af, zodat de remwerking
voldoende is.16 Transport Ibis
6 Transport 25
6.1 Transport van de rolstoel
(zonder rolstoelgebruiker)
Onderdelen die gemakkelijk losgenomen
kunnen worden van de rolstoel dienen
verwijderd te worden. ( Zitsysteem).
a. Zitkussen wegnemen.
b. Beensteunen wegnemen.
c. Armsteunen wegnemen.
d. Rugleuning neerklappen.
Berg deze veilig op. Gebruik geschikte
oprijplaten om de rolstoel in het voertuig
te krijgen. Eenmaal in het voertuig dient
de rolstoel dan te worden vastgezet met
een volgens ISO 10542 goedgekeurd
vastzetsysteem dat geschikt is voor het gewicht
van de rolstoel, plus eventuele opties
6.2 De rolstoel als passagiersstoel
in een auto
Let op!
Er werd een crashtest op deze rolstoel
uitgevoerd volgens ISO 7176-19 (2008)
waarbij de passagier max. 160 kg mag
wegen.
Een rolstoel is niet ontworpen als zitplaats in
een voertuig en kan u niet dezelfde veiligheid
bieden als een gewone zitplaats in een auto,
hoe goed de rolstoel ook gefixeerd is in het
desbetreffende voertuig.
Er dient met het volgende te worden rekening
gehouden wanneer de transfer van een rolstoel
naar een gewone zitplaats in de auto niet
mogelijk is.
De rolstoel kan als zitplaats in een auto of bus
worden gebruikt, indien de rolstoel door een
4-punt geïntegreerd bevestigingssysteem – dat
beantwoordt aan de ISO 10542 norm – wordt
vastgemaakt. Zorg dat dit bevestigingssysteem
geschikt is voor het totale gewicht van
de rolstoel. Het gewicht van de rolstoel is
afhankelijk zijn configuratie. De specificaties
geven een overzicht van de verschillende opties
en hun bijdrage aan het totale gewicht. WeegIbis Transport 17
altijd de volledige rolstoel zodat u zeker bent
dat u het juiste bevestigingssysteem gebruikt. 26
Het systeem vereist dat er bevestigingsrails in
de auto worden gemonteerd. De rolstoel dient
altijd aan de vier punten te worden bevestigd
Waarschuwing!
Indien mogelijk, maak een transfer naar een
gewone zitplaats in de auto.
Vraag om bevestiging van de vervoerder dat
de auto geschikt, verzekerd en uitgerust is
voor het vervoeren van een gebruiker in een
rolstoel.
Plaats de rolstoel in de standaard positie en
gebruik de hoofdsteun als de rolstoel van
een hoofdsteun is voorzien.
27
Als een stoel met rijondersteuning wordt
getransporteerd, dan dient deze te worden
uitgeschakeld.
6.3 De veiligheidsgordel
vastmaken
Waarschuwing!
Gebruik de drie-punts veiligheidsgordel
om het risico op hoofd- en rompletsels bij
plotseling afremmen of een aanrijding te
beperken.
Breng de veiligheidsgordel met zorg aan bij
de rolstoelinzittende.
Gebruik de veiligheidsgordel als volgt: rolstoel te bevestigen of deze van de stoel te
• Plaats de veiligheidsgordel over de bekken, verwijderen en ze in het voertuig op te bergen.
zo strak mogelijk en in een hoek tussen
30° en 75°. Het andere gedeelte van de
veiligheidsgordel gaat over de romp en de
schouder (zie figuur).
• De veiligheidsgordel moet zo strak mogelijk
zitten en mag niet gedraaid zijn.
• Zorg dat de veiligheidsgordel niet
door onderdelen van de rolstoel wordt
belemmerd, zoals armsteunen of wielen (zie
figuur).
Om bij een ongeval verwondingen te vermijden,
dient u de accessoires van de rolstoel aan de18 Transport Ibis
Waarschuwing!
A. De stoel moet in de rijrichting staan en vergrendeld
worden conform de instructies van de fabrikant van het
bevestigingssysteem.
B. Deze rolstoel is getest voor gebruik in auto’s en voldoet aan de
eisen die gelden voor transport in rijrichting. De rolstoel is niet
getest voor afwijkende posities in een voertuig.
C. The rolstoel is dynamisch getest voor gebruik in rijrichting,
waarbij de gebruiker een bekken- en schoudergordel gebruikt
(3-punts gordel).
D. Er moet zowel een bekken- als schoudergordel gebruikt worden
om de kans op hoofd en borst verwondingen te minimaliseren
bij eventuele botsingen met delen van de auto.
E. Om ongelukken te voorkomen dienen werkbladen:
• verwijderd te worden en separaat vergrendeld te worden
• vergrendeld te worden aan de rolstoel, waarbij gebruik wordt
gemaakt van schokabsorberend materiaal tussen werkblad
en gebruiker
F. Daar waar mogelijk dienen accesoires vergrendeld te worden
aan de rolstoel. Anders dienen de accesoires te worden
verwijderd en vergrendeld in het voertuig tijdens transport.
G.Ondersteunings en positionerings uitrustingen mogen niet
gezien worden als veiligheids uitrustingen/gordels als deze niet
voorzien zijn van een label dat aangeeft dat ze voldoen aan ISO
7176/19- 2008
H. Na een botsing dient de rolstoel geinspecteerd te worden door
een door de fabrikant geautoriseerd persoon, alvorens deze
opnieuw mag worden gebruikt.
I. Er mogen geen wijzigingen worden aangebracht aan de
verankeringspunten/auto bevestigingen van de rolstoel. Ook
ontwerpwijzigingen aan het frame, zonder afstemming met de
fabrikant, zijn niet toegestaan.
J. Er mogen alleen gel-accu's worden gebruikt.Ibis Onderhoud 19
7 Onderhoud 7.3 Rolstoel reinigen
Droog vuil afnemen
7.1 Onderhoudstabel Reinig de bekleding, metalen delen en framedelen
met een droge zachte doek.
Laat het zitsysteem eenmaal per jaar, of
bij intensief gebruik, eenmaal per half jaar Modder en ander nat vuil afnemen
controleren door uw dealer. De onderstaande Reinig de vuile delen eerst met een natte spons.
tabel toont het onderhoud dat u zelf kunt uitvoeren. Wrijf de delen daarna droog met een droge zachte
doek.
Tijd Omschrijving
Wekelijks Bandenspanning controleren Voorzichtig!
en zonodig banden oppompen. Gebruik geen organische oplosmiddelen als
Zie 7.2. thinner, wasbenzine of terpentine.
Maandelijks Rolstoel reinigen. Zie 7.3.
Draaisysteem van de stoel Gebruik nooit schurende of agressieve
smeren. schoonmaakmiddelen. Deze kunnen krassen
veroorzaken op de rolstoel.
7.2 Banden controleren en
oppompen
Pomp de banden op met een voetpomp of
fietspomp. Gebruik de bijgeleverde verloopnippel.
U kunt de banden ook bij een benzinestation laten
oppompen.
Voorzichtig!
Zorg ervoor dat de banden op de juiste
spanning worden gehouden.
Overschrijd nooit de aangegeven
bandenspanning.20 Storingen Ibis 8 Storingen Als u een probleem heeft met uw rolstoel, neem dan contact op met uw dealer.
Ibis                                                                      Technische specificaties      21

9      Technische specificaties
9.1 CE verklaring en normen

         Het product voldoet aan de bepalingen van de richtlijn voor Medische Hulpmiddelen 93/42/
EEC 14 juni 1993 en is voorzien van een CE-markering. Het product voldoet verder aan onderstaande
normen en eisen. Deze worden gecontroleerd door onafhankelijke testinstellingen:.

                                                                                          Gewicht
 Norm                Toelichting/Omschrijving
                                                                                          testdummy
 EU richtlijn
                     Van toepassing zijn de eisen zoals vermeld in Annex 1                N.v.t.
 93/42 EEC
 NEN-EN 12183        Met de hand aangedreven rolstoelen - Eisen en
                                                                                          N.v.t.
 (2009)              beproevingsmethoden
                     Eisen en testmethoden voor impact-, statische- en
 ISO 7176-8                                                                               N.v.t.
                     vermoeiingssterkte juli 1998
                     Klimaattest voor elektrisch aangedreven rolstoelen
 ISO 7176-9                                                                               N.v.t.
                     IPX4
 ISO 7176-16         Eisen aan weerstand tegen ontbranding.                               N.v.t.
 ISO 7176-19         De Ibis voldoet aan de eisen voor een crashtest zoals
                                                                                          102 kg
 (2008)              omschreven in ISO 7176-19 (2008)

9.2 Technische gegevens

                                                                  Rolstoel met          Rolstoel met
 Omschrijving                                      Eenheid          12”/16”             20”/22”/24”
                                                                     wielen                wielen
 Diameter achterwielen                                inch           12” / 16”           20 / 22 / 24
 Diameter voorwiel                                    inch                7”                  7
 Bandenspanning achterwielen                          Bar                 2,5                7,5
 Max. gebruikersgewicht                               kg                  160                160
 Totale lengte                                        mm                 1040               1040
 Totale breedte                                       mm                  625           660-700-740
 Totaal gewicht                                       kg                  40                  42
 Totaal gewicht zwaarste deel                         kg                  26                  28
 Statische stabiliteit neerwaarts                      °                  15                  15
 Statische stabiliteit opwaarts                        °                  15                  15
 Statische stabiliteit zijwaarts                       °                  15                  15
 Kantelverstelling                                     °                  30                  30
 Zithoek                                               °                 0-6                0-6
22 Technische specificaties Ibis
Rolstoel met Rolstoel met
Omschrijving Eenheid 12”/16” 20”/22”/24”
wielen wielen
Effectieve zitdiepte mm 440 - 600 440 - 600
Effectieve zitbreedte mm 400 - 540 400 - 540
Zithoogte aan voorzijde zitting mm 390 - 540 390 - 540
Rughoek ° 89 - 128 89 - 128
Rughoogte mm 500 - 640 500 - 640
Onderbeenlengte mm 360 - 530 360 - 530
Armsteunhoogte mm 170 - 290 170 - 290
Voorzijde armsteun (30 cm pad) tot
mm 360 - 500 360 - 500
rugleuning
Voorzijde armsteun (40 cm pad) tot
mm 390 - 500 390 - 500
rugleuning
Minimale draaicirkel mm 810 810
Grondspeling mm 70 70
Hoogte duwbeugel mm 920 - 1250 920 - 1250Ibis Garantie 23 10 Garantie 10.1 Definities van termen Definities van in deze garantie gebruikte termen: • Aanbieder van de garantie: Sunrise Medical HCM B.V., Vossenbeemd 104, 5705 CL Helmond, Nederland (ook aangeduid als Sunrise Medical). • Dealer: degene die het product doorverkoopt aan de gebruiker. • Defect: een omstandigheid waardoor het product niet stevig is of geschikt voor gebruik en die wordt veroorzaakt door gebrekkige kwaliteit van het materiaal dat gebruikt is om het product te fabriceren, of door de kwaliteit van het fabricageproces. • Garantie: de rechten en verplichtingen zoals beschreven in dit document. • Garantieperiode: de tijdsduur van de garantie. • Gebruiker: degene die het product gebruikt. • Herstelmaatregel: reparatie, vervanging of teruggave van het product. • Klant: degene die het product rechtstreeks bij Sunrise Medical koopt. • Onderdeel: onderdeel van het product dat verwisseld of vervangen kan worden, zoals een optie, accessoire, reserveonderdeel of slijtbaar onderdeel. • Optie: een accessoire dat door Sunrise Medical met het oorspronkelijke product wordt geleverd ter uitbreiding van het standaard productmodel. • Product: product dat geleverd is volgens de brochure of het contract (bv. rolstoel, scooter, acculader enz.). • Reserveonderdeel: duurzaam onderdeel dat na aankoop van het oorspronkelijke product is gekocht en bloot kan staan aan natuurlijke slijtage of natuurlijke vervuiling bij normaal gebruik tijdens de levensduur van het product. • Retourzending: product of onderdeel dat moet worden geretourneerd. • RMA-procedure gebruiker: procedure voor het retourneren van goederen, contacteer uw dealer. • RMA-procedure klant: procedure voor het retourneren van goederen, contacteer de Customer Service van Sunrise Medical. • Slijtbaar onderdeel: het onderdeel dat blootstaat aan natuurlijke slijtage of natuurlijke vervuiling bij normaal gebruik tijdens de levensduur van het product (paragraaf 9 van de algemene verkoopsvoorwaarden van Sunrise Medical HCM B.V.). In weerwil van de rechten en verplichtingen van Sunrise Medical, de klant en gebruiker, zoals beschreven in de algemene verkoopsvoorwaarden van Sunrise Medical, zijn de rechten van de klant en/of gebruiker jegens Sunrise Medical ingeval van defecten beperkt tot de in deze garantie beschreven bepalingen. Sunrise Medical garandeert dat tijdens de garantieperiode het product zonder defecten functioneert. Bij een defect is de gebruiker verplicht om - binnen twee weken na constatering van het defect - contact op te nemen met de dealer. Hij moet een retourneringsformulier invullen en het product of onderdeel retourneren via de RMA-procedure. Naar eigen goeddunken zal Sunrise Medical het herstel uitvoeren dat onder de gegeven omstandigheden geschikt lijkt, binnen een redelijke tijdsperiode (hangt af van de aard van de claim) vanaf ontvangst van het ingevulde retourneringsformulier. De garantieperiode zal na het herstel niet worden verlengd.
24    Garantie                                                                                     Ibis

10.2 Tabel garantieperiode
                                                            Voorbeelden zijn onder meer (maar
 Omschrijving            Garantieperiode                    zijn niet beperkt tot de hieronder
                                                            genoemde onderdelen)
 Frame                   2 jaar                             Assemblage/frame
                         Nieuw: 1 jaar na factuurdatum
 Reserveonderdelen       Hersteld: 90 dagen na              Remmen
                         factuurdatum
                                                            Stoffen voor zitting en rug, wielen,
 Slijtbare onderdelen    40 dagen na factuurdatum
                                                            handvatten enz.
                                                            Hoofdsteunen, beensteunen, trommelrem
 Opties/accessoires      2 jaar                             enz. Geleverd met het oorspronkelijke
                                                            product

Alleen tijdens de garantieperiode accepteert Sunrise Medical verzend- en herstelkosten die verband
houden met garantie op het hulpmiddel.

Deze garantie komt te vervallen indien:
• het product en/of de onderdelen ervan veranderd zijn;
• er uiterlijke veranderingen zijn door gebruik;
• de instructies voor gebruik en onderhoud niet zijn nageleefd, het apparaat niet op de normale
  manier gebruikt is, er sprake is van slijtage, onachtzaamheid, bijkomende schade door
  veronachtzaming van eerdere symptomen, overbelasting, ongevallen door derden, het gebruik van
  niet-originele onderdelen, en niet door het product veroorzaakte defecten;
• er overmacht heeft plaatsgevonden (overstroming, brand enz.).

Onder deze garantie vallen niet:
• banden en binnenbanden;
• accu’s (vallen onder de garantie van de accufabrikant).

Klanten en/of gebruikers hebben juridische (wettelijke) rechten onder de toepasselijke nationale
wetten met betrekking tot de verkoop van consumentenproducten. Deze garantie heeft geen invloed
op uw mogelijke wettelijke rechten, noch op de rechten die niet kunnen worden uitgesloten of beperkt,
noch op rechten tegen de entiteit bij wie het product gekocht is. Klanten mogen opkomen voor rechten
die zij naar eigen oordeel hebben.
Ibis Labels 25 11 Labels 28 11.1 Markeringen op de rolstoel Voor gebruikte markeringen op de rolstoel, zie de figuren. Let op! Verwijder of bedek nooit de markeringen, symbolen en instructies die op het zitsysteem zijn aangebracht. Deze veiligheidsvoorzieningen moeten gedurende de gehele levensduur op het zitsysteem zitten en duidelijk leesbaar zijn. Aanduidingen op de rolstoel 29 A Kantelverstelling B Rugverstelling met gasveerbediening (optie) C Taxifixatie D Identificatieplaatje E Bandenspanning achterwielen Gegevens identificatieplaatje A Type A Bouwjaar B Identificatienummer C Gebruikersgebied binnen of buiten D Maximale belasting in kg
26      Accessoires                                Ibis

                      A                        B

                      C                        D

12 Accessoires
A.   Heupgordel (kort of lang)
B.   Stokhouder voor twee loopstokken
C.   Spaakbeschermers
D.   Anti-tip wegdraaibaar

Beschikbare elektrische
rijondersteuningssystemen:
• WheelDrive
• PowerSupport
• PowerDrive

Zie onze website of neem contact op met uw
Sunrise Medical dealer voor meer accessoires
en reserve-onderdelen.
Ibis 27
English
© 2016 Sunrise Medical
All rights reserved.
The information provided herein may not be reproduced and/or published in any form, by print,
photoprint, microfilm or any other means whatsoever (electronically or mechanically) without the prior
written authorization of Sunrise Medical.
The information provided is based on general data concerning the construction known at the time
of the publication of this manual. Sunrise Medical executes a policy of continuous improvement and
reserves the right to changes and modifications.
The information provided is valid for the product in its standard version. Sunrise Medical can therefore
not be held liable for any damage resulting from specifications of the product deviating from the
standard configuration. Illustrations contained in the manual may deviate from the configuration of your
product.
The information made available has been prepared with all possible diligence, but Sunrise Medical
cannot be held liable for any errors contained in the information or the consequences thereof.
Sunrise Medical accepts no liability for loss resulting from work executed by third parties.
Names, trade names, trademarks etc. used by Sunrise Medical may not, as per the legislation
concerning the protection of trade names, be considered as being available.28 Table of contents Ibis
Table of contents
1 Introduction..................................................................................................................................29
1.1 This user manual 29
1.2 For further information 29
1.3 Symbols used in this manual 29
2 Safety...........................................................................................................................................30
2.1 Temperature 30
2.2 Symbols and labels used on the product 30
2.3 Moving parts 30
2.4 General safety guidelines and instructions 30
3 Product description......................................................................................................................31
3.1 Main components 31
4 Use...............................................................................................................................................32
4.1 Adjustment options (user) 32
4.2 Inspection before use 33
4.3 Getting in and out 33
4.4 Parking 34
4.5 Driving 34
4.6 Obstacles 35
4.7 Slopes 36
5 Settings (by a professional)..........................................................................................................37
6 Transport......................................................................................................................................40
6.1 Transport of the wheelchair (without occupant) 40
6.2 The wheelchair as a passenger seat in a car 40
6.3 Fastening the seat belt 41
7 Maintenance.................................................................................................................................43
7.1 Maintenance table 43
7.2 Checking and inflating the tyres 43
7.3 Cleaning the wheelchair 43
8 Troubleshooting............................................................................................................................44
9 Technical specifications................................................................................................................45
9.1 CE declaration and requirements 45
9.2 Technical information 45
10 Warranty.......................................................................................................................................47
10.1 Definitions of terms 47
10.2 Warranty period table 48
11 Labelling.......................................................................................................................................49
11.1 Markings on the wheelchair 49
12 Accessories..................................................................................................................................50Ibis Introduction 29
1 Introduction 1.3 Symbols used in this manual
Congratulations on choosing your tilt in
Note!
space wheelchair. All of our high-quality
Pointing out possible problems to the user.
mobility products are designed to enhance
independence and make your everyday life
easier. Caution!
Advice for the user to prevent damage to the
1.1 This user manual product.
This user manual will help you to use and
maintain your wheelchair safely. Where Warning!
necessary this user manual refers to other Warnings for the user to prevent personal in
manuals as shown below: jury.
& Seating system: Refers to the user manual
for the seating system.
Not following these instructions may result
Read this user manual and the other user in physical injury, damage to the product or
manuals referred to carefully before using damage to the environment!
the product. If one of the user manuals was
not included with your wheelchair, please Symbols in illustrations
contact your dealer immediately. Illustrations may include icons and numbering
In addition to this user manual, there is also a to indicate what needs to be done and in which
service manual for qualified specialists. order.
If you are visually impaired, this
document can be viewed in PDF format at Loosen by one turn with torx
www.SunriseMedical.eu or alternatively is
available on request in large text.
Tighten by one turn with torx
1.2 For further information
Please contact your local, authorised Sunrise Step 1, 2 etc.
Medical dealer if you have any questions
regarding the use, maintenance or safety An arrow, as part of an illustration, indicates
of your wheelchair. Make sure you always that the component in question moves or needs
mention the model, year of manufacture and to be moved in the direction indicated.
identification number. In case there is no
authorised dealer in your area or you have any
questions, contact Sunrise Medical either in
writing or by telephone.
For information about product safety
notices and product recalls, go to
www.SunriseMedical.eu30 Safety Ibis
2 Safety 2.3 Moving parts
Please note all safety instructions before
starting to use the wheelchair. Warning!
A wheelchair has moving and rotating parts.
Be careful: contact with moving parts may
Warning!
result in serious physical injury or damage to
Always follow the instructions given next
the wheelchair.
to the warning symbols! Not following
these instructions may result in physical
injury, damage to the wheelchair or to
the environment. Where possible, the
warnings have been placed in the applicable
paragraphs.
2.1 Temperature
If you do not use the wheelchair, ensure that
it is not exposed to direct sunlight for lengthy
periods of time. Certain parts of the wheelchair,
such as the seat, the back and the armrests
can become hot if they have been exposed to
full sunlight for too long. This may cause burns
or allergic reactions to the skin.
2.4 General safety guidelines and
instructions
2.2 Symbols and labels used on
the product Sunrise Medical accepts no liability whatsoever
for damage or injury caused by failure to
The signs, symbols and instructions affixed (strictly) adhere to the safety guidelines and
to the wheelchair comprise part of the safety instructions or else due to carelessness during
facilities. They must never be covered or the use, service and cleaning of the wheelchair.
removed. They must remain present and clearly Depending on the specific use circumstances,
legible throughout the entire lifespan of the additional safety instructions may be required.
wheelchair. Please contact your dealer immediately if you
Replace or repair all illegible or damaged signs, observe a potential danger during the use of the
symbols and instructions immediately. Please product.
contact your dealer for assistance.
Warning!
Only use the wheelchair as intended and as
prescribed in this manual. Do not adjust or
change the product if not promptly described.
Do not use parts or add-ons which are
not clearly marked as compatible with the
wheelchair.
In case of possible technical malfunctioning,
please contact your dealer.Ibis Product description 31
3 Product description 1
The Ibis is a range of wheelchairs designed
for users who need excellent seating posture
and maximum comfort. Every model in the Ibis
range has tilt-in-space adjustment, allowing the
user to rest in the wheelchair.
Ibis provides a range that extends from a push
wheelchair (12”/16” rear wheels) and manual
or foot-propelling wheelchair (20”/22”/24” rear
wheels) for use in and around the house. As a
result, a wheelchair offering maximum comfort
and safety is available for every situation.
Depending on the model, the user will be able
to push the wheelchair or an attendant will be
required to push and operate the wheelchair.
2
The frame height of the wheelchair can easily
be adjusted, ensuring a ideal seat height for
everyone. Additionally, the seating system
can be fully customized to satisfy the specific
wishes and requirements of the individual.
Ibis has been designed for:
• Transport of persons to a maximum weight
of 160 kg.
• Use on paved roads, sidewalks, foot- and
bicycle paths.
• Use in and around the house.
If you use the wheelchair for other purposes
than those for which it is intended, Sunrise
Medical accepts no liability whatsoever for
damage or injury resulting from such use other
than for which the wheelchair was developed 3.1 Main components
and designed.
A Seat
B Backrest
Caution! C Seat tilt adjustment
Please study this manual carefully before D Armrest
using the wheelchair. E Legrest
F Push bracket
G Brake
H Castor wheels
I Rear wheels
J Anti-tip brackets
K Headrest (option)
L Lap belt, to be provided by the dealer
(option)32 Use Ibis
3
4 Use
4.1 Adjustment options (user)
Seat tilt adjustment
1. Apply the wheelchair brake.
2. Grasp the push handles of the push bracket
and squeeze the handle (A).
3. Push the push handles downward until the
desired angle is reached.
Manually recling backrest (by attendant) 4
1. Squeeze (A).
2. Adjust (B) to the desired position while
squeezing (A)
3. Release (A).
Manually recling backrest (by user) 5
1. Squeeze (A).
2. Lean forwards or backwards to adjust (B) to
the desired position while squeezing (A)
3. Release (A).Ibis Use 33
8
Push handle height
1. Loosen (A) by one turn.
2. Slide (B) into the desired position.
3. Tighten (A).
Note!
The seat tilt adjustment cable should not be
too tight.
4.2 Inspection before use
Check if the tyres are sufficiently inflated before
you start using the wheelchair.
4.3 Getting in and out 6
Forward transfer
• Flipping up the central legrest footplate
• Flip up (A).
Warning!
Do not stand on the footplates. Putting
your full weight on the footplates may lead
to wheelchair damage and to hazardous
situations, including the wheelchair tipping
up.
Sideways transfer
• Folding back the armrest assembly
• Press (A) and fold (B) to the rear.
7
Warning!
Remove the tray before folding back the
armrest assembly.
Do not lean on the armrest when folded
back.
Note!
Some versions of the controller will need to
be swung aside.34 Use Ibis
10
4.4 Parking
12”/16” rear wheels
Apply the brake to the wheelchair by pushing
the footbrake (A) downward or pulling the
handle (B) backward.
20”/22”/24” rear wheels
Apply the brake to the wheelchair by pushing
the handle (B) downward.
Warning!
Make sure the brake handle is pushed all the
way backward while driving the wheelchair,
so that the brake cannot be applied
accidentally. 9
If the wheelchair is stopped on a slope,
the brake should be applied to prevent the
wheelchair from moving down the slope.
4.5 Driving
Warning!
As a wheelchair user, you could be
vulnerable in traffic. When travelling in or
across a road, keep in mind that other traffic
participants may not always notice you. Keep
to the applicable traffic regulations.
Avoid out-of-the way routes, so that help can
be on its way quickly when needed.
Push the wheelchair (12”/16”)
4. Adjust the height of the push handles.
5. Release the brake from the rear wheels.
6. The wheelchair can now be pushed.
Foot propelling the wheelchair (20”/22”/24”)
1. Release the brake from the rear wheels.
2. Take the hoops of the rear wheels and push
the hoops forward or backward with your
hands.
3. The wheelchair can also be moved by foot-
propelling.Ibis Use 35
Braking (20”/22”/24”) 4.6 Obstacles
Tightly grasp both hoops.
The method described below is to be used
Warning! when the wheelchair is pushed by an attendant
By braking this way, friction is caused and will make the user feel safe.
between your hands and the hoops, which
will create heat. If you brake too fast, your Driving up obstacles
hands may become very hot. 4. Push the kick-tube downward and pull the
wheelchair slightly backward, so that the
castor wheels are released from the ground.
Miscellaneous 5. Push the wheelchair onto the elevation and
release the kick-tube.
Warning! 6. Push the wheelchair further and lift the rear
Drive carefully on slippery roads, resulting wheels over the obstacle using the push
from rain, ice or snow! bracket.
Prevent the wheelchair from coming into
contact with seawater: seawater is caustic Warning!
and may damage the wheelchair. Always descend from a sidewalk back to
Prevent the scooter from coming into front, so that the wheelchair cannot tip over
contact with sand: sand may can affect the and make the user fall out of the chair.
moving parts of the wheelchair, resulting in Do not drive down stairs.
unnecessarily rapid wear.
Do not put the wheelchair in direct sunlight:
the upholstery may become too hot, which
may cause burning or an allergic reaction of
the skin.
Do not drive the wheelchair when you are
under the influence of drugs, alcohol or
medication that could affect your ability to
drive.
You must have sufficient eye sight to be able
to safely drive the wheelchair.
Be sure that no items of clothing hang loose.
These could be caught between the wheels.36 Use Ibis
11
4.7 Slopes
Driving up slopes
Warning!
Slopes with an angle of more than 5° must
not be taken.
If you move the wheelchair yourself, always
make sure that you hold on to the hoops, so
the wheelchair cannot start to move by itself.
The wheelchair is less stable on a slope.
Do not drive on slopes when the seat is
tilted.
The attendant pushing the wheelchair must
continue to push to prevent the wheelchair
from moving downhill on its own accord.
Apply the brake of the wheelchair if it is not
pushed or not pushed hard enough.
Driving down slopes
Warning!
The wheelchair will start to move by itself,
caused by gravity.
If you push the wheelchair yourself, use both
hands to control the speed with the hoops.
The attendant pushing the chair must hold
on to the push handles to apply some brake
force.
Prevent the wheelchair from gaining too
much speed.Ibis Settings (by a professional) 37
13
5 Settings (by a
professional)
Caution!
The seat tilt range can vary depending on the
way the wheelchair is adjusted.
Seat height
Before adjusting the seat height, remove as
many heavy seat parts as possible (seat,
backrest, etc.) to limit the weight to be lifted.
1. Loosen the 4 bolts (A) using a 13 mm
spanner, and remove them.
2. Lift the seat post off the bracket (B) and
place it back in the desired position on the 14
bracket.
3. Tighten the bolts (A) securely.
Seat angle
1. Tilt the seat with the seat tilt adjustment, so
that the adjusting plate becomes free.
2. Loosen the bolt (A) with a 4 mm Allen key,
and remove it.
3. Loosen the bolt (B) a few turns.
4. Turn the plate © in the desired position
(angle).
5. Tighten both bolts (A and B) securely.
Frame width (20”/22”/24”) 15
1. Loosen the bolts (A) with a 13 mm spanner
and remove them.
2. Put the frame tube (B) in the desired
position, so that the holes are level with the
frame.
3. Tighten the bolts (A) securely.38 Settings (by a professional) Ibis
Position of the wheels 16
Warning!
Changing the position of the wheels may
affect the stability of the wheelchair. Check
the stability of the chair and make sure the
anti-tip brackets are well adjusted.
Check the brake.
12”/16” rear wheels 17
1. Put the frame on a solid base, so that the
wheels are off the ground.
2. Remove the manual control (A).
3. Remove the foot bracket (B).
4. Loosen the nut (C) with a 19mm spanner.
5. Move the wheel into the desired position.
6. Tighten the nut (C) securely.
20”/22”/24” rear wheels 18
1. Put the frame on a solid base, so that the
wheels are off the ground.
2. Loosen the bolts (A) with a 19 mm spanner
and remove them.
3. Move the wheel plate (B) into the desired
position.
4. Tighten the bolts (A) securely.Ibis Settings (by a professional) 39 Anti-tip brackets 19 1. Loosen the bolts (B). 2. Put the anti-tip brackets in the desired position. 3. Tighten the bolts (B) securely. Warning! Check if the anti-tip brackets work properly. Brake 20 For the various wheel sizes, specific holes are available. 1. Loosen the Allen bolt (D) a few turns with a 15 mm Allen key. 2. Put the brake in the desired position. 3. Tighten the Allen bolt (D) securely. Warning! Check the brake. Readjust the brake, so that the brake power is sufficient.
40 Transport Ibis
6 Transport 25
6.1 Transport of the wheelchair
(without occupant)
Parts of the wheelchair that can easily be
detached should be removed when transporting
the wheelchair. ( Seating system)
a. Remove the seat
b. Remove the legrests
c. Remove the armrests
d. Fold down the backrest
Store these parts securely. Use suitable ramps
for wheeling the chair in and out of the vehicle.
Once the wheelchair is in the vehicle, it must
be secured with an ISO 10542 approved tie-
down system that is suited to the weight of that
particular wheelchair including any options
6.2 The wheelchair as a passenger
seat in a car
Note!
This wheelchair is crashtested according to
ISO 7176-19 (2008) considering a maximum
passenger weight of 160 kg.
Wheelchairs are not primarily designed to be
used as car seats and cannot offer the same
degree of safety offered by standard car seats,
no matter how securely they have been tied
down in the vehicle concerned.
Due attention should be paid to the following
points when a transfer from the wheelchair to a
standard car seat is not possible.
The wheelchair can be used as a passenger
seat in a car or bus by using a 4-point
integrated transport tie-down system that has
been approved to ISO 10542 standards. Make
sure that this restraint system is suitable to
the total weight of the wheelchair. The weight
of a wheelchair depends on it’s configuration.
The specifications give an overview of several
options and their share in the total weight.
Always weigh the total chair to make sure that
the right restraint system is used.Ibis Transport 41
The system requires tie-down rails to be 26
mounted in the car. The chair must then always
be strapped to the four tie-down points.
Warning!
Transfer to a regular car seat if possible
Always ask the transporter for confirmation
that the vehicle is suitably designed, insured
and equipped for transporting a person in a
wheelchair.
Set the wheelchair in the standard position
and use the headrest if the wheelchair is
fitted with one.
A chair with electrical power assist must
always be switched off when being
transported. 27
6.3 Fastening the seat belt
Warning!
Use the three-point seat belt in order to
reduce the risk of head and chest injuries in
the event of sudden braking or a collision.
Care should be taken when applying the
occupant restraint.
Use the seat belt as follows:
• Position the belt across the hips as tightly
as possible at an angle between 30° and
75°. Within these limits a steeper angle
is desirable. The other part of the belt
is positioned to sit across the chest and
shoulder (see figure).
• The seat belt should fit as tightly as possible
and must not be twisted.
• Ensure that the seat belt is not obstructed
from having contact with the body by
wheelchair parts, such as armrests or
wheels (see figure).
In order to prevent injury in the event of a
collision, secure wheelchair accessories to the
wheelchair or remove them from the chair and
secure them in the vehicle.42 Transport Ibis
Warning!
A. The wheelchair should be in a forward facing direction
and secured in accordance with the instructions from the
manufacturer of the fastening system.
B. This wheelchair is approved for use in cars and meets the
requirements for forward facing transport and head on
collisions. The wheelchair has not been tested for other
positions in a vehicle.
C. The wheelchair has been dynamically tested in a forward facing
direction, with the user secured by both a pelvic and chest belt
(3-point seat belt)
D. Both the pelvic and chest belts should be used to reduce the
risk of head and chest injuries in the event of colliding with parts
in the car.
E. In order to reduce the risk of injury to the user, tables that are
fitted to the wheelchair must be:
• Removed and secured separately in the vehicle, or
• Secured to the wheelchair, but with energy-absorbing padding
placed between the table and the user
F. Where possible, other wheelchair accessories should be
secured to the wheelchair or removed from the chair and
secured in the vehicle during transport, so that they don’t
become loose and cause injury to the user in the event of a
collision.
G.Support and positioning equipment must not be regarded
as safety equipment/seat belts if they are not labelled in
accordance with the requirements of ISO 7176/19-2008.
H. The wheelchair should be inspected by a representative of the
manufacturer before being used again after any kind of collision.
I. No changes or replacements must be made to the anchorage
points/car fastenings on the wheelchair, or to constructional
elements or parts of the frame without consulting the
manufacturer.
J. When using electric wheelchairs in motor vehicles, gel-filled
batteries should be used.Ibis Maintenance 43
7 Maintenance 7.3 Cleaning the wheelchair
Removing dry dirt
7.1 Maintenance table Upholstery, metal parts and frame parts can
usually easily be cleaned with a dry soft cloth.
It is recommended to have your wheelchair
serviced by your dealer once a year or, in case Removing mud and other wet dirt
of intensive use, every six months. The table The dirty parts can best be cleaned by first
below shows the maintenance activities you wiping them with a wet sponge and then wiping
can perform yourself. them dry with a dry soft cloth.
Frequency Description
Caution!
Weekly Check tyre pressure and inflate Do not use organic solvents such a thinner,
the tyres if necessary. See 7.2. benzene or white spirit.
Monthly Clean the wheelchair. See 7.3. Never use abrasive or aggressive cleansers.
Lubricate the turning system of They can scratch the wheelchair.
the seat.
7.2 Checking and inflating the
tyres
Inflate the tyres with a foot pump or a bicycle
pump, in combination with the reducing nipple
included in the delivery. You can also have your
tyres inflated at your local petrol station.
Caution!
Make sure the tyres are kept at the correct
pressure.
The tyre pressure may never exceed the
maximum value indicated on the tyre.44 Troubleshooting Ibis 8 Troubleshooting If there is a problem with your wheelchair, please contact your dealer.
Vous pouvez aussi lire