MYPLUS - INSPIRED BY LIFE - LIFE & MOBILITY
←
→
Transcription du contenu de la page
Si votre navigateur ne rend pas la page correctement, lisez s'il vous plaît le contenu de la page ci-dessous
MyPlus

                          HANDLEIDING
                          USER MANUAL
                         MODE D’EMPLOI
                   GEBRAUCHSANWEISUNG

Inspired by life
Voorwoord

                                                        De MyPlus is een comfortabele en stevige rolstoel
                                                        voor permanent gebruik. Door een solide basisframe
                                                        is de Plus ook uitermate geschikt voor intensief
                                                        gebruik door grote en/of zware personen. Deze
                                                        praktische ‘no nonsense’ rolstoel koppelt een extreme
                                                        duurzaamheid aan uitstekend zitcomfort en rijgedrag.

                                                        De MyPlus is eenvoudig te bedienen door zowel
                                                        gebruiker als begeleider. Om de stoel aan te passen
                                                        aan een specifieke gebruiker, zijn er bovendien veel
                                                        extra onderdelen en accessoires verkrijgbaar. Dankzij
                                                        het vouwbare of vaste frame en de achterwielen met
                                                        quick release assen is ook demontage, transport en
                                                        opslag geen enkel probleem.

                                                        De MyPlus is spatwaterbestendig en geschikt voor
                                                        gebruik zowel binnens- als buitenshuis.

                                                        In de standaard uitvoering is de Myplus getoetst aan
                           Maximum user weight 150 kg   de Europesse Rolstoelnorm NEN-EN12183 en ook
                                                        positief getest als botsproefveilige rolstoel conform
Logistiekweg 7
7007 CJ DOETINCHEM
T +31 (0)314 328000
E info@life-mobility.com   * R 1 9 0 7 8 9 8 *

                                                        ISO7176-19:2008. De MyPlus voldoet daarmee aan
                                                        de essentiële eisen van de verordening (EU) 2017/745
                                                        voor Medische Hulpmiddelen. In die gevallen dat
                                                        de Myplus is aangepast aan uw specieke eisen,
                                                        waardoor een CM (custommade) markering is
                                                        aangebracht, voldoet de rolstoel niet persee meer
                                                        aan de crashtestnorm. Neem in dat geval contact met
                                                        Life & Mobility voor een individuele beoordeling van
                                                        MyPlus.

                                                         et op:
                                                        L
                                                        n Lees voordat u de rolstoel in gebruik neemt deze
                                                            gebruiksaanwijzing goed door.
                                                        n Ziet u dit teken in de handleiding, dan volgt een
                                                            aanvullende instructie. Volg deze instructies altijd
                                                            op. Nalatigheid kan de werking van de rolstoel
                                                            nadelig beïnvloeden en mogelijk leiden tot
                                                            lichamelijk letsel of tot schade aan de rolstoel of
                                                            het milieu.
                                                                                                                   NL3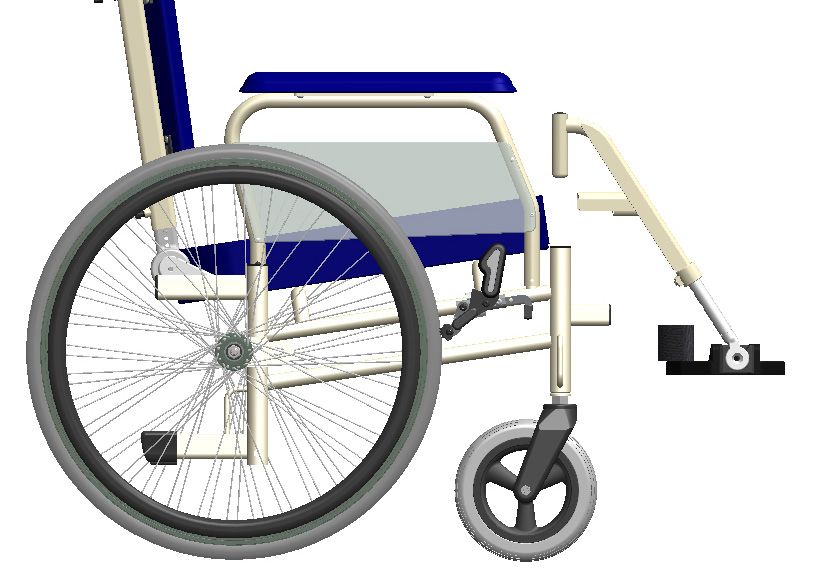
Inspired by life

Inhoudsopgave                                                    Veiligheidsvoorschriften

                                            U bent als gebruiker van de rolstoel altijd
      Veiligheidsvoorschriften          5   verantwoordelijk voor het naleven van de geldende
                                            veiligheidsvoorschriften en -richtlijnen.
      Controle van de levering          9
                                            Life & Mobility aanvaardt geen aansprakelijkheid voor
      Technische specificaties         10   schade of letsel veroorzaakt door onachtzaamheid of
                                            het niet naleven van de veiligheidsvoorschriften.
      Productbeschrijving              11   Afhankelijk van de specifieke omstandigheden
                                            of bouwuitvoering (CM) kunnen aanvullende
      Instellingen en verstellingen    12   veiligheidsinstructies gesteld worden.

      Rolstoel verkleinen              16   Algemeen
                                            Waarschuwing:
      Gebruik                          18   n Wijzig de constructie van de rolstoel nooit.
                                            n Blijf met de rolstoel uit de buurt van open vuur.
      Transport                        20
                                            Let op:
      Onderhoud                        24   n Deze rolstoel is geschikt voor het vervoeren van
                                               één persoon.
      Technische problemen             25   n Gebruik uitsluitend originele Life & Mobility
                                               onderdelen en accessoires.
      Garantie                         26   n De veiligheidsinstructies en stickers nooit
                                               afdekken of verwijderen.
      Afvoeren product en verpakking   27
                                            Eisen aan de persoon
                                            Let op:
                                            n U dient voldoende gezichtsvermogen te hebben
                                               om in elke mogelijke gebruikssituatie veilig met
                                               de rolstoel te kunnen rijden.

                                            Monteren en afstellen
                                            (zie ook hoofdstuk ‘Instellingen en verstellingen’)

                                            Waarschuwing:
                                            n Controleer voordat u de rolstoel gebruikt of alle
                                                onderdelen van de rolstoel goed gemonteerd zijn
                                                en goed vastzitten.

NL4                                                                                                 NL5
Inspired by life
Veiligheidsvoorschriften Veiligheidsvoorschriften
Let op: n Z
et de rolstoel op de rem voordat u instapt,
n Houd een minimale afstand van 5 cm aan tussen uitstapt of een transfer maakt.
de beensteunen en de grond. Als de afstand n
Gebruik de bandrem alleen om de stilstaande
tussen de grond en de beensteunen kleiner is dan wielen te blokkeren. De rem is ongeschikt om de
4 cm, kunnen de voetplaten blijven haken achter rolstoel af te remmen.
oneffenheden, waardoor u voorover kunt kantelen.
n Controleer de maatvoering en stel deze Transport van de rolstoel
optimaal af volgens de aanwijzingen in deze Let op:
gebruikershandleiding. n Pas op dat uw vingers niet bekneld raken tijdens
het opvouwen van de rolstoel.
Zitten in de rolstoel n Til de rolstoel alleen aan vaste framedelen en
Waarschuwing: niet aan afneembare accessoires als armleggers,
n Zorg dat vingers en ledematen van de inzittende beensteunen, zitting, rugleuning etc.
niet bekneld raken. Wees vooral waakzaam: n In geval van vouwbaar binnenwerk. Zorg dat de
- Wanneer de rugleuning ver naar achteren is rolstoel volledig uitgevouwen is voordat u deze
versteld. gaat gebruiken.
- Wanneer de inzittende scheef in de stoel hangt.
- Wanneer de inzittende zijn/haar armen over de Transport van de rolstoel met inzittende in een
armlegger slap omlaag heeft hangen. taxibus (zie ook pag. 20 voor meer informatie)
- Wanneer er een combinatie is van bovenstaande De MyPlus is ontworpen om in voorwaartse richting
gevallen. vastgezet te kunnen worden in een taxibus. De
n Door een onjuiste zithouding kunnen drukplekken MyPlus is positief getest als botsproefveilige rolstoel
ontstaan. Als u hier onzeker over bent, neem dan conform ISO 7176-19:2008. De MyPlus is dus als stoel
direct contact op met uw arts of therapeut. met inzittende te vervoeren in een taxibus (zie ook de
8
aanduidingssticker op de stoel).
Rijden met de rolstoel n Bevestig de stoel met inzittende in een taxibus
Let op: met een goedgekeurd 4-punts vastzetsysteem.
n Bij het oprijden van een helling zal het zwaartepunt n Gebruik daarnaast een goedgekeurde 3-punts
zich verplaatsen en kan de rolstoel makkelijker veiligheidsgordel voor het veilig vervoeren van de
achterover kantelen. inzittende van de rolstoel.
n Denk om uw handen tijdens het hoepelen wanneer
er aan de zijkant(en) van de rolstoel weinig ruimte is. Let op: de zithoudingsgordel is niet bedoeld als
n Begeleiders mogen de rolstoel nooit ongeremd veiligheidsgordel.
op een helling achterlaten.
n Neem obstakels hoger dan 10 cm nooit alleen. L ife & Mobility adviseert om bij het vervoer van de
Alleen geoefende rijders, die over voldoende rolstoel met inzittende de rolstoel te voorzien van een
kracht beschikken, zijn over het algemeen in staat Matrixx hoofdsteun.
obstakels tot 10 cm te nemen.
NL6 NL7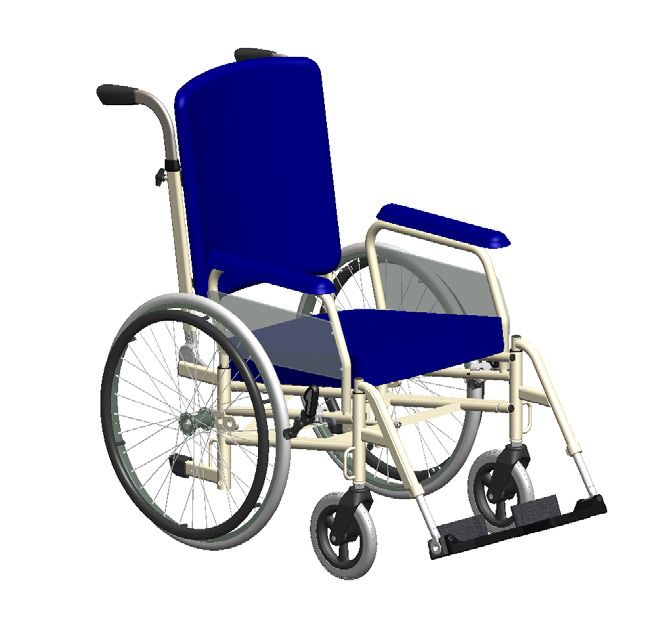
Inspired by life

Veiligheidsvoorschriften                                                                   Controle van de levering

      Hellingen en andere obstakels                                        Controle van de levering
      (zie ook pag. NL 20 voor meer informatie)                            Controleer voordat u de rolstoel gaat gebruiken of
                                                                           de levering overeenkomt met de productbeschrijving
      Let op:                                                              op pagina 11. Indien u bij aflevering transportschade
      n De kans op kantelen van de rolstoel is op een helling             constateert, geef dit dan door aan uw dealer.
         groter dan op een vlakke ondergrond.                              Life & Mobility vertrouwt erop dat de MyPlus aan uw
      n Ga altijd achteruit een stoep af, zodat de rolstoel               verwachtingen voldoet en wenst u er veel gemak van.
         niet voorover kan hellen en u uit de stoel valt.
      n Rijd zelf nooit met de rolstoel van een trap af.
      n Rijd nooit een helling op met een hellingshoek van
         meer dan 5°.
      n Roep hulp in van derden wanneer u er niet zeker van
         bent dat u het hoogste punt zelfstandig haalt.
      n De begeleider die de rolstoel voortbeweegt, moet
         blijven duwen om te voorkomen dat de rolstoel uit
         eigen beweging gaat rijden.                             Trap
      n Keer niet op een steile helling. Wanneer de rolstoel
         dwars op een steile helling staat, is de kans op
         kantelen groot.
      n Houd bij het afdalen altijd uw snelheid onder
         controle.
      n De begeleider dient de rolstoel af te remmen aan de
         duwhandvatten.
      n Indien u zelf rijdt, de rolstoel uitsluitend met uw     Stoep
         handen aan de hoepels afremmen en niet met de
         bandrem. Anders bestaat de mogelijkheid dat u de
         controle over de rolstoel verliest.

      Overige
      Waarschuwing:
      n Zet de rolstoel niet in direct zonlicht: de bekleding
         kan heet worden met mogelijk verbranding of             Helling
         overgevoeligheid van de huid tot gevolg.

      Voorzichtig:
      n Laat de rolstoel niet in contact komen met zeewater:
         zeewater is agressief en tast de rolstoel aan.
      n Laat de rolstoel niet in contact komen met zand: zand
         kan doordringen tot in de draaiende delen van de
         rolstoel, waardoor onnodig snelle slijtage optreedt.
NL8                                                                                                                                NL9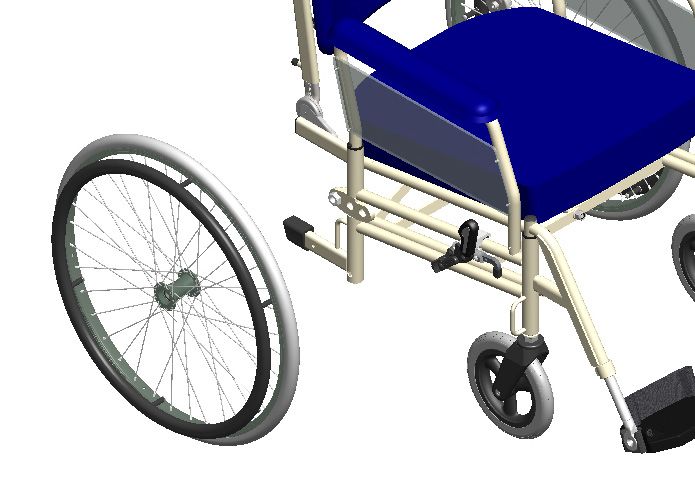
Inspired by life
Technische specificaties
n Z itbreedte (ZB): 37 / 42 / 47 / 52 / 57 /
62 cm / overig Bovengenoemde verklaring is alleen dan van toe
n Zitdiepte (ZD): 44 / 48 / 52 cm / overig passing wanneer de gebruiker het product gebruikt
n Zithoogte (ZH): van 41 tot 58 cm in de hoedanigheid waarin deze door Life & Mobility
(zie adaptatieformulier voor de exacte is bestemd en als zodanig CE-gemarkeerd, inclusief
mogelijkheden) eventuele originele accessoires.
n Armleggerhoogte (AH): 23 cm
n Breedte rolstoel (BR): 62 / 67 / 72 / 77 /
82 / 87 cm
n Breedte rolstoel opgevouwen (inclusief
wielen): 37 cm
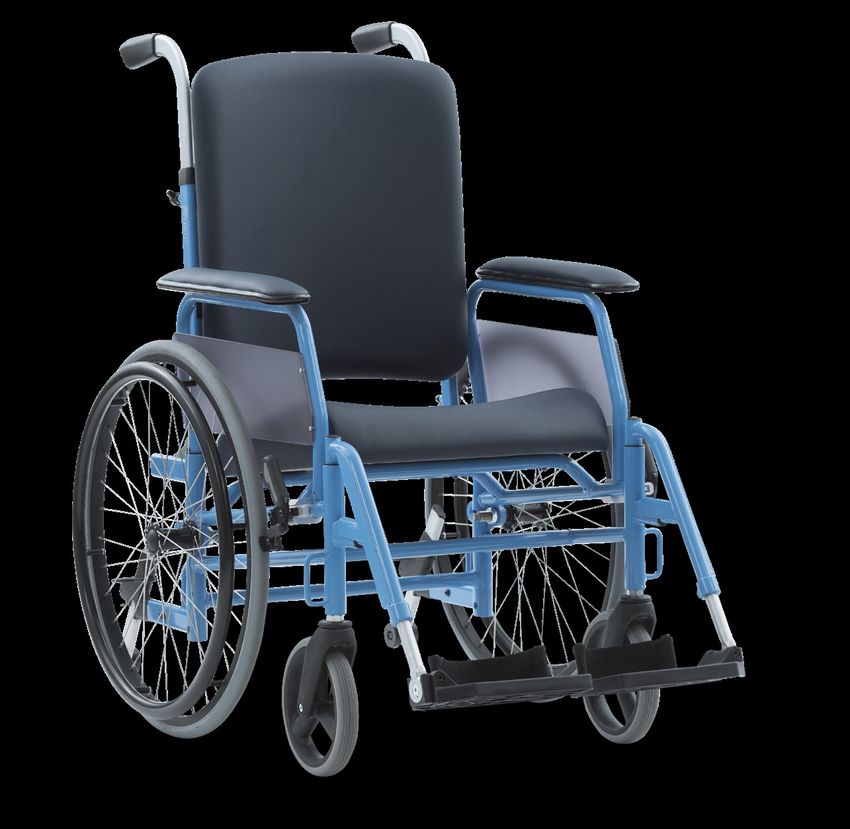
Productbeschrijving
n Hoogte duwhandvatten (HD): verstelbaar Productbeschrijving
n Onderbeenlengte (OL): 38-49, 40-51 cm 1. Duwhandvat
n Zithoek: 3 / 6° 1 2 2. Matrixx rugleuning
n Rughoekverstelling: tandschijf 3. Standaard zijkant
n Totale massa basismodel: 28 kg 4. Matrixx zitting
n Tilgewicht: 14 kg 3 5. Matrixx beensteun
n Maximaal gewicht inzittende: 160 kg* 6. Vouwbaar frame
n Voldoet aan EN12182/EN12183/7176-8/ 4 7. Voorwiel (semi-massief)
12
EN1021-2 5 8. Bandrem
n Voldoet aan ISO7176-19:2008 (alleen in 6 9. Achterwiel (lucht)
standaard CE uitvoering) 11 10. Quick Release as
Doorsnede over
11. Trapdop
hartlijn van stoel
Life & Mobility adviseert de rolstoel te 10 9 8 7 12. Hoepel
gebruiken in een omgevingstemperatuur tussen 13. Taxihaken*
de -5˚ en +40˚ Celsius.
*alleen bij standaard CE uitvoering is de
*
Wanneer de inzittende meer dan 160 kg weegt, rolstoel als zitplaats in een taxi getest.
kan de rolstoel op aanvraag worden versterkt. U
dient hiervoor het aanvullende formulier voor een
adaptatie-aanvraag in te vullen. De rolstoel wordt Niet afgebeeld:
voorzien van CM markering; gebruiksdoel en n Gebruikershandleiding
veiligheidsvoorschriften kunnen wijzigen.
In deze handleiding worden de standaard producten
Technische levensduur beschreven. Deze rolstoel is uit te breiden met vele
Door Life & Mobility wordt aan dit product een andere mogelijkheden en accessoires, deze staan
technische levensduur toegeschreven van 7 jaar. vermeld onder opties.
Dit wil zeggen dat het product in deze periode
reparabel, veilig en bruikbaar is.
NL10 NL11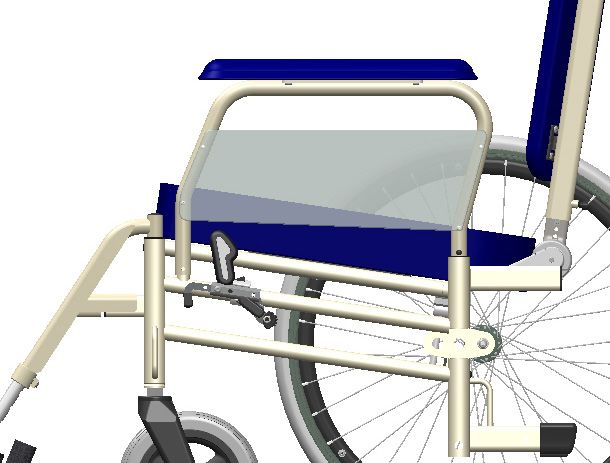
Inspired by life
Instellingen en verstellingen Instellingen en verstellingen
De rolstoel beschikt over diverse instel- en Rughoekverstelling t.b.v. zitdiepte
verstel
mogelijkheden waarmee de stoel aan De zitdiepte kan nog extra nauwkeurig ingesteld
uw eigen wensen kan worden aangepast. A worden door middel van het verplaatsen van de
Life & Mobility adviseert u om voor de instellingen rugbuizen met 4 cm.
uw dealer te raadplegen. De verstellingen kunt u 1. Neem de zitting uit.
eenvoudig zelf uitvoeren. 2. Draai de 2 inbusschroeven per kant (A) een
aantal slagen los. Wij adviseren om hiervoor de
Rijeigenschappen instellen imbussleutel M5 zoals afgebeeld te gebruiken.
De rijeigenschappen van de rolstoel zijn aan te 3. Schuif het plaatje met de duwstangen naar voren of
passen. De achterwielen kunnen in drie posities naar achteren tot de gewenste zitdiepte is bereikt.
worden ingesteld door het verplaatsen van de asbus. 4. Bepaal de exacte maat met behulp van de
1. Plaats de asbus in één van de drie asgaten. maatstreepjes op beide zijkanten van het zijframe.
2. Draai de M16 moer vast. Deze worden aangeduid met stickers.
5. Pas, indien nodig, de rijeigenschappen aan.
Het uitnemen en plaatsen van de QR achter Let op: zorg dat links en rechts op gelijke diepte
wielen Rijeigenschappen geplaatst zijn.
Let op: 6. Draai de inbusschroeven (A) weer vast.
n Het wiel dient u in ongeremde stand af te nemen
of te plaatsen. Het uitnemen en plaatsen van de zijkanten
De zijkanten zijn eenvoudig uit te nemen.
1. Druk de ontkoppelknop in het midden van de 1. Plaats uw hand in het midden van de armlegger.
naaf in (A). 2. Neem de gehele zijkant naar boven uit.
2. Houd de pen ingedrukt en neem het wiel uit. B 3. Plaats de zijkant in de houders.
3. Leg het wiel weg met de as naar boven zodat de 4. Laat de armlegger weer los.
assen niet vervuilen of beschadigen.
4. Plaats het wiel terug in het asgat (B). U hoort een A Let op:
klik als het wiel goed gefixeerd is. nControleer of de zijkanten in de houders zijn
5. Overtuig uzelf ervan dat het wiel goed vastzit al- Zijkanten geplaatst en niet ernaast. Dit kan de zijkanten en
Achterwiel plaatsen
vorens u de rolstoel weer gaat gebruiken. wielen beschadigen.
Rughoekverstelling De beensteunen uitnemen
1.
Draai de inbusschroeven (A) in de rug- De beensteunen zijn eenvoudig uit het frame te nemen
scharnierpunten een paar slagen los. door deze aan het ophangdeel te pakken en met een
2. Verander de rughoek. opwaartse beweging uit te nemen.
3. Draai daarna de inbusschroeven weer vast.
Let op:
Let op: controleer met behulp van het A nZorg dat de voetplaten opgeklapt zijn alvorens u uit
“maatstreepje”of de linker- en rechterduwstang de rolstoel stapt. Ga nooit op de voetplaten staan.
Beensteunen
dezelfde hoek hebben. De kans bestaat dat de rolstoel hierdoor voorover
Rughoek kantelt.
NL12 NL13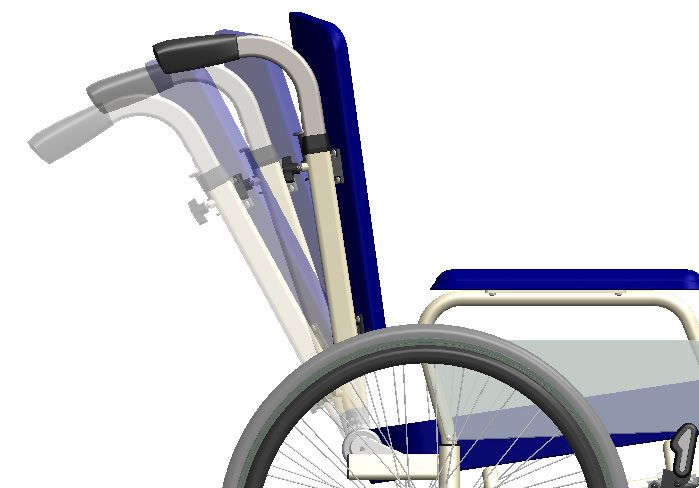
Inspired by life

Instellingen en verstellingen                                                                                            Instellingen en verstellingen

       Onderbeenlengte instellen                                                                               5.	Indien nodig neem dan ook de wielen uit.
       1. Draai de inbusschroef (A) een slag los.                                                              	  Let op: Leg het wiel met de as naar boven weg
       2. Stel de gewenste onderbeenlengte in.                                                                     zodat de assen niet verontreinigen of
       	 Let op: houd rekening met een afstand van                                                                beschadigen.
          minimaal 5 cm tot de vloer.                           A                                              6.	Plaats uw hand om de middelste buis (A) van
                                                                                                           A
       3. Draai de inbusschroef weer vast.                                                                         het vouwframe
                                                                                                               7.	Trek het frame omhoog zodat de zijkanten
       Enkelscharnier fixeren                                                                                      naar elkaar toe komen.
       n Stel de gewenste enkelhoek in.                        Onderbeenlengte      Rolstoel verkleinen
       n Boor een gat in het scharnier (A).                                                                   Het uitnemen en plaatsen van de hoofd-steun*
       n Fixeer het enkelscharnier met behulp van het                                                         1.	Draai de sterknop los.
          bijgeleverde fixeerpinnetje.                                                                         2.	Neem de hoofdsteun uit.
                                                                                                               3. Plaats de hoofdsteun in de houder.
       Het uitnemen en plaatsen van de rug–leuning                                                             4. Draai de sterknop weer vast.
       1. Trek de linker en rechter knoppen (A) van het
           bovenbeslag gelijktijdig omhoog.                                                                    Banden oppompen*
                                                                       A
       2. Roteer de rugleuning naar voren zodat het                                                           Met een bandenpomp kunnen de banden op
           U-profiel de rugnokken verlaat.                                                                     spanning worden gebracht. U heeft ook bij
       3. Laat de knoppen van het bovenbeslag weer                   Enkelhoek                                levering een ventielnippel ontvangen, waarop
                                                                                     Hoofdsteun
           los.                                                                                                u een fietspomp kunt aansluiten om de banden
       4. Neem de rugleuning naar boven uit.                                                                  op te pompen. De juiste bandenspanning staat
                                                                                                               aangegeven op de banden.
       Let op:                                              A
       n Controleer altijd of de rugleuning goed vastzit                                                      Om comfortabel met de rolstoel te rijden, d.w.z.
           alvorens u plaatsneemt in de rolstoel.                                                              met een laagst mogelijke rol- en draaiweerstand,
                                                                                                               is het belangrijk dat de banden de juiste spanning
       Het uitnemen en plaatsen van de zitting                                                                 hebben. Bij een lage bandenspanning rijdt en
       1. Trek de zitting aan de voorzijde omhoog.                   Rugleuning                                manoeuvreert de rolstoel zwaarder.
       2. Til de zitting uit het frame.
       3. Bij vast binnenwerk 4 schroeven losdraaien                                                           Advies
                                                                                                               Om de garantie te waarborgen, adviseert de
       Het vouwen van het frame*                                                                               fabrikant om de instellingen door een dealer te
       1.	Om de rolstoel mee te nemen in de auto kunt                                                         laten uitvoeren.
           u het frame inklappen.
       2. Neem de zitting uit.
       3. Neem de rugleuning uit.
       4.	Til de beensteunen uit het frame.
                                                                           Zitting

NL14      * Indien van toepassing                                                                              * Indien van toepassing                              NL15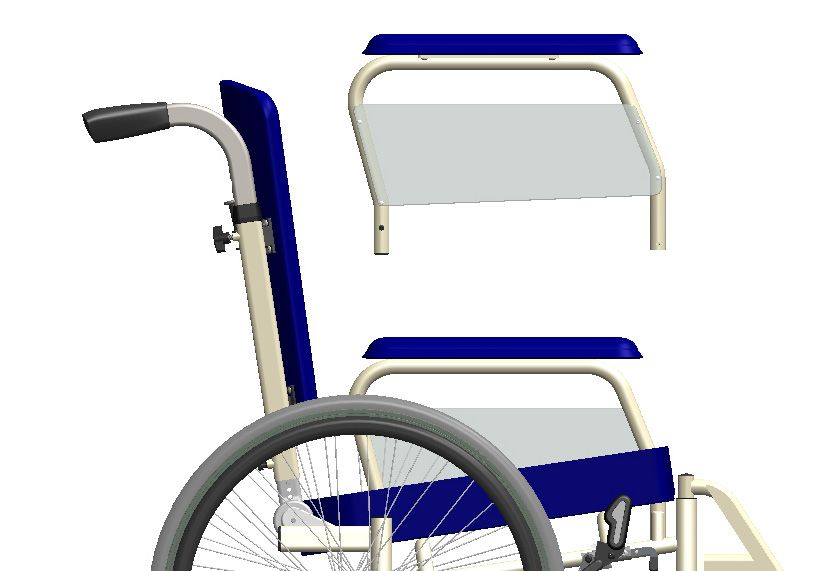
Inspired by life

Rolstoel verkleinen                                                                            Rolstoel verkleinen

       Rolstoel verkleinen                                          7.	Trek de middelste buis van het vouwframe omhoog
       (Alleen indien de rolstoel over een vouwbaar                     (zie NL 15: Het vouwen van het frame).
       binnenwerk beschikt). Zie ook hoofdstuk instellingen         	De zijkanten bewegen naar elkaar toe. De rolstoel
       en verstellingen.                                                is nu verkleind.

       Waarschuwing:
       n Controleer voordat u de rolstoel gebruikt of alle
          onderdelen van de rolstoel goed gemonteerd zijn
          en goed vastzitten.

       Let op:
       n Pas op dat uw vingers niet bekneld raken tijdens
          het opvouwen van de rolstoel.
       n Draag de rolstoel altijd aan het frame, nooit aan
          andere onderdelen.
       n Zorg dat de rolstoel volledig uitgevouwen is
          voordat u deze gaat gebruiken.

       Voer onderstaande stappen uit in de aangegeven
       volgorde om de rolstoel te verkleinen, bijvoorbeeld
       voor transport:
       1.	 Verwijder de rugleuning van het rugframe (zie
            NL 14: Het uitnemen en plaatsen van de
            rugleuning).
       .2.	Til de zitting uit het frame (zie NL 14: Het uitnemen
            en plaatsen van de zitting).
       3.	Neem de beensteunen uit het frame (zie NL 13: De
            beensteunen uitnemen).
       4.	Neem de zijkanten voorzien van armleggers uit het
            frame (zie NL 13: Het uitnemen en plaatsen van de
            zijkanten).
       5.	 Druk      op     de      ontgrendelknop      van   de
            Quick Release-as en neem beide achterwielen naar
            buiten toe uit (zie NL 12: Het uitnemen en plaatsen
            van de achterwielen).
       6.	 Draai de sterknop los en neem de hoofdsteun
            uit de adapter indien aanwezig (zie NL 15: Het
            uitnemen en plaatsen van de hoofdsteun).

NL16                                                                                                                      NL17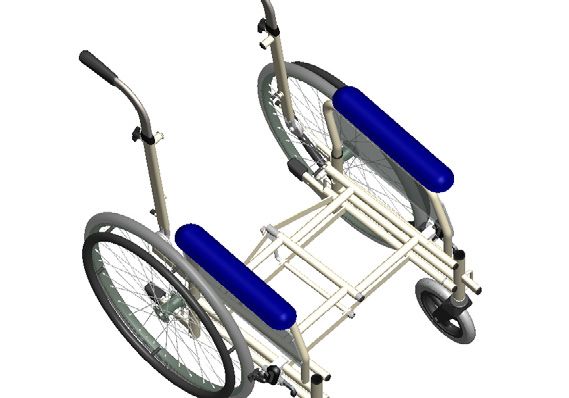
Inspired by life
Gebruik Gebruik
Het maken van transfers Remmen
De MyPlus is een rolstoel voor gebruikers met diverse De remmen van de rolstoel zijn standaard vanuit de
beperkingen. Transfers van rolstoel naar bijvoorbeeld fabriek op de juiste wijze afgesteld. Life & Mobility
bed, toilet of douche en andersom kunnen op ver- raadt u aan altijd beide remmen tegelijk te gebruiken
schillende manieren worden gemaakt. bij het in- en uitstappen. Om de remkracht optimaal
te houden dient u regelmatig de bandenspanning te
De mate waarin de rolstoelgebruiker medewerking controleren.
kan verlenen, bepaalt de wijze van tillen. Zowel ac-
tieve als passieve transfers zijn bij de MyPlus, al dan
niet met behulp van hulpverlener of tillift, mogelijk.
Let op:
n Zet de rolstoel te allen tijde op de rem voordat
een transfer wordt gemaakt.
Voorwaartse transfer
1. Klap de voetplaten op. Of zwenk de beensteunen
eventueel weg.
2. Zet de stoel op de rem.
Zijwaartse transfer
Neem eventueel de zijkanten voorzien van armleggers Trap
uit.
Het nemen van hindernissen met een begeleider
n Duw met uw voet op de trapbuis en druk de
duwhandvatten omlaag
n Duw de rolstoel op de verhoging (hindernis) en
laat de trapbuis weer los.
n Duw de rolstoel verder en til de achterwielen aan Stoep
de duwhandvatten over de hindernis.
Het oprijden van een stoep kan men voor waarts
doen, het afrijden van een stoep is beter achterwaarts
uit te voeren.
Let op:
n Houd bij het afgaan van een helling de snelheid Helling
onder controle.
NL18 NL19Inspired by life
Transport Transport
Taxibus n D e posities van de vier bevestigingspunten op de
De MyPlus is ontworpen om in voorwaartse richting MyPlus zijn aangeduid met een haaksymboolsticker
vastgezet te kunnen worden in een taxibus. De (zie illustratie 1).
MyPlus is positief getest als botsproefveilige rolstoel n Gemakkelijke toegang en manoeuvreerbaarheid in
conform ISO 7176-19:2008. De MyPlus is dus als stoel motorvoertuigen kan aanzienlijk worden beïnvloed
met inzittende te vervoeren in een taxibus (zie ook de door rolstoelgrootte en wendbaarheid. Kleinere
8
Illustratie 1
aanduidingssticker op de stoel). rolstoelen met een kortere draaicirkel bieden
over het algemeen een betere toegangkelijkheid
Voor het veilig vervoeren is de conditie van de tot de auto en manoeuvreerbaarheid naar een
inzittende en het advies van de arts bepalend. voorwaartse -positie. De MyPlus heeft een goede
Life & Mobility adviseert toch om, indien mogelijk, de beoordeling m.b.t. vastzetbaarheid volgens ISO
inzittende een transfer van de MyPlus naar een vaste 7176-19:2008 annex D.
stoel te laten maken. n De MyPlus dient met de gebruiker vooruitkijkend
vervoerd te worden. De rolstoel moet vastgezet
n D e MyPlus is getest, waarbij de testdummy was worden volgens de instructies van de fabrikant van
vastgezet met een 3-puntsgordel. De geschiktheid het vastzetsysteem.
bij andere botsingen of andere type gordels dan n De MyPlus moet vastgezet worden met ver
in bovenstaande norm genoemd is niet getest. ankeringssystemen die geschikt zijn voor de 4
n De MyPlus is in verschillende configuraties getest. bevestigingspunten.
n Life & Mobility adviseert te allen tijde de stoel te n De rolstoelgebruiker moet een goedgekeurde*
voorzien van een Matrixx hoofdsteun. 3-puntsveiligheidsgordel gebruiken in de taxibus.
n Uit preventieve veiligheid plaatst Life & Mobility af Deze veiligheidsgordels moeten aan de taxibus
fabriek een hoofdsteunadapter op de rugleuning. Illustratie 2 bevestigd worden.
n De MyPlus moet met een goedgekeurd* 4-punts n De heupgordel moet laag over het middel van
vastzetsysteem conform EN 10542-2. aan de vloer de gebruiker lopen. Hierbij moet de hoek tussen
van de taxibus bevestigd worden conform. gordel en het vloeroppervlak tussen de 30° en 75°
(een grotere hoek is wenselijker) zijn (zie illustratie 2).
Let op: indien er geen crashtest safesticker n De heupgordel moet dwars over de voorzijde van
af fabriek op de rolstoel zit, is dit geen veilig het lichaam lopen ter hoogte van de plek waar de
vervoerbare rolstoel. Illustratie 3 heup en het bekken bij elkaar komen. De gordel
moet daarbij goed aansluiten op het lichaam.
Let op: til de rolstoel alleen aan vaste framedelen 1 De bovengordel moet de gebruiker volledig
en niet aan afneembare accessoires als armleggers, ondersteunen, zoals aangegeven in illustratie 3.
beensteunen, zitting, rugleuning etc. n De diagonale gordel moet over de schouder en
˚55
2
de borst lopen zoals te zien is in illustratie 4.
Let op: de MyPlus is alleen crashtest safe in n De gordels moeten voldoende strak zitten
combinatie met de originele Matrixx elementen waarbij ze niet oncomfortabel mogen zijn voor de
en onderdelen. gebruiker.
Illustratie 4
* Volgens EN10542
NL20 NL21Inspired by life
Transport Transport
n D e gordel mag niet gedraaid zitten. Waarschuwingen
n De gordel mag niet tegen rolstoelonderdelen n Conform convenant is het MyPlus
(zoals armleggers of wielen) aanliggen, waardoor onderstel in combinatie met specifieke
de gordel niet meer volledig het lichaam van de ortheses botsproefveilig verklaard
gebruiker ondersteunt (zie illustratie 5). (ISO 7176-19:2008) en voorzien van CE
n De goedgekeurde 3-puntsveiligheidsgordel is markering.
bedoeld om letsel aan hoofd en borst te voor n De MyPlus is dynamisch getest in
Illustratie 5
komen. voorwaartse richting, waarbij de test
n Om te voorkomen dat andere inzittenden letsel dummy (= 103 kg) was vastgezet met een
oplopen, moet een werkblad (indien aanwezig) heupgordel en een schoudergordel.
verwijderd worden. Dit werkblad dient elders in n Bevestig de stoel in een taxibus met
het voertuig veilig opgeborgen te worden. een 4 -punts vastzetsysteem. Gebruik
n Indien mogelijk, moeten de accessoires worden tevens een 3 -punts veiligheidsgordel
vastgezet of worden verwijderd. voor het vervoer van de rolstoel met
n Na ieder ongeval dient de fabrikantvertegen inzittende om de kans op verwondingen
woordiger de rolstoel te beoordelen of deze weer aan hoofd en borst te verkleinen
gebruikt kan worden. n De zithoudingsgordel is ongeschikt als
n Wijzigingen en/of vervangingen aan de vastzet veiligheidsgordel.
punten of structurele delen en framedelen dienen n Werkbladen dienen afgenomen te
niet te worden uitgevoerd, zonder vooraf de worden en veilig opgeborgen in de
fabrikant te raadplegen. taxi.
n Alle accesoires dienen vastgezet of
Zithoudingsgordel verwijderd en veilig opgeborgen te
De zithoudingsgordel is bedoeld om de inzittende worden in de taxi.
te positioneren. Bevestig deze om of op het metalen n Na ieder ongeval dient de fabrikant
zitframe. vertegenwoordiger de rolstoel te
beoordelen of deze weer gebruikt kan
Auto worden.
Naast een taxibus is de MyPlus ook in verkleinde n Wijzigingen en/of vervangingen aan
toestand vervoerbaar in de kofferbak van een de vastzetpunten of structurele delen
personenwagen. Lees op pagina 16 en 17 hoe u de en framedelen dienen niet te worden
rolstoel kunt verkleinen. uitgevoerd, zonder vooraf de fabrikant
te raadplegen.
n Eventuele batterijen dienen “spill-
proof” te zijn.
n De gesp van de gordel moet zodanig
gepositioneerd worden dat rolstoel
onderdelen er geen contact mee zullen
maken tijdens een botsing.
NL22 NL23Inspired by life
Onderhoud Technische problemen
Klein onderhoud (iedere twee weken) Wanneer zich onverhoopt directe technische
Klein onderhoud aan de MyPlus kunt u zelf uitvoeren. problemen voordoen aan uw rolstoel, raden wij u
Reinig uw rolstoel met een vochtige doek, water en aan contact op te nemen met uw dealer. De dealer
allesreiniger. zal beoordelen of hij de stoel kan repareren of dat de
stoel voor reparatie terug moet naar de fabrikant.
Let op: Een aantal problemen kunt u wellicht zelf oplossen.
n Gebruik nooit schurende en agressieve
schoonmaak- of oplosmiddelen zoals thinner, Beweegbare onderdelen zoals duwstang, in hoogte
wasbenzine en dergelijke. verstelbare armlegger, beensteun en zijkant zitten
vast:
Controleer of alle bevestigingsonderdelen goed vast- n Door te grote krachten op bovengenoemde
zitten. Draai deze zonodig opnieuw aan. onderdelen, kunnen de onderdelen zich
hebben vastgeklemd in het frame. Tik
Let op: voorzichtig de onderdelen met een kunststof
n Het met overmatige kracht aandraaien van de hamer los.
schroeven kan de rolstoel beschadigen.
De remmen hebben onvoldoende remkracht of
Controleer de bandenspanning en -gesteldheid remmen niet met dezelfde remkracht aan beide
(veroudering). Zachte banden rijden minder gemakke kanten:
lijk door de toegenomen rolweerstand. Gebruik n Controleer de bandenspanning.
voor het oppompen van de banden eventueel de n U dient de remmen te laten stellen, raadpleeg
bijgeleverde ventielnippel (bijvoorbeeld bij gebruik hiervoor uw dealer.
van een fietspomp). De juiste bandenspanning staat
aangegeven op de banden. Let op:
n Alle andere reparaties dan bovenstaand vermeld,
Groot onderhoud (jaarlijks) dienen altijd uitgevoerd te worden door een
Uw dealer zal graag het groot onderhoud aan de erkende dealer. Door onzorgvuldige repara ties
rolstoel voor zijn rekening nemen. Op deze wijze bent kan uw gezondheid in gevaar komen. Bovendien
u er zeker van dat u optimaal gebruik maakt van uw komt de garantie op het product te vervallen.
rolstoel. Ook voor het vervangen van onderdelen, Gebruik gezond verstand en oordeel of u zelf in
kunt u terecht bij uw dealer. staat bent technische problemen aan de stoel op
te lossen. Wanneer u twijfelt, raadpleeg dan altijd
uw dealer. Houdt u zich bij het instellen en in-en
uitplaatsen van onderdelen aan deze handlei
ding en aan de adviezen van uw dealer. Sluit elke
gevaarlijke situatie voor de begeleider en voor de
inzittende van de stoel uit!
NL24 NL25Inspired by life
Garantie Afvoeren product en verpakking
Garantievoorwaarden Afvoeren product en verpakking
De producten van Life & Mobility zijn met zorg Vanuit milieuoogpunt adviseren wij om de verpakking
samengesteld en nauwkeurig gecontroleerd voordat en de rolstoel zoveel mogelijk gescheiden af te voeren
zij de fabriek verlaten. Mocht blijken dat een product zodat de gebruikte materialen efficiënt gerecycled
niet aan de verwachtingen voldoet, dan kunt u kunnen worden.
zich wenden tot de partij waar u het product heeft
aangeschaft. Life & Mobility respecteert de wet- en In de meeste gevallen kunt u uw gebruikte
regelgeving, ter bescherming van de consument, die rolstoel inleveren bij uw rolstoeldealer. Als dit niet
van toepassing zijn in het land van aanschaf. mogelijk is kunt u de rolstoel afleveren bij uw lokale
afvalinzamelingspunt.
Buiten de garantie vallen in ieder geval gebreken
ontstaan ten gevolge van: niet in acht nemen van
bedienings- en onderhoudsvoorschriften, anders
dan normaal gebruik, slijtage, onachtzaamheid,
overbelasting, ongeval door derden, toegepaste
niet originele onderdelen en gebreken waarvan de
oorzaak is gelegen buiten het product.
Met deze garantie vervalt elke andere garantie: in de
wet bepaald, of mondeling meegedeeld, behoudens
dat wat door Life & Mobility schriftelijk wordt ge-
garandeerd.
Garanties gelden uitsluitend binnen de EU.
NL26 NL27Inspired by life
Foreword
Deze handleiding is met de grootst mogelijke zorg The MyPlus is a comfortable and strong wheelchair
samengesteld en is gebaseerd op de informatie for permanent use. Due to its solid basic frame, the
zoals bij Life & Mobility bekend op het moment MyPlus is also extremely suitable for intensive use
van verschijnen. Life & Mobility neemt geen by large and/or heavy persons. This practical, no-
verantwoordelijkheid voor eventuele fouten in de nonsense wheelchair combines extreme durability
tekst of gevolgen daarvan. with excellent sitting comfort and a superb ride.
De informatie in deze handleiding is van toepassing The MyPlus is easy to operate for both the user and
op de standaard uitvoering van het product. Life & the accompanying person. There is also a wide range
Mobility neemt geen verantwoordelijkheid voor of extra parts and accessories available, which enable
eventuele schade ontstaan door wijzigingen in of it to be adapted to a specific user. The folding frame
aanpassingen op het product na het moment van or fixed frame and rear wheels with quick-release axles
eerste verkoop. Tevens kan Life & Mobility niet also make it easy to dismantle, transport and store.
aansprakelijk gesteld worden voor schade door
werkzaamheden door derden. The MyPlus is splash-resistant and is suitable for both
indoor and outdoor use.
De informatie in deze handleiding mag op geen
enkele manier vermenigvuldigd en / of openbaar In the standard model, the MyPlus was tested in
gemaakt worden, zonder de voorafgaande schriftelijke Maximum user weight 150 kg accordance with the NEN-EN12183 European
toestemming van Life & Mobility. Wheelchair Standard and also positively tested as
Logistiekweg 7
7007 CJ DOETINCHEM
T +31 (0)314 328000
E info@life-mobility.com * R 1 9 0 7 8 9 8 *
a safe wheelchair in a crash test in accordance with
De door Life & Mobility gebruikte handelsnaam en ISO7176-19:2008. The MyPlus therefore complies with
handelsmerken mogen krachtens de handelsnaamwet the mandatorily applicable European REGULATION
niet als vrij worden beschouwd. (EU) 2017/745 for Medical Devices.
In those cases in which the MyPlus was adapted to
Aan deze tekst kunnen geen rechten worden your specific requirements, after which a CM (Custom
ontleend. Wijzigingen voorbehouden. Made) marking was applied, the wheelchair no longer
necessarily complies with the crash test standard. In
© Life & Mobility – Alle rechten voorbehouden that case, you should contact Life & Mobility for an
individual assessment of the MyPlus.
ote:
N
n Before using the wheelchair, please read these
instructions carefully.
n This sign in the manual indicates additional
instructions. Always follow these instructions.
Negligence can have a negative influence on the
operation of the wheelchair and can possibly lead
to physical injury or damage to the wheelchair or
the environment.
NL28 EN3Inspired by life
Contents Safety instructions
As the user of the wheelchair, you are always
Safety instructions 5 responsible for complying with the applicable safety
instructions and guidelines.
Delivery Check 9
Life & Mobility accepts no liability for damage or
Technical specifications 10 injury caused by negligence or non-compliance with
the safety instructions.
Product description 11
Additional safety instructions may be necessary,
Settings and adjustments 12 depending on the specific circumstances or structural
design (CM).
Folding the wheelchair 16
General
Use 18 Warning:
n Never change the construction of the wheelchair.
Transport 20 n Keep the wheelchair away from naked flames.
Maintenance 24 ote:
N
n This wheelchair is suitable for transporting one
Technical problems 25 person.
n Only use original Life & Mobility parts and
Guarantee 26 accessories.
n Never cover or remove the safety instructions and
Disposal of the product and packaging 27 stickers.
Requirements placed on the person
Note:
n Your eyesight must be sufficiently good to allow
you to use the wheelchair safely in any possible
situation.
Assembly and adjustment
(also see Chapter ‘Settings and adjustments’)
Warning:
n Before using the wheelchair, check that all of the
components of the wheelchair are correctly and
securely installed.
EN4 EN5Inspired by life
Safety instructions Safety instructions
ote:
N n O
nly use the brake to lock stationary wheels. The
n Ensure that there is a minimum distance of 5 cm brake is not suitable for slowing the wheelchair
between the legrests and the floor. If the distance down.
between the floor and the legrests is less than
4 cm, the footrests can catch on an uneven floor, Transporting the wheelchair
causing you to topple forward. Note:
n Check the dimensions and correctly adjust them n Ensure that your fingers do not get caught when
in accordance with the instructions given in this folding up the wheelchair.
manual. n Only lift the wheelchair using fixed frame
components and not removable accessories such
Sitting in the wheelchair as armrests, legrests seating, back support etc.
Warning: n In the event of a foldable inner frame. Ensure that
n Ensure that the fingers and limbs of the user do the wheelchair is completely unfolded before you
not become trapped. Be particularly vigilant: use it.
- If the backrest is adjusted a long way backwards.
- If the user is sitting lopsidedly in the wheelchair. Transporting the wheelchair with the occupant in it
- If the user’s arms are hanging limply over the in a taxibus (see also page 30 for more information)
armrest. The MyPlus was designed to be secured in a forward
- In any combination of the above situations. direction in a taxi van. The MyPlus was tested positi-
vely as a crash-test safe wheelchair in accordance with
n A
n incorrect sitting position can cause pressure ISO 7176-19:2008. It can therefore be transported with
sores. In case of doubt, please contact your the occupant in it in a taxibus (see also the sticker on
physician or therapist immediately. the wheelchair).
n Attach the wheelchair with its occupant in it in a
8
Using the wheelchair taxibus with a four-point securing system.
Note: n In addition, use a 3-point safety belt to safely
n When travelling up a slope, the centre of gravity transport the occupant of the wheelchair.
will move backwards, making it easier for the
wheelchair to tip over backwards. Note: The normal seat belt used to hold the
n When self propelling the wheelchair, consider occupant in position is not intended for use as a
your hands if there is not much room at the side(s) safety belt.
of the wheelchair.
n Accompanying persons must never leave the When transporting the wheelchair with the occupant
wheelchair on a slope without engaging the brake. in it, Life & Mobility recommends fitting the wheelchair
n Never tackle obstacles higher than 10 cm on with a Matrixx headrest.
your own. Only experienced users with sufficient
strength are generally capable of tackling
obstacles up to 10 cm in height.
n Engage the brake on the wheelchair before
getting in or out of the chair or transferring from it.
EN6 EN7Inspired by life
Safety instructions Delivery Check
Slopes and other obstacles Delivery Check
(see also page EN 20 for more information) Before you start to use it, check that the delivered
wheelchair matches the product description on page 11.
ote:
N If you notice any damage caused during transport,
n The wheelchair is more likely to tip over on a slope please inform your dealer. We at Life & Mobility are
than on a level surface. sure that your Plus will meet your expectations and we
n Always descend a pavement or step backwards to wish you every success with it.
prevent the wheelchair from tipping forwards and
the user falling out of it.
n Never descend stairs in the wheelchair alone.
n Never propel the wheelchair up a slope that has an
angle greater than 5°.
n Ask somebody to help you if you are not sure whether Stairs
you can reach the top of the slope by yourself.
n The accompanying person must continue to push
the chair to prevent it from starting to move under
its own momentum.
n Do not turn the wheelchair around on a steep slope.
If the wheelchair is facing across a steep slope, it can
very easily tip over.
n Always keep your speed under control when going Kerb
downhill.
n The accompanying person must reduce the speed
of the wheelchair using the push-handles.
n If you are operating the wheelchair yourself, slow the
wheelchair down using your hands on the handrims
only. Never use the brake as this can cause you to
lose control of the wheelchair.
Slope
Other
Warning:
n Do not leave the wheelchair in direct sunlight:
the upholstery can become hot, causing burns or
oversensitivity of the skin.
Take care:
n Do not allow the wheelchair to come in contact with
seawater: seawater is aggressive and will corrode it.
n Do not allow the wheelchair to come in contact with
sand: sand can penetrate the rotating parts of the
wheelchair, causing unnecessarily rapid wear.
EN8 EN9Inspired by life
Technical specifications Product description
n S eat width (SW): 37 / 42 / 47 / 52 / 57 / Product description
62 cm other 1. Push-handle
n Seat depth (SD):44 / 48 / 52 cm / other 1 2 2. Matrixx backrest
n Seat height (SH): 41 - 58 cm 3. Standard side
(see adaptation form for the exact possibilities) SW 4. Matrixx seat
3
n Armrest height (AH): 23 cm 5. Matrixx legrest
n Width of wheelchair (WW): 62 / 67 / 72 / 77 / 82 / 6. Foldable frame
4
87 cm 12 7. Front wheel (semi-solid)
n Width of wheelchair folded up (including wheels) 5 8. Tyre brake
37 cm WW 6 9. Rear wheel (pneumatic)
11
n Height of push-handles (HP): adjustable 10. Quick Release axle
n Lower leg length (LL): 38-49, 40-51 cm 11. Tipping lever
n Seat angle: 3 / 6° SD
10 9 8 7 12. Handrims
n Backrest angle adjustment: toothed 13. Taxi hooks (4x)*
n Total weight: 28 kg
n Lift weight: 14 kg *only the standard CE model of the
AH
n Maximum user weight: 160 kg* wheelchair was tested as a seat in a taxi.
HP
LL
n Complies with EN12182/EN12183/7176-8/
EN1021-2 Not illustrated:
SH
n Complies with ISO7176-19:2008 (only the n User manual
standard CE model)
Cross section through This manual describes the standard products. This
Life & Mobility recommends using the wheelchair in an centre line of chair wheelchair can be extended with many options and
ambient temperature of between -5 °C and +40 ° C. accessories, these are listed under ‘Options’.
* If the user weights more than 160 kg, the MyPlus can be
strengthened on request. Please fill in a supplementary form
to request the adaptation. The wheelchair will be supplied
with CM marking; the intended use and safety regulations
can change.
Expected service life
Life & Mobility assigns a service life of 7 years to this
product. This means that during this period, the
product is fixable, safe and usable.
The statement above is only applicable if the user uses
the product in the manner that Life & Mobility intended,
marked with CE and including any original accessories.
EN10 EN11Inspired by life
Settings and adjustments Settings and adjustments
The wheelchair has a wide range of settings and
adjustment options with which the chair can Backrest angle adjustment for seat depth
be adjusted to match your own requirements. A The seat depth can be adjusted even more precisely by
Life & Mobility recommends that you consult your moving the back tubes by 4 cm.
dealer with regard to the settings. You can easily 1. Remove the seat.
make adjustments yourself. 2. Loosen the 2 socket screws (A) on each side for
several turns. We recommend you use the socket
Adjusting the ride characteristics wrench M5 for this, as pictured.
The ride characteristics of the wheelchair are 3. Slide the plate forwards or backwards using the
adjustable. The rear wheels can be located in three push-handles until the desired seat depth.
different positions by moving the axle bearing. 4. Determine the exact measurement by using the
1. Place the axle bearing in one of the three axle measurement lines on both sides of the side frame.
holes. These are indicated with stickers.
2. Replace and tighten the M16 nut. 5. Adjust the ride characteristics, if necessary.
Note: e nsure that left and right are placed at equal
Removing and replacing the QR rear wheels Ride characteristics depths.
Note: 6. Re-tighten the socket screws (A).
n The brake must be disengaged to remove or
replace the wheel. Removing and replacing the sides
The sides are easy to remove.
1. Press the release button in the middle of the 1. Place you hand in the middle of the armrest.
hub (A). 2. Lift out the entire side.
2. Keep the pin pressed and remove the wheel. B 3. Put the side in the holders.
3. Lay the wheel down axle-side up, so that the 4. Release the armrest.
axle does not become dirty or damaged.
4. Replace the wheel in the axle hole (B). You will A ote:
N
hear a click when the wheel is properly fitted. Sides n Ensure that the sides are fitted into the holders and
5. Ensure that the wheel is correctly attached be- Fitting rear wheel not next to them. This can damage the sides and
fore you use the wheelchair again. the wheels.
Removing the legrests
Backrest angle adjustment The legrests can be easily lifted from the frame by
1.
Loosen the socket screws (A) in the backrest holding them above where they are fitted and lifting
hinge points for a couple of turns. them out.
2. Adjust the backrest angle.
3. Then tighten the socket screws again. ote:
N
n Ensure that the footrests have been folded away
Note: Using the measurement lines, check whether before you get out of the wheelchair. Never stand
Legrests
the left and right push-handles are at the same on the footrests. If you do, there is a chance that the
angle. Backrest angle wheelchair will tip over.
EN12 EN13Inspired by life
Settings and adjustments Settings and adjustments
Adjusting the lower leg length
1. Unscrew the socket screw (A) one turn. Note: Lay the wheel down axle-side up, so
2.
Set the legrest to the required lower leg that the axle does not become dirty or
length. damaged.
Note: Ensure that the legrest is at least 5 cm 6. Place your hand around the middle tube (A)
from the floor. A of the folding frame
A
3. Retighten the socket screw. 7. Pull the frame upwards so that the sides
move towards each other.
Locking the position of the ankle hinge
n Adjust the ankle angle to the required Lower leg length Folding the wheelchair Removing and replacing the headrest*
position. 1. Loosen the star knob.
n Drill a hole in the hinge (A). 2. Remove the headrest.
n Fix the ankle hinge using the fixing pin 3. Insert the headrest in the holder.
provided. 4. Retighten the star knob.
Removing and replacing the backrest Inflating the tyres
1. Simultaneously pull the left and right buttons The tyres can be inflated using a bicycle pump.
A
(A) of the top fittings upwards. You received a valve nipple with the wheelchair
2. Rotate the backrest forwards so that the U that you can use to connect a pump. The correct
profile is separated from the back cams. Ankle angle tyre pressure is shown on the tyres.
3. Release the buttons of the top fittings. Headrest
4. Remove the backrest upwards. To use the wheelchair comfortably, that is to
say with the lowest possible rolling and turning
ote:
N A resistance, it is important that the tyres are at
n Always check whether the backrest is correctly the right pressure. The wheelchair will be more
attached before you sit in the wheelchair. difficult to propel and manoeuvre if the tyre
pressure is too low.
Removing and replacing the seat
1. Pull up the front of the seat. Backrest Recommendation
2. Lift the seat out of the frame. To not jeopardise the guarantee, the manu
3. With a fixed inner frame, unscrew 4 screws. facturer recommends having the dealer carry
out these settings.
Folding the frame*
1. To be able to transport the wheelchair by car,
you can fold the frame.
2. Remove the seat.
3. Remove the backrest.
4. Lift the legrests out of the frame.
5. If necessary also remove the wheels. Seat
EN14 * if applicable * if applicable EN15Inspired by life
Folding the wheelchair Folding the wheelchair
Folding the wheelchair
(Only if the wheelchair has a foldable inner frame) See
also the Section ‘Settings and adjustments’.
Warning:
n Before using the wheelchair, check that all of the
components of the wheelchair are correctly and
securely installed.
ote:
N
n Ensure that your fingers do not get caught when
folding up the wheelchair.
n Always carry the wheelchair by the frame, never by
other parts.
n Ensure that the wheelchair is completely unfolded
before you use it.
Perform the steps below in the given order to fold the
wheelchair, for instance for transport:
1. Remove the backrest from the back frame (see
GB 14: Removing and replacing the backrest).
2. Lift the seat out of the frame (see GB 14: Removing
and replacing the seat).
3. Remove the legrests from the frame (see GB 13:
Removing the legrests).
4. Remove the sides with armrests from the frame
(see GB 13: Removing and replacing the sides).
5. On both sides, push the release button of the
Quick-Release axle and remove the rear wheels
outwards (see GB 12: Removing and replacing the
rear wheels).
6. Loosen the star knob and remove the headrest
from the holder (if present) (see GB 15: Removing
and replacing the headrest).
7. Pull the middle tube of the folding frame upwards
(see GB 15: Folding the frame).
The sides will move towards each other. The
wheelchair is now folded.
EN16 EN17Inspired by life
Use Use
Transferring to and from the chair Brakes
The MyPlus is a wheelchair for users with various han- The brakes of the wheelchair are correctly adjusted
dicaps. Transfers from the wheelchair to, for example, ex factory. Life & Mobility strongly recommends en-
a bed, toilet or shower and vice versa can be made in gaging both brakes when getting in and out of the
various ways. chair. To keep the braking power optimal, you should
regularly check the tyre pressure.
The extent to which the wheelchair user is able to
cooperate determines how he or she should be lifted.
Both active and passive transfers are possible with the
MyPlus, if required with the aid of the care provider or
using a lift.
ote:
N
n Always engage the brake before transferring to or
from the chair.
Forwards transfer
1. Fold up the footrests. Or fold away the legrests (if
applicable).
2. Engage the wheelchair brake
Sideways transfer Stairs
Remove the sides and armrests, if required.
Negotiating obstacles with an accompanying person
n Push with your foot on the step tube and push
down on the push-handles.
n Push the wheelchair onto the obstacle and remove
your foot from the step tube.
n Push the wheelchair further and lift the rear wheels Kerb
over the obstacle using the push-handles.
You can mount a kerb forwards, but it is better to
descend backwards.
ote:
N
n Keep your speed under control on gentle slopes.
Slope
EN18 EN19Inspired by life
Transport Transport
Taxibus
The MyPlus was designed to be secured in a forward n T he positions of the four securing points on the
direction in a taxi van. The MyPlus was tested positively MyPlus are shown with a hook symbol sticker (see
as a crash-test safe wheelchair in accordance with ISO Figure 1).
7176-19:2008. It can therefore be transported with the n Easy access and manoeuvrability in motor vehicles
occupant in it in a taxibus (see also the sticker on the can be significantly influenced by wheelchair size
8
Figure 1
wheelchair). and agility. Smaller wheelchairs with a shorter
turning circle generally offer better accessibility
However, whether the wheelchair occupant can be to the vehicle and manoeuvrability to a forward
safely transported depends on the state of his or position. The MyPlus was assessed positively for
her health; the user’s physician should be consulted. securability according to ISO 7176-19:2008, Annex
Life & Mobility recommends transferring the occupant D.
from the MyPlus into a fixed seat if possible. n The MyPlus must be transported with the
occupant facing forward. The wheelchair must be
n T he MyPlus has been tested, with the test dummy secured in accordance with the instructions of the
fixed in position using a 3-point safety belt. The manufacturer of the securing system.
suitability of the MyPlus in crashes or other types of n The MyPlus should be fastened using anchoring
belts other than those specified in the above standard systems that are suitable for the 4 attachment
has not been tested. points).
n The MyPlus was tested in various configurations. n The wheelchair occupant must wear an approved*
n Life & Mobility recommends that the chair should three-point safety belt in the taxibus. These safety
always be fitted with a Matrixx headrest. belts must be attached to the taxibus.
n For preventive safety reasons, Life & Mobility installs, Figure 2 n The lap belt must be positioned low across the
ex factory, a headrest adapter on the backrest. occupant’s waist. The angle between the belt and
n The MyPlus must be fastened to the floor of the taxibus the floor must be between 30° and 75° (a larger
using an approved* four-point securing system. angle is better) (see Figure 2).
n The lap belt must run over the front of the body
Note: If there is no ex factory crashtest safe sticker following the line where the hip and the pelvis
on the wheelchair, it is not a wheelchair that can be meet. The belt must closely follow the body here.
transported safely with the occupant in it. Figure 3 The top belt must fully support the occupant as
illustrated in Figure 3.
1
Note: Only lift the wheelchair using fixed frame n The diagonal belt must be positioned across
components and not removable accessories such the occupant’s shoulder and chest as shown in
as armrests, legrests seating, back support etc. Figure 4.
˚55
2
n The belt must be sufficiently tight but should not
Note: The MyPlus is only crashtest safe in cause the occupant discomfort.
combination with the original Matrixx elements and n The belt must not be twisted.
parts.
Figure 4
* In accordance with EN10542
EN20 EN21Inspired by life
Transport Transport
n The belt must not come into contact with Warnings
components of the wheelchair (such as armrests or n In accordance with the agreement,
wheels) in such a way that it does not fully support the MyPlus base was declared
the occupant’s body (see Figure 5). collision-test safe (ISO 7176-19:2008)
n The approved three-point safety belt is intended in combination with specific ortheses
to prevent injury to the head and chest. and was issued with CE marking.
n If a worktop is fitted, it must be removed in order n The MyPlus has been dynamically
Figure 5
to prevent injury to other passengers. The worktop tested in a forward direction, where
should be safely stowed away elsewhere in the the test dummy (= 103 kg) was secured
vehicle. with a hip belt and a shoulder belt.
n If possible, any accessories must be secured or n Secure the chair in a taxi van with a
removed. 4point fastening system. Also use a
n Following an accident, a representative of the 3-point safety belt for transporting the
factory must inspect the wheelchair to determine wheelchair and occupant to reduce
whether it can still be used. the risk of head and chest injuries.
n The attachment points, structural components n The sitting posture belt is unsuitable
and frame components must not be modified or as a safety belt.
replaced without first consulting the manufacturer. n Worktops should be removed and
stored safely in the taxi.
Seat belt n All accessories should be secured or
The seat belt is intended to keep the occupant in removed and safely stored in the taxi.
position. Attach it to or around the metal seat frame. n After every accident, the
manufacturer’s representative should
Car examine the wheelchair to determine
In addition to a taxibus, the MyPlus can also be whether it can be used again.
transported folded up in the boot of a passenger car. n The fastening points or structural and
See page 16 and 17 for instructions on how to fold up frame components should never be
the wheelchair. changed and/or replaced without first
consulting the manufacturer.
n Any batteries should be “spill-proof”.
n The belt clasp must be positioned so
that no wheelchair parts can come in
contact with it during a collision.
EN22 EN23Inspired by life
Maintenance Technical problems
Minor maintenance (every two weeks) In the unlikely event that you experience technical
You can do minor maintenance on the MyPlus yourself. problems with your wheelchair, please contact your
Clean your wheelchair with a damp cloth, water and dealer. The dealer will decide whether he can repair
an all-purpose cleaner. the chair or whether it will have to be returned to the
factory. You may be able to solve some problems
Note: yourself.
n
Never use abrasive and aggressive cleaning
agents or solvents including thinner, dry cleaning Movable components such as the push-handle,
fluid or similar. height-adjustable armrest, legrest and sides get stuck:
n These components can become jammed in
Check that all fastenings are secure. Tighten if neces- the frame if too much pressure is exerted on
sary. them. Carefully tap the components loose with
a plastic hammer.
Note:
n
Over-tightening the screws can damage the The brakes have insufficient braking power or do not
wheelchair. brake with the same braking power on both sides:
n Check the tyre pressure.
Check the tyre pressure and condition of the tyres n You need the brakes to be adjusted, please
(ageing) regularly. Soft tyres make the wheelchair consult your dealer.
more difficult to use as they increase rolling resistance.
Use, if necessary, the valve nipple supplied with the ote:
N
wheelchair for pumping up the tyres (for example, n All repairs other than those described above must
when using a bicycle pump). The correct tyre pressure always be performed by an authorised dealer.
is shown on the tyres. Improper repairs may endanger your health.
Furthermore, repairs carried out by unauthorised
Major maintenance (annual) persons will invalidate the guarantee on your
Your dealer will be happy to carry out the major chair. Use your common sense and decide
maintenance of your wheelchair. You can then be sure whether you are in a position to resolve technical
that you will be getting the best possible use out of problems on the wheelchair yourself. If in doubt,
it. You should also consult your dealer if components always consult your dealer. When adjusting and
need replacing. installing or removing parts, consult this manual
and follow your dealer’s advice. Do not place the
accompanying person or the wheelchair user in
danger.
EN24 EN25Inspired by life
Guarantee Disposal of the product and packaging
Terms and Conditions of Warranty Disposal of the product and packaging
The Life & Mobility products are made with care and are From the environmental viewpoint, we recommend
carefully inspected before leaving the factory. Should it disposing of the packaging and the wheelchair in
emerge that a product does not meet expectations please such a way that the materials used can be efficiently
contact the party where you purchased the product. Life recycled.
& Mobility respects the laws and regulations that protect
the consumer and that apply in the country in which the In the majority of cases, you can hand in your used
product is purchased. wheelchair to your wheelchair dealer. If this is
impossible, you can hand in the wheelchair at your
The guarantee does not cover faults caused by a failure local refuse collection location.
to comply with instructions for use and maintenance,
abnormal use, wear and tear, negligence, overloading,
accidents caused by third parties, use of non-original
components or faults the cause of which is not related
to the product.
This guarantee supersedes any other guarantee
either laid down in law or verbally notified, with the
exception of any written guarantee provided by Life
& Mobility.
Guarantees are only valid within the EU.
EN26 EN27Inspired by life
Avant-propos
This manual has been compiled with all possible Le modèle MyPlus est un fauteuil roulant solide et confortable
care and is based on the information known to Life destiné à un usage permanent. Grâce à son cadre robuste,
& Mobility at the time of writing. Life & Mobility le modèle MyPlus convient tout particulièrement à une
accepts no liability for any errors in the text or their utilisation intensive par des personnes de taille et/ou de poids
consequences. importants. En effet, ce fauteuil simple et pratique combine
une résistance rigoureuse à un confort d’assise et une conduite
The information in this manual applies to the standard impeccables.
model of the product. Life & Mobility accepts no
liability for any damage resulting from changes in L’utilisateur et son accompagnateur n’éprouveront aucune
or adaptations to the product after the first sale. In difficulté à manier le modèle MyPlus. De plus, de nombreux
addition, Life & Mobility cannot be made liable for éléments et accessoires supplémentaires sont disponibles
any damage resulting from third-party activities. afin d’adapter ce fauteuil aux besoins de chaque utilisateur.
Grâce au cadre pliable ou rigide et aux roues arrière équipées
The information in this manual must not be copied d’essieux à encliquetage rapide ou Quick-release, le
and/or published in any way whatsoever without the démontage, le transport et l’entreposage du fauteuil MyPlus
prior written approval of Life & Mobility. s’effectuent également en un tour de main. Le fauteuil MyPlus
résiste aux éclaboussures et convient aussi bien à l’utilisation à
The trade name and trademarks used by Life & l’intérieur qu’à l’extérieur.
Mobility are protected by virtue of the Trade Names
Act. Dans la version standard, le MyPlus a été testé conformément
à la norme européenne NEN-EN12183 sur les fauteuils roulants
No rights can be derived from this text. Subject to Logistiekweg 7
Maximum user weight 150 kg et a également été testé positivement en tant que fauteuil
alteration. roulant résistant aux chocs conformément à la norme ISO7176-
7007 CJ DOETINCHEM
T +31 (0)314 328000
E info@life-mobility.com * R 1 9 0 7 8 9 8 *
19:2008. Le MyPlus répond ainsi aux critères essentiels du
© Life & Mobility – All rights reserved RÈGLEMENT européen (UE) 2017/745 obligatoire applicable
aux dispositifs médicaux. Dans les cas où le MyPlus est adapté
à vos besoins spécifiques (dans ce cas un marquage CM
(Custom Made) est appliqué) le fauteuil roulant ne répond
plus nécessairement à la norme du crash-test. Veuillez alors
contacter Life & Mobility pour une évaluation individuelle de
MyPlus.
ttention :
A
n Lisez attentivement ce mode d’emploi avant d’utiliser le
fauteuil roulant.
n Ce symbole affiché dans le manuel précède une instruction
complémentaire. Respectez toujours ces instructions. Toute
négligence est susceptible de nuire au fonctionnement
du fauteuil roulant, d’entraîner des blessures ou
d’endommager le fauteuil ou l’environnement.
EN28 FR3Vous pouvez aussi lire