KETTLER RUDERGERÄT REGATTA 500
←
→
Transcription du contenu de la page
Si votre navigateur ne rend pas la page correctement, lisez s'il vous plaît le contenu de la page ci-dessous
KETTLER RUDERGERÄT REGATTA 500
                  ANLEITUNG
       Art.-Nr.   22488 · Kategorie:   Rudergeräte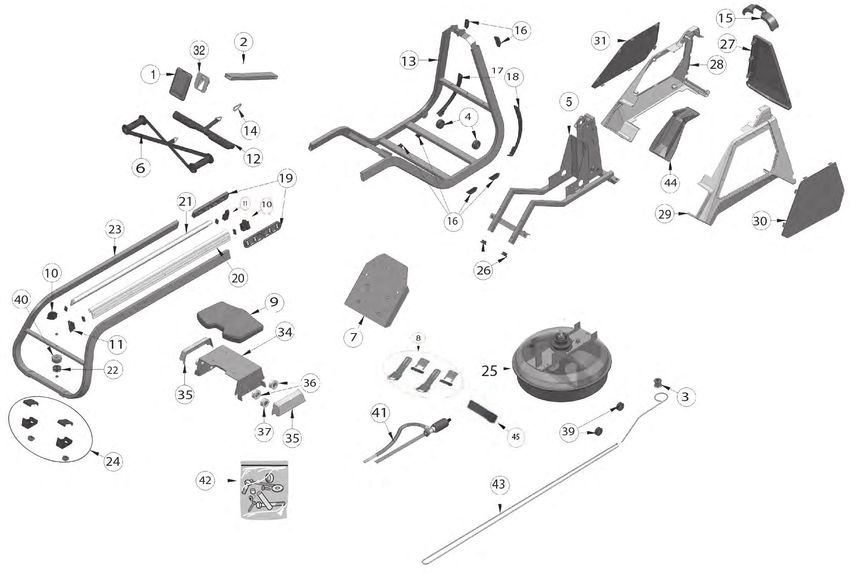
2
REGATTA 500   I   RO1031-100

DE     MONTAGEANLEITUNG

EN     ASSEMBLY INSTRUCTIONS

FR     INSTRUCTIONS DE MONTAGE
6
0
6    INHALT
9
     DE WICHTIGE HINWEISE        4
70
38       LIEFERUMFANG           10
 0       TYPENSCHILD            19
         ERSATZTEILBESTELLUNG
                                20

     EN IMPORTANT INFORMATION    6
         SCOPE OF DELIVERY      10
         TYPE LABEL             19
         SPARE PARTS ORDER
                                20

     FR REMARQUES IMPORTANTES    8
         FOURNITURES            10
         ÉTIQUETTE DE TYPE      19
         COMMANDE DE PIÈCES
                                20
         DE RECHANGE

     2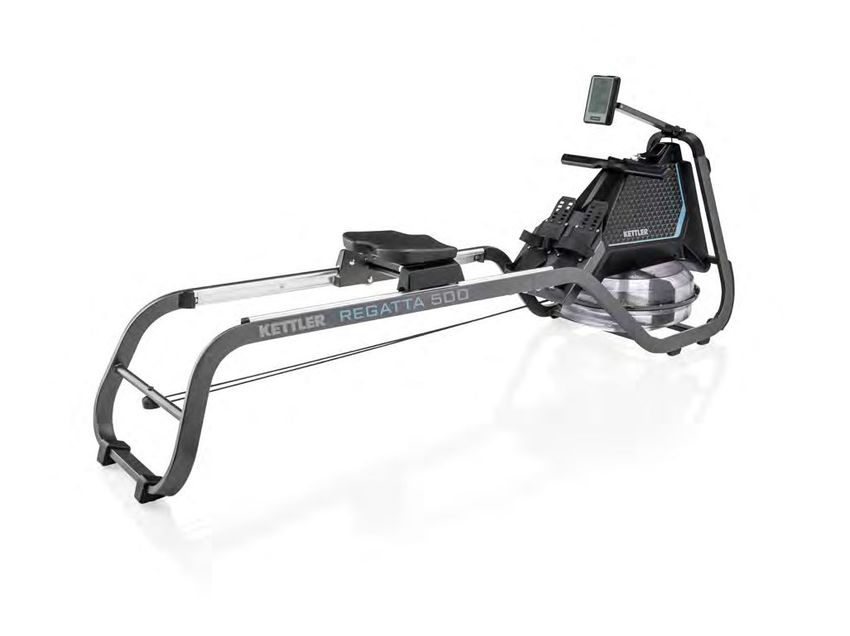
C

A                             B

    RO 1031-100 Regatta 500 55 kg

    A x B x C (m)     2,25 x0,58 x 0,99

             max. 130 kg

            30 Min.

                                              3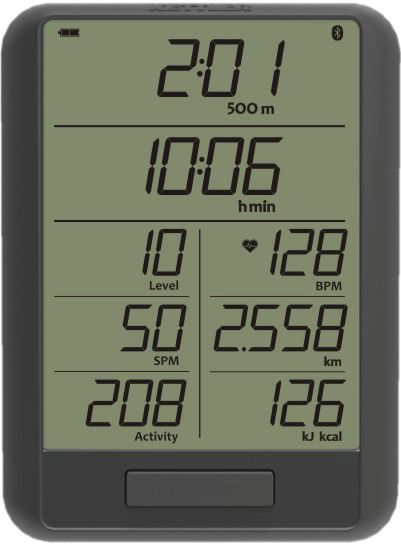
DE   WICHTIGE HINWEISE

             Wichtig! Bitte lesen Sie die Anweisungen vor der Montage und der

               ersten Benutzung aufmerksam durch. Sie erhalten wichtige Hin-
          weise für Ihre Sicherheit sowie den Gebrauch und die Wartung des
         Gerätes. Bewahren Sie diese Anleitungen zur Information bzw. für
         Wartungsarbeiten oder Ersatzteilbestellungen sorgfältig auf. Händigen
         Sie diese Anleitungen bei einem Besitzerwechsel des Gerätes mit aus.
         Dieses Symbol ⚠ weisst auf einen wichtigen Warnhinweis hin. Diese
         Anleitung kann auch unt er www.kettlersport.com heruntergeladen
         werden

     1.0 BENUTZERINFORMATION
     • Achtung! Beachten Sie auch unbedingt die Hinweise in den Heften „Si-
       cherheitshinweise und Informationen zum gebrauch“ 1 3 und „Computer-
       / Trainingsanleitung, Bedienung, Biomechanik“ 3 3 .
     • Dieses Symbol              weisst auf einen Inbusschlüssel hin.
     • Dieses Symbol              weisst auf einen Drehmomentschlüssel hin.

     • Dieses Sportgerät entspricht der DIN EN ISO 20957-1:2014, sowie ...
     • DIN EN 957-7:2019, Genauigkeit HB

     2.0 ELEKTRISCHE SICHERHEIT
     ⚠ WARNUNG! Gefahr durch elektrischen Strom!
       Elektrischer Strom bedeutet immer eine potentielle Gefahrenquelle.
       Handhaben Sie das Gerät stets mit der nötigen Umsicht.
     ⚠ Setzen Sie das Gerät keiner Feuchtigkeit aus! Schützen Sie es vor Kontakt
       mit Flüssigkeiten
     • Die vorschriftsmäßig installierte Steckdose zum Anschluss des Gerätes
       muss leicht zugänglich sein.
     • Bevor der Stecker des Netzteiles/Gerätes an die Steckdose angeschlos-
       sen wird, muss die auf dem Netzteil/Gerät angegebene Netzspannung mit
       der örtlichen Netzspannung verglichen werden. Stimmen die Werte nicht
       überein, wenden Sie sich bitte an unser Serviceteam.
     • Trennen Sie den Netzstecker nach dem Abschalten wieder vom Strom-
       netz.
     • Achten Sie unbedingt darauf, dass das Netzkabel nicht eingeklemmt oder
       zur „Stolperfalle” wird.

     4
DE
• Verbinden Sie das Netzkabel mit einer Schutzkontakt-Steckdose mit
Schutzerdung. Verwenden Sie keine Mehrfachsteckdosen zum Anschluss!
Bei Verwendung eines Verlängerungskabels muss dieses den VDE-Richt-
linien entsprechen.
• Das Gerät darf nur mit den mitgelieferten Netzkabel benutzt werden.
⚠ Ein beschädigtes Netzkabel darf nicht weiter verwendet werden und
ist sofort auszutauschen. Ein beschädigtes Netzkabel darf nicht weiter
verwendet werden und ist sofort auszutauschen. Wenn die Netzleitung
beschädigt ist, muss diese vom Hersteller, einem Servicemitarbeiter oder
einer anderen qualifizierten Fachperson ersetz werden, um Gefahren zu
vermeiden.
• Dieses Symbol weisst auf Geräte der Schutzklasse I hin.
• Dieses Symbol weisst auf Geräte der Schutzklasse II hin.
• Dieses Symbol weisst auf Geräte der Schutzklasse III hin.
⚠ Ziehen Sie bei allen Reparatur-, Wartungs- und Reinigungsarbeiten un-
bedingt den Netzstecker!
ERSTMALIGE WASSERAUFBEREITUNG
Geben Sie bei jeder vollen Tankfüllung 1 Wasseraufbereitungstablette hinzu.
VERWENDEN SIE IN JEDEM FALL NUR HANDELSÜBLICHE
AUFBEREITUNGSTABLETTEN FÜR WASSERRUDERGERÄTE.
4 Wasseraufbereitungstabletten sind für mehrere Jahre ausreichend. Wenden Sie sich
zum Kauf zusätzlicher Chlortabletten an einen regionalen Händler.
5EN IMPORTANT INFORMATION
Important! Please read these instructions carefully before instal-
lation and first use. You will receive important information for your
safety as well as for the use and maintenance of the appliance. Keep
these instructions somewhere safe for information purposes or for
maintenance work or ordering replacement parts. Pass these instruc-
tions on with the appliance if the owner of the appliance changes.
This symbol ⚠ indicates an important warning.
These instructions can also be downloaded at www.kettlersport.com
1.0 USER INFORMATION
• Caution! Please ensure you observe the instructions in the booklets “Sa-
fety Instructions and Instructions for Initial Operation and Maintenance“
1 3 and „Computer/training instructions, handling, biomechanics“ 3 3 .
• This symbol indicates an Allen key.
• This symbol indicates a torque wrench.
• This sport appliance corresponds to DIN EN ISO 20957-1:2014, and ...
• DIN EN 957-7:2019, Accuracy HB
2.0 ELECTRICAL SAFETY
⚠ WARNING! Danger due to electric current!
Electric power is always a potential source of danger. Always use the ap-
pliance with the necessary caution.
⚠ Do not expose the appliance to moisture! Protect it from contact with
liquids
• The properly installed electrical socket to connect the appliance must be
easily accessible.
• Before connecting the plug of the mains adapter/device with the socket,
the mains adapter/appliance voltage must be compared to the local volta-
ge. If the values do not match, please contact our service team.
• After switching the appliance off, remove the plug from the power supply
again.
• Be very careful in ensuring that the cable does not become trapped or a
“tripping hazard”.
• Connect the cable with a grounded safety socket. Do not connect via mul-
6EN
tiple socket strips! When using an extension cable, this must comply with
the VDE guidelines.
⚠ Do not use damaged cables again and exchange them immediately. Do not
use damaged cables again and exchange them immediately. If the mains
line is damaged, this must be replaced by the manufacturer, a member of
the service team or another qualified specialist to avoid danger.
• This symbol indicates that the appliance is protection class I.
• This symbol indicates that the appliance is protection class II.
• This symbol indicates that the appliance is protection class III.
⚠ The appliance may only be used with the mains adapter provided.
Initial water treatment
Add 1 water treatment tablet with each full tank of water.
ALWAYS USE ONLY COMMERCIAL CONDITIONING TABLEtS FOR
WATERROWER EQUIPMENT.
4 water treatment tablets are sufficient for several years. Contact a regional dealer to
purchase additional chlorine tablets.
7FR REMARQUES IMPORTANTES
Important ! Veuillez lire attentivement les instructions avant le
montage et la première utilisation. Vous y trouverez des conseils
importants pour votre sécurité ainsi que pour l‘utilisation et la mainte-
nance de l‘appareil. Conservez soigneusement ces instructions à titre
d‘information, pour les travaux de maintenance ou la commande de
pièces de rechange. En cas de changement de propriétaire de l‘appareil,
remettez aussi ces instructions.
Ce symbole ⚠ attire l‘attention sur un avertissement important. Ces
instructions peuvent également être téléchargées sur
www.kettlersport.com
1.0 INFORMATION UTILISATEUR
• Attention ! Suivez aussi impérativement les conseils dans les cahiers
„Conseils de sécurité et informations pour l‘utilisation“ 1 3 et „Instruc-
tions ayant trait à l‘ordinateur / l‘entraînement, utilisation, biomécanique“
33.
• Ce symbole attire l‘attention sur une clé mâle à six pans.
• Ce symbole attire l‘attention sur une clé de serrage dynamo-
métrique.
• Cet appareil de sport répond à la norme DIN EN ISO 20957-1:2014 ainsi
que...
• DIN EN 957-7:1998, précision HB
2.0 SÉCURITÉ ÉLECTRIQUE
⚠ AVERTISSEMENT ! Danger dû au courant électrique !
Le courant électrique est toujours synonyme de source potentielle de
danger. Manipulez toujours l‘appareil avec la circonspection nécessaire.
⚠ N‘exposez pas l‘appareil à l‘humidité ! Protégez-le contre tout contact
avec des liquides
• La prise de courant installée comme il se doit pour connecter l‘appareil
doit être facilement accessible.
• Avant que la prise mâle du bloc d‘alimentation/de l‘appareil ne soit rac-
cordée à la prise femelle, comparer la tension de secteur indiquée sur
le bloc d‘alimentation/l‘appareil avec la tension de secteur locale. Si les
8FR
valeurs ne correspondent pas, veuillez vous adresser à notre équipe du
service.
• Débranchez de nouveau la prise mâle après la mise à l‘arrêt.
• Veillez impérativement à ce que le câble d‘alimentation ne soit pas coincé
et ne risque pas de faire chuter.
• Raccordez le câble d‘alimentation à une prise de courant de sécurité.
N‘utilisez pas de blocs multiprises pour le raccord ! En cas d‘utilisation
d‘une rallonge électrique, celle-ci doit répondre aux directives VDE.
• N’utilisez l‘appareil qu‘avec le câble d‘alimentation fourni.
⚠ Ne continuez pas d‘utiliser un câble d‘alimentation endommagé et
échangez-le immédiatement. Si la ligne de secteur est endommagée,
celle-ci devra être remplacée par le fabricant, un collaborateur du service
après-vente ou une autre personne qualifiée pour éviter tout danger.
• Ce symbole indique les appareils de la classe de protection I.
• Ce symbole indique les appareils de la classe de protection II.
• Ce symbole indique les appareils de la classe de protection III.
⚠ Débranchez impérativement la fiche d‘alimentation pour tous les travaux
de réparation, de maintenance et de nettoyage !
Traitement initial de l'eau
Ajoutez 1 comprimé de traitement de l'eau à chaque réservoir d'eau plein.
DANS TOUS LES CAS, N'UTILISEZ QUE DES TABLETTES DE TRAITEMENT DE
L'EAU DISPONIBLES DANS LE COMMERCE POUR LES GOUVERNAILS À EAU.
4 comprimés de traitement de l'eau suffisent pour plusieurs années. Contactez un
distributeur régional pour acheter des comprimés de chlore supplémentaires.
9LIEFERUMFANG
EN SCOPE OF DELIVERY
FR FOURNITURES
NL LEVERINGSOMVANG
1x
1x
1x
1x
1x
1x
10LIEFERUMFANG
M6x35 ........ | 1x
.................. | 2x
M8x25 .................. | 2x
M6............ | 1x
M8x20 ........................| 2x
ø8,3x16 ..... | 2x
M8x16 ............................| 4x
0 10 20 30 40 50 60 0 10 20
07975-500 Coach H2O
1x
Cl
DE Benötigtes Werkzeug – Gehört nicht zum Lieferumfang.
EN Tools required – Not included.
FR Outils nécessaires – Ne fait pas partie du domaine de livraison.
SW6 SW4
111.
1.1.
1.2.
122.
2.1. 2.2. 2.3.
4x | M8x16 2x | M8x20 2x | M8x25 ø8,3x16 SW 6 = 10 Nm
2.1.
2.2.
2.3.
133.
3.1.
1x | M6x35 M6 SW4 = 3 Nm
3.1.
3.2.
3.2.
144.
4.1.
4.2.
155.
A
B
166.
6.2.
6.1.
177.
Cl
7.1.
1x |
7.1.
Cl
8.2.
H2O
!
18TYPENSCHILD
DE Beispiel Typenschild
- Seriennummer
EN Example Type label - Serial
number
FR Example Plaque signalétique -
Numèro de serie
TRISPORT AG
Boesch 67
CH 6331 Huenenberg
A/N 77777-777
88888-888
44444-444
S/N 7777777
8888888 77777
4444444 88888 7777
44444 8888
4444
DIN EN ISO 20957-1:2014
DIN EN ISO 20957-7:2017,
20957-8:2017, SS
20957-4:2017, VV
AA
max. ### kg
19ERSATZTEILBESTELLUNG REGATTA 500
RO1031-100 RO1031-100
REGATTA 500 REGATTA 500
1 1x * 68001890 33 – –
2 1x * 68001892 34 1x 69050024
3 1x * 69050010 35 1x 69050026
4 1x * 69050008 36 1x 69050025
5 1x 70001005 37 1x 69050027
6 1x * 69050053 38 - -
7 1x 69050029 39 1x 69050022
8 1x * 69050028 40 1x 69050021
9 1x 69050023 41 1x * 70010002
10 1x * 69050016 42 1x * 70001003
11 1x * 69050017 43 1x * 70001004
12 1x 69050031 44 1x * 69050054
13 1x 68001893 45 1x * 69050051
14 1x 69050032
15 1x 69050004
16 1x * 69050005
17 1x * 69050007
18 1x 69050006
19 1x * 69050019
20 1x 69050014
21 1x 69050015
22 1x 69050009
23 1x 69050013
24 1x 69050020
25 1x 69050033
26 1x 69050012
27 1x * 69050037
28 1x * 69050034
29 1x 69050035
30 1x 69050038
31 1x 69050036
32 1x 68709770
20ERSATZTEILBESTELLUNG REGATTA 500
21REGATTA 300 I RO1030-100 1 3
REGATTA 500 I RO1031-100
Computer-/Trainingsanleitung, Bedienung, Biomechanik DEUTSCH 2
Computer/training instructions, handling, biomechanics ENGLISH 15
Notice d‘utilisation de l‘ordinateur/instructions d‘entraînement, 28
FRANÇAIS
mode d‘emploi, biomécanique
Update:
www.kettlersport.comKETTLER | INHAlTsverzeICHNIs
INHAlTsverzeICHNIs
GrUNDlAGeN Der BeDIeNUNG ......................................................... 3
TrAININGsNAvIGATION..................................................................... 4
erKlÄrUNG Der TrAININGsPArAMeTer ............................................. 5
JUsTIereN Der eINHeITeN................................................................... 6
BlUeTOOTH FUNKTIONeN .................................................................. 6
verNeTzTes TrAINING ...................................................................... 7
BeFÜllUNG WAsserTANK (NUr REGATTA 500)................................... 7
sTANDOrT Des GerÄTes .................................................................... 8
COCKPITversTellUNG........................................................................ 8
AUFsTelleN UND BeWeGeN Des GerÄTes ......................................... 9
TrAININGsANleITUNG ..................................................................... 10
BIOMeCHANIK ................................................................................. 13
DE
2 DeUTsCHKETTLER | GrUNDlAGeN Der BeDIeNUNG
GrUNDlAGeN Der BeDIeNUNG
1 Aktivierung des Trainingscomputers
Der Trainingscomputer benötigt zur spannungsversorgung 2 x 1,5v AA Batterien. Dieser ist
mit einer Folie gesichert. Öffnen sie das Batteriefach und ziehen sie die Folie heraus. Der Trai-
ningscomputer kann daraufhin entweder durch Drücken der reset-Taste oder durch ziehen des
ruderseils gestartet werden.
2 Allgemeines
Ihr rudergerät ist übersichtlich und einfach zu bedienen. es gibt einen zentralen Trainingsmodus
mit dem sie Ihr Training eindeutig und ohne Menüführung starten können.
verwenden sie z.B. einen Bluetooth Herzfrequenz sensor um ihren Puls zu messen oder ver-
binden sie sich mit einem smartphone/ Tablet um zusätzliche Inhalte über eine Fitness App zu
bekommen.
Weitere Informationen finden sie in den Unterpunkten der Anleitung.
Batterieanzeige Bluetooth-Anzeige
500 m-Zeit
Trainingszeit
Bremsstufe Trainingspuls
(nur REGATTA 300)
DE Ruderschläge/Minute Trainingsdistanz
Aktivität pro Schlag Energieverbrauch
Reset-Taste
3 DeUTsCHTrAININGsNAvIGATION | KETTLER
TrAININGsNAvIGATION
Nach dem einschalten erscheint der Willkommensbildschirm. Dieser leitet sie nach drei sekun-
den automatisch zum Trainingsmodus, in dem sie Ihr Training beginnen können.
1 Start des Trainings
sie stehen unmittelbar vor dem Training. Das Display zeigt alle Trai-
ningsdaten an. Alle Werte, abgesehen vom Widerstandslevel und von
der Pulsanzeige, starten bei null. sobald der erste ruderschlag erkannt
wird, beginnt das Training und die Trainingszeit startet. Ändern sie
Ihren Widerstand manuell über den Handknauf.
entscheiden sie, ob sie sich über Bluetooth mit dem Computer verbin-
den oder ob sie ein freies Training durchführen möchten. Weitere In-
formationen über die Bluetooth verbindung finden sie unter Bluetooth
Funktionen.
2 Training
Der Trainingsmodus ermöglicht Ihnen einen Überblick über alle notwen-
digen Trainingsdaten. stoppen sie das Training, befinden sie sich im
Pause-Modus. Beendet wird das Training über einen kurzen Druck auf
die reset-Taste. Daraufhin gelangen sie zurück zum Trainingsstart.
sofern sie einen Bluetooth Brustgurt oder Herzfrequenzsensor tragen,
verbindet sich der Trainingscomputer automatisch mit dem sensor. Wei-
tere Informationen finden sie im Folgenden unter Bluetooth Funktionen.
3 Pause
sobald das rudergerät während des Trainings keine ruderschläge
mehr erkennt, befinden sie sich im Pause-Modus und es werden Durch-
schnittswerte für die 500m zeit, für die Anzahl an ruderschlägen pro
Minute und für die Trainingsaktivität angezeigt. Die Trainingsdaten des
energieverbrauchs, der zurückgelegten strecke, des Widerstandslevels DE
und der zeit bleiben bestehen. Die Pulsanzeige zeigt konstant den ak-
tuellen Trainingspuls an. setzen sie Ihr Training mit einem erneuten ru-
derschlag fort.
4 Standby
Durch einen langen Tastendruck auf die reset-Taste schaltet sich der
Trainingscomputer aus. Nach mehr als 4 Minuten ohne Benutzung der
Trainingsanzeige wird ebenfalls automatisch ausgeschaltet. Wecken
sie das Display auf, indem sie die reset-Taste erneut drücken.
Hinweis: Nach einer Pause von über 4 Minuten starten die Trai-
ningswerte bei null. Sofern die Pause kürzer ist, werden die Daten
aus dem vorherigen Training fortgeführt.
DeUTsCH 4KETTLER | erKlÄrUNG Der TrAININGsPArAMeTer
erKlÄrUNG Der TrAININGsPArAMeTer
In der Trainingsanzeige lassen sich die Trainingswerte beim rudern able-
sen. Im Folgenden finden sie eine kurze erläuterung:
1 500m
Im markierten Feld des Displays wird Ihnen die zeit, die sie für 500m
benötigen, angezeigt. es dient als referenz für Ihre Geschwindigkeit.
2 BPM und SPM
Der BPM-Wert vermittelt Ihnen die Anzahl der Pulsschläge pro Minute
und unter sPM ist die Anzahl Ihrer ruderschläge pro Minute zu verste-
hen.
⚠ Warnhinweis: Herzfrequenzüberwachungs-
systeme können ungenau sein. Übermäßiges
Training kann zu ernsthaften verletzungen oder
zum Tod führen. Wenn sie sich einer Ohnmacht
nahe fühlen, ist das Training sofort zu unterbre-
chen.
3 Activity
Das Feld signalisiert Ihnen eine Durchschnittsaktivität pro schlag. Diese
hängt unter anderem von der schlagfrequenz Ihres ruderzuges und
dem Bremswiderstand ab und dient als vergleich zwischen den
schlägen.
DE
4 KJ/ Kcal
Der Wert „kJ“ oder „kcal“ informiert sie über den kumulierten energie-
verbrauch des aktuellen Trainings.
5 DeUTsCHJUsTIereN Der eINHeITeN | KETTLER
JUsTIereN Der eINHeITeN
Auf der rückseite des Displays befinden sich zwei schiebe-schalter, mit
denen sie die von Ihnen präferierten längen- und energieeinheiten ein-
stellen können. schieben sie den schalter nach rechts, zeigt Ihnen das
Display Kilometer als längeneinheit und Kilokalorien als energieeinheit
an. Die linke schalterposition wird Ihnen die energie in Kilojoule und
die länge in Meilen ausweisen.
BlUeTOOTH FUNKTIONeN
Das KeTTler rudergerät können sie zur Herzfrequenzüberwachung mit
einem Brustgurt koppeln, der die Bluetooth® low energy Technologie unter-
stützt. zusätzlich lässt sich das KeTTler rudergerät mit smartphones, Tab-
lets oder PCs ab Bluetooth v4.0 verbinden, was das Training mit vielfältigen
Fitness APPs oder PC softwares ermöglicht.
es ist jeweils nur einer der beiden Modi auszuwählen.
1 Anwendung des APP-Modus
vor dem Training blinkt das Bluetooth symbol. Möchten sie Ihren Trai-
ningscomputer mit einem smartphone und entsprechender App kop-
peln, suchen sie vor Beginn des Trainings innerhalb des smartphones/
Tablets nach dem rudergerät. sobald eine verbindung aufgebaut wur-
de, leuchtet zusätzlich das Bluetooth symbol und das APP symbol kon-
stant auf. Ihr Training kann im APP-Modus beginnen.
Befinden sie sich im APP Modus, kann ein Bluetooth Herzfrequenzsen-
sor nicht zusätzlich über den Trainingscomputer verbunden werden.
TIPP: Möchten sie trotzdem nicht auf Ihre Herzfrequenzanzeige verzich-
ten, koppeln sie doch Ihren sensor direkt mit dem smartphone oder
Tablet.
DE
Anwendung des Puls-Modus (HR Sensor)
Möchten sie einen Herzfrequenzsensor mit dem Trainingscomputer ver-
binden, starten sie ihr Training wie in den ersten schritten beschrieben
und warten sie, bis das entsprechende Herzsignal in der Trainingsan-
zeige sichtbar wird. Dieser vorgang kann mehrere sekunden andauern.
stellen sie sicher, dass ihr Puls-sensor aktiv ist und dass sie ihn wie
vorgeschrieben am Körper tragen.
Der Trainingscomputer sucht Ihren sensor in unmittelbarer Umgebung
und verbindet sich automatisch mit diesem. sollte Ihr signal verloren
gehen, wird im Abstand von wenigen Minuten ein weiteres Mal nach
Geräten gesucht und erneut verbunden.
Wiederholen sie diesen vorgang bei einem erneuten Training.
TIPP: Ihr Herzfrequenzsensor wird nur im Training automatisch gefun-
den und verbunden.
DeUTsCH 6KETTLER | verNeTzTes TrAINING
verNeTzTes TrAINING
Für alle die eine besondere Trainingsmotivation suchen.
Nutzung der KETTMAPS APP
Mit KeTTMAPs laden sie viele videorealistische strecken als Trainings-
motivation auf Ihr smartphone oder Tablet. Bereits in der kostenlosen
Basisversion stehen mehrere stecken zur verfügung. Gegen eine gerin-
ge monatliche Gebühr haben sie den vollen zugriff auf die Datenbank
mit mehreren Tausend strecken. Auch eigene streckenvideos können
hochgeladen und zur Datenbank hinzugefügt werden. Die verbindung
erfolgt entweder per Bluetooth oder aber über die Frontkamera Ihres
smartphones oder Tablets, das Ihre Geschwindigkeit ablesen kann. sie
finden die APP im Apple store oder im Google Play store unter KeTT-
MAPs.
sobald weitere Apps mit Ihrem KeTTler rudergerät kompatibel sind,
werden sie unter www.kettlersport.com informiert.
BeFÜllUNG WAsserTANK (NUr REGATTA 500)
zum Befüllen und entleeren des Wassertanks benutzen sie bitte die mitgelieferte Pumpe. Der
Tank sollte im Optimalfall mit destilliertem Wasser (alternativ: leitungswasser) gefüllt werden
und der Wasserstand muss sich immer innerhalb der gekennzeichneten skala befinden. Öffnen
sie dazu den schraubverschluss des Tanks, führen sie die Pumpe durch die Öffnung und
pumpen sie Wasser aus einem anderen Behälter in Ihren ruderer hinein. Um das Gerät bei der
verwendung von leitungswasser vor Bakterien, Algen oder Ähnlichem zu schützen, sollten sie
im Wasser außerdem immer eine Chlortablette auflösen. es wird empfohlen alle 3 bis 6 Monate
das Chlorwasser mit neuem Wasser auszutauschen. sofern sich das Wasser dennoch verfärbt,
ist es sofort auszuwechseln.
DE
Cl
⚠ Warnhinweis:
Kein Trinkwasser!
H2O
7 DeUTsCHsTANDOrT Des GerÄTes | KETTLER
sTANDOrT Des GerÄTes
Das rudergerät muss auf einem ebenen und waagerechten Untergrund aufgestellt werden.
Der standort des Geräts muss so gewählt werden, dass ausreichende sicherheitsabstände zu
Hindernissen gewährleistet sind. In unmittelbarer Nähe von Hauptlaufrichtungen sollte das Auf-
stellen unterbleiben. Der Freibereich muss umlaufend mindestens 1 Meter größer als der Übungs-
bereich sein.
Achten sie darauf, dass sich niemand außer dem Trainierenden im Freibereich aufhält, solange
das Gerät in Bewegung ist.
1m
1m
Übungsbereich
Freibereich
DE
COCKPITversTellUNG
lösen sie den schnellspanner (1), um das Cockpit in die gewünschte Höhe zu verstellen (2).
Arretieren sie anschließend den schnellspanner wieder (3).
1 2 3
DeUTsCH 8KETTLER | AUFsTelleN UND BeWeGeN Des GerÄTes
AUFsTelleN UND BeWeGeN Des GerÄTes
1 Aufstellen
2 Bewegen
DE
9 DeUTsCHTrAININGsANleITUNG | KETTLER
TrAININGsANleITUNG
Vorteile des Rudertrainings
rudern steigert die leistungsfähigkeit des Herz-/Kreislaufsystems und verbessert zudem die sau-
erstoffaufnahmefähigkeit des Körpers. Man kann ferner eine Fettreduktion erreichen, da durch
das Ausdauertraining vermehrt Fettsäuren zur energiebereitstellung herangezogen werden. ein
weiterer vorteil des rudertrainings liegt darin, dass alle wichtigen Muskelgruppen des Körpers
gekräftigt werden. Als besonders wertvoll kann aus orthopädischer sicht die durch das ruder-
training hervorgerufene Kräftigung der rücken- und schultermuskulatur genannt werden. Gerade
die Kräftigung der rückenmuskulatur wirkt den heutzutage häufig auftretenden orthopädischen
Problemen in diesem Bereich entgegen. Das Training mit dem rudergerät stellt somit ein umfang-
reiches Fitnesstraining dar. es steigert die Ausdauer und Kraft und ist gelenkschonend.
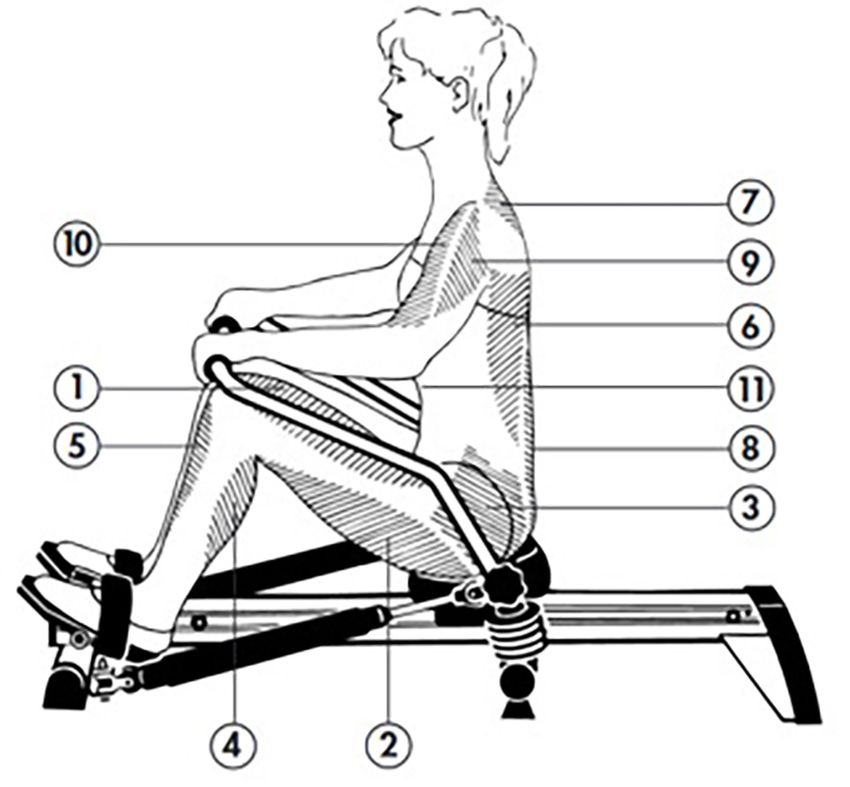
Welche Muskeln werden beansprucht?
Die ruderbewegung belastet die gesamte Muskulatur des Körpers. einige Muskelgruppen wer-
den allerdings besonders trainiert. sie sind in der Abbildung aufgeführt.
Wie die Abbildung zu erkennen gibt, werden
beim rudern Ober- und Unterkörper aktiviert.
Innerhalb der Beinmuskulatur beansprucht
das rudern besonders den Beinstrecker (1),
den Beinbeuger (2) sowie die schienbein-
und Wadenmuskulatur (5, 4). Durch die Hüft-
streckbewegung wird beim rudern ebenfalls
die Gesäßmuskulatur (3) belastet. Im Bereich
der rumpfmuskulatur spricht das rudern vor-
nehmlich den breiten rückenmuskel (6) und
den rückenstrecker (8) an. Ferner trainiert
man den Trapezmuskel (7), den Deltamuskel
(9), den Armbeuger (10) und die Bauchmus-
kulatur (11).
DE
Planung und Steuerung Ihres Rudertrainings
Die Grundlage für die Trainingsplanung ist Ihre aktuelle körperliche leistungsfähigkeit. Mit einem
Belastungstest kann Ihr Hausarzt Ihre persönliche leistungsfähigkeit diagnostizieren, der die Basis
für Ihre Trainingsplanung darstellt. Haben sie keinen Belastungstest durchführen lassen, sind in
jedem Fall hohe Trainingsbelastungen zu vermeiden. Folgenden Grundsatz sollten sie sich für die
Planung merken: Ausdauertraining wird sowohl über den Belastungsumfang als auch über die
Belastungshöhe/ -intensität gesteuert.
Zur Trainingsintensität
Die Belastungsintensität kann beim rudertraining über die Pulsfrequenz Ihres Herzens kontrolliert
werden. Die maximale Herzfrequenz pro Minute entspricht einem Pulsschlag aus der Differenz
von 220 und dem lebensalter. Diese Pulsfrequenz sollten sie während des Trainings keinesfalls
überschreiten.
DeUTsCH 10KETTLER | TrAININGsANleITUNG
Trainingsempfehlung
zur optimalen Trainingssteuerung empfiehlt sich ein Training in folgenden Pulszonen:
60-70 % der maximalen Herzfrequenz
• steigerung der Grundlagenausdauer und zur regeneration
• Bei dieser Belastung gewinnt der Körper den größten Anteil der benötigten energie aus der
Fettverbrennung
• Angenehme, ruhige Atmung, geringe muskuläre Belastung, leichtes schwitzen
• Für Jedermann empfohlen
80-90 % der maximalen Herzfrequenz
• erhöhung der maximalen leistungsfähigkeit
• Muskuläre ermüdung und hohe Atemfrequenz
• Der Körper kann den sauerstoffbedarf nicht mehr decken, für sehr fitte Personen und kurze
Trainingseinheiten geeignet.
Die Intensität wird bei dem Training mit dem rudergerät einerseits über die schlagzahl und an-
dererseits über den Widerstand des seilzuges geregelt. Mit steigender schlagzahl erhöht sich
die Intensität des Trainings. sie nimmt ebenfalls zu, wenn der Widerstand erhöht wird. Wählen
sie als Anfänger grundsätzlich eine geringe Intensität, d.h. die schlagfrequenz sollte unter 20
schlägen pro Minute liegen und der Widerstand sollte gering eingestellt sein. vermeiden sie
als Anfänger eine zu hohe schlagzahl oder ein Training mit zu großem Widerstand. versuchen
sie Ihre individuelle schlagzahl und den optimalen Widerstand des ruderseilzuges mit Hilfe der
empfohlenen Pulsfrequenz abzustimmen.
Hinweise zur manuellen Pulsmessung
sollten sie ohne elektronische Pulsmessung trainieren, kontrollieren sie Ihre Pulsfrequenz wäh-
rend des Trainings an drei zeitpunkten. vor dem Training wird der ruhepuls festgestellt. Während
des Trainings (ca. 10 Minuten nach Trainingsbeginn) überprüft man den Belastungspuls, der bei
richtiger Belastungsintensität in der Nähe der Trainingsempfehlung liegt. eine Minute nach Trai-
ningsabschluss messen sie den sogenannten erholungspuls. Die drei Werte tragen sie in der da-
für vorgesehenen Tabelle ein. ein regelmäßiges Training führt zu einem Absinken des ruhe- und
DE Belastungspulses. Hierin ist eine der zahlreichen positiven Auswirkungen des Ausdauertrainings
zu sehen. Da das Herz langsamer schlägt, steht mehr zeit für die Füllung der Herzkammern und
die Durchblutung der Herzmuskulatur (durch die Herzkranzgefäße) zur verfügung. ertasten sie
Ihren Puls an der Halsschlagader oder am Handgelenk in verlängerung des Daumens. zählen sie
Ihren Pulsschlag 10 sekunden und multiplizieren sie diesen Wert mit dem Faktor 6, dann erhalten
sie die Pulsfrequenz pro Minute.
Messen sie Ihre Pulsfrequenz zu drei zeitpunkten:
1. vor dem Training = ruhepuls
2. 10 Minuten nach Trainingsbeginn = Trainings- oder Belastungspuls
3. eine Minute nach dem Training = erholungspuls
Bei einem regelmäßigen Training werden sie feststellen, dass Ihr erholungspuls deutlich unterhalb
des Belastungspulses liegt. Dies ist ein Indikator für eine gute Herz-/Kreislauf-Fitness.
11 DeUTsCHTrAININGsANleITUNG | KETTLER
Zum Belastungsumfang
Unter dem Belastungsumfang versteht man die Dauer einer Trainingseinheit und deren Häufigkeit
pro Woche. Als trainingswirksam werden von seiten der sportmedizin folgende Belastungsum-
fänge erachtet:
Trainingshäufigkeit Trainingsdauer
täglich 10 Minuten
2 – 3 x wöchentlich 30 Minuten
1 – 2 x wöchentlich 60 Minuten
Trainingseinheiten von 20 - 30 Min. eignen sich nicht für den Anfänger. Der Anfänger steigert
den Belastungsumfang seines Trainings nur allmählich. Gestalten sie die ersten Trainingseinhei-
ten relativ kurz. Als eine günstige variante des Anfängertrainings erachtet man das Intervalltrai-
ning. Das Anfängertraining kann für die ersten 4 Wochen folgendermaßen konzipiert sein:
1.-2. Woche Umfang einer Trainingseinheit
Trainingshäufigkeit 3 Minuten rudern
3 x wöchentlich 1 Minute Pause
3 Minuten rudern
1 Minute Pause
3 Minuten rudern
3.-4. Woche Umfang einer Trainingseinheit
Trainingshäufigkeit 5 Minuten rudern
4 x wöchentlich 1 Minute Pause
5 Minuten rudern
Im Anschluss an dieses 4-wöchige Anfängertraining können sie täglich 10 Minuten ohne Pause
mit dem rudergerät trainieren. Wenn sie im späteren verlauf das 3 x wöchentliche Training von
20 - 30 Minuten bevorzugen, sollte zwischen zwei Trainingstagen ein trainingsfreier Tag geplant
werden. DE
Trainingsbegleitende Gymnastik
eine optimale ergänzung des rudertrainings ist in der Gymnastik zu sehen. Beginnen sie das
Training grundsätzlich mit einer Aufwärmphase.
Aktivieren sie Ihren Kreislauf einige Minuten durch leichte ruderübungen (10-15 schläge pro Mi-
nute). Beginnen sie dann mit Dehnübungen. Danach folgt das eigentliche rudertraining. Beendet
wird das Training ebenfalls durch leichte ruderübungen. Dehnübungen runden die Abwärmpha-
se ab.
DeUTsCH 12KETTLER | BIOMeCHANIK
BIOMeCHANIK
Um ein effektives und zugleich gesundes Training zu gewährleisten, ist die richtige Position auf
dem Gerät unabdingbar. Achten sie daher darauf, dass sie Ihr Training wie in der folgenden
skizze dargestellt, durchführen.
1
2
DEBIOMeCHANIK | KETTLER
DE
DeUTsCH 14KETTLER | Contents
Contents
BAsICs oF oPeRAtIon..................................................................... 16
tRAInInG nAVIGAtIon ................................................................... 17
eXPLAnAtIon oF tHe tRAInInG PARAMeteRs .................................. 18
ADJUstInG tHe UnIts ...................................................................... 19
BLUetootH FUnCtIons .................................................................. 19
tRAInInG on tHe netWoRK ......................................................... 20
FILLInG tHe WAteR tAnK (REGATTA 500 onLY) ................................ 20
LoCAtIon oF tHe MACHIne ........................................................... 21
CoCKPIt ADJUstMent ..................................................................... 21
settInG UP AnD MoVInG tHe MACHIne ........................................ 22
tRAInInG InstRUCtIons................................................................. 23
BIoMeCHAnICs ............................................................................... 26
EN
15 enGLIsHKETTLER | BAsICs oF oPeRAtIon
BAsICs oF oPeRAtIon
1 Activating the training computer
As voltage supply, the training computer requires 2 x 1.5V AA batteries. It is secured by means
of foil. open the battery compartment and pull out the foil. the training computer can then be
started either by pressing the Reset button or by pulling the rowing rope.
2 General information
Your rowing machine is clearly arranged and easy to operate. there is a central training mode
by means of which you can easily start your training without menu navigation.
You can, for example, use a Bluetooth heart frequency sensor to measure your pulse or establish
a connection to a smartphone / tablet to get more contents via a fitness app.
You will find further information in the sub-points of the instruction manual.
Battery display Bluetooth display
500 m time
Training time
Braking level Training pulse
(only REGATTA 300)
Strokes/minute Training distance
Activity per stroke Energy consumption
EN
Reset button
16 enGLIsHtRAInInG nAVIGAtIon | KETTLER
tRAInInG nAVIGAtIon
once you have switched the computer on, the welcome screen appears. After three seconds,
this screen automatically takes you to the training mode, in which you can begin your training.
1 Starting the training
You are just about to start your training. the display shows all training
data. All values – except for the resistance level and the pulse display –
start at zero. As soon as the first oarstroke is detected, the training
begins and the training time starts. Change your resistance manually
using the hand knob.
Decide whether you want to establish a connection to the computer via
Bluetooth or complete a free training. For more information regarding
the Bluetooth connection please refer to Bluetooth functions.
2 Training
the training mode gives you an overview of all necessary training data.
If you stop the training, you will find yourself in pause mode. the train-
ing is ended by briefly pressing the Reset button. this will take you back
to the training start.
If you wear a Bluetooth chest belt or heart frequency sensor, the training
computer will automatically establish a connection to the sensor. For
more information please refer to the following under Bluetooth functions.
3 Pause
As soon as the rowing machine no longer detects any strokes during the
training, you find yourself in the pause mode and average values will
be displayed for the 500 m time, for the number of strokes per minute
and for the training activity. the training data of energy consumption,
the distance covered, the resistance level and the time remain the same.
the pulse display constantly shows the current training pulse. Continue
your training with a new oarstroke.
EN
4 Standby
Holding down the Reset button switches off the training computer. After
more than 4 minutes without using the training display, it also switches
off automatically. Awaken the display be pressing the Reset button once
again.
Note: After a pause of more than 4 minutes, the training values will
start at zero. If the pause is shorter, the data from the previous train-
ing will be continued.
enGLIsH 17KETTLER | eXPLAnAtIon oF tHe tRAInInG PARAMeteRs
eXPLAnAtIon oF tHe tRAInInG PARAMeteRs
You can read off the training values from the training display during row-
ing. the following is a short explanation:
1 500m
In the marked field of the display, you are shown the time that you need
for 500 m. It serves as reference for your speed.
2 BPM and SPM
the BPM value tells you the number of pulse beats per minute and sPM
is the number of your strokes per minute.
⚠ Warning: Heart rate monitoring systems can
be inaccurate. excessive training can lead to
serious injuries or to death. If you feel faint,
the training is to be interrupted immediately.
3 Activity
the field signals you an average activity per stroke. It is, amongst oth-
ers, dependent on the stroke frequency of your stroke and the braking
resistance and serves as comparison between the strokes.
EN
4 KJ/ Kcal
the value “kj” or “kcal” informs you about the cumulated energy con-
sumption of the current training session.
18 enGLIsHADJUstInG tHe UnIts | KETTLER
ADJUstInG tHe UnIts
on the backside of the display, there are two slide switches by means
of which you can adjust your preferred length and energy units. Push
the switch to the right and the display will show you kilometres as length
unit and kilocalories as energy unit. the left switch position will indicate
the energy in kilojoules and the length in miles.
BLUetootH FUnCtIons
You can pair the KettLeR rowing machine with a heart rate monitor device
such as a chest strap which supports Bluetooth® low energy technology.
Additionally, the KettLeR rowing machine can be connected to smart-
phones, tablets and computers as of Bluetooth v4.0, which enables training
with a variety of fitness APPs or computer software.
only one of the two mode can be selected at one time.
1 Use of the APP mode
Before the training, the Bluetooth symbol flashes. If you want to con-
nect your training computer to a smartphone and a corresponding app,
search the rowing machine in the smartphone / tablet before starting
the training. As soon as a connection has been established, the Blue-
tooth symbol and the APP symbol will moreover be permanently lit. Your
training can begin in APP mode.
If you are in APP mode, a Bluetooth heart rate sensor cannot be connect-
ed additionally via the training computer.
tIP: If you do not want to do without your heart rate display, connect
your sensor directly to the smartphone or tablet.
Use of the pulse mode (HR sensor)
If you want to connect a heart frequency sensor to the training comput-
er, start your training as described in the first steps and wait until the EN
corresponding heart signal becomes visible in the training display. this
process may take several seconds.
ensure that your pulse sensor is active and that you are wearing it on
your body as specified.
the training computer will look for your sensor in the direct vicinity and
will the automatically establish a connection to it. If your signal is lost,
the computer will look for devices and re-establish a connection at an
interval of few minutes.
Repeat this process in the case of a new training session.
TIP: Your heart frequency sensor will only be automatically found and
connected during the training.
enGLIsH 19KETTLER | tRAInInG on tHe netWoRK
tRAInInG on tHe netWoRK
For everyone who is looking for a special training motiva-
tion.
Use of the KETTMAPS APP
With KettMAPs, you can load many video-realistic distances as train-
ing motivation onto your smartphone or tablet. even the free basic ver-
sion offers several distances. For a small monthly fee, you will gain
full access to the data base with several thousands of distances. even
personal distance videos can be uploaded and added to the data base.
the connection can be done via Bluetooth or via the front camera of
your smartphone or tablet which is able to read your velocity. You will
find the APP in the Apple store or in the Google Play store under Kett-
MAPs.
As soon as further apps are compatible with your KettLeR rowing machine,
you will be informed at www.kettlersport.com.
FILLInG tHe WAteR tAnK (REGATTA 500 ONLY)
Please use the supplied pump to fill and drain the water tank. Ideally, the tank should only be
filled with distilled water (alternative: tap water) and the water level must always be within the
marked scale. For this purpose, remove the plug from the tank surface, insert the pump through
the opening and pump water from another tank into your rowing machine. In order to protect the
device from bacteria, algae or the like when using it with tap water, you should always dissolve
a chlorine tablet in the water. It is recommended to replace the chlorine water with new water
every 3 to 6 months. If the water still changes its colour, it has to be replaced immediately.
Cl
EN
⚠ Warning:
no drinking water!
H2O
20 enGLIsHLoCAtIon oF tHe MACHIne | KETTLER
LoCAtIon oF tHe MACHIne
the rowing machine must be positioned on an even, stable surface.
the location of the machine must be chosen so that sufficient safety distances to obstacles are
ensured. It should not be set up in direct proximity to main walking directions. the free area must
be at least 1 metre larger than the exercise area all around.
ensure that no-one other than the person training is in the free area as long as the machine is in
motion.
1m
1m
exercise area
free area
CoCKPIt ADJUstMent
Release the quick clamp (1) to adjust the cockpit to the desired height (2). then lock the quick
EN
clamp into place again (3).
1 2 3
enGLIsH 21KETTLER | settInG UP AnD MoVInG tHe MACHIne
settInG UP AnD MoVInG tHe MACHIne
1 Setup
2 Moving
EN
22 enGLIsHtRAInInG InstRUCtIons | KETTLER
tRAInInG InstRUCtIons
Advantages of rowing training
Rowing increases the efficiency of the cardiovascular system and also improves the body’s oxy-
gen intake capacity. Further, one can achieve fat reduction, since due to the endurance training
an increased amount of fatty acids are used to supply energy. Another advantage of rowing train-
ing is that all the important muscle groups of the body are strengthened. From an orthopaedic
perspective, the strengthening of the back and shoulder muscles produced by the rowing training
can be mentioned as being particularly valuable. the strengthening of the back muscles in par-
ticular counteracts the orthopaedic problems in this area that frequently occur nowadays. Hence,
training with a rowing machine constitutes comprehensive fitness training. It increases endurance
and strength and is joint-friendly.
Which muscles are called into action?
the rowing exercise puts pressure on the body’s entire musculature. However, a few muscle
groups receive particular training. these are shown in the illustration.
As the illustration shows, rowing activates the
upper and lower body. Within the leg mus-
cles, rowing places particular demands on
the leg extensor (1), the biceps femoris (2)
as well as the shin and calf muscles (5, 4).
Due to the hip-stretching movement, pressure
is also placed on the gluteal muscles (3) in
rowing. In the area of the trunk musculature,
rowing activates primarily the wide back
muscle (6) and the musculus erector spinae
(8). Further, one trains the trapezius (7), the
deltoid (9), the brachialis (10) and the mus-
cles of the abdomen (11).
EN
Planning and controlling your rowing training
the basis for training planning is your current physical performance level. Your doctor can di-
agnose your personal ability with an exertion test which can form the basis for your training
planning. If you have not undergone an exertion test, you should avoid high training exertion in
any circumstances. You should note the following for your planning: endurance training is also
governed by the scope of exertion as well as the level/intensity of exertion.
Training intensity
the exercise intensity can be controlled by your heart rate during rowing training. the maximum
heart rate per minute corresponds to a pulse rate from the difference of 220 and your age. Under
no circumstances should you exceed this pulse rate during the training.
enGLIsH 23KETTLER | tRAInInG InstRUCtIons
Training recommendation
For the optimal training management, training in the following pulse zones is recommended:
60–70% of the maximum heart rate
• Increase in basic endurance and regeneration
• With this exertion, the body gains the greatest share of the required energy from the burning
of fat
• Pleasant, calm breathing, low muscular exertion, light sweating
• Recommended for everyone
80–90 % of the maximum heart rate
• Increase of maximum performance ability
• Muscular fatigue and high breathing rate
• the body can no longer cover the oxygen requirements; suitable for very fit persons and short
training units.
on the one hand, the intensity of rowing machine training is governed by the beat, and on the
other hand, by the resistance of the cable. As the beat rises, the intensity of the training increases.
It also increases if the resistance is increased. As a beginner, choose a low intensity, i.e. the pulse
rate should be below 20 beats per minute and the resistance should be set low. As a beginner,
avoid too high a beat or training with resistance that is too high. try to find your personal beat
and the optimal resistance of the oar cable using the recommended pulse rate.
Advice on manual pulse measurement
should you train without electronic pulse measurement, check your pulse rate at three points
in time during the training. the resting heart rate is established before the training. During the
training (approx. 10 minutes after the start of the training), one checks one’s exertion heart rate,
which, if the correct exercise intensity is deployed, should be close to the training recommenda-
tion. A minute after the end of the training, you measure the recovery heart rate. You enter the
three values in the table provided for this. Regular training leads to a reduction in the resting and
exertion heart rate. this is one of the numerous positive effects of endurance training. since the
heart beats more slowly, more time is available for filling the ventricles and the circulation of the
cardiac musculature (through the coronary vessels). Feel your pulse on your carotid or on your
wrist whilst extending your thumb. Count your pulse rate for 10 seconds and multiply this figure
EN by 6; this gives you your pulse rate per minute.
Measure your pulse rate at three points in time:
1. Before the training = resting heart rate
2. 10 minutes after the start of the training = training or exertion heart rate
3. one minute after the training = recovery heart rate
If you train regularly, you will see that your recovery heart rate is significantly lower than your
exertion heart rate. this is an indicator of good cardiovascular fitness.
24 enGLIsHtRAInInG InstRUCtIons | KETTLER
The scope of exertion
the scope of exertion is the duration of a training unit and its frequency per week. sports medical
professionals consider the following scopes of exertion to be effective training:
Training frequency Training duration
daily 10 minutes
2 – 3 x weekly 30 minutes
1 – 2 x weekly 60 minutes
training units of 20 – 30 min. are not suitable for beginners. Beginners should increase the scope
of exertion of their training only gradually. Make the first training units relatively short. Interval
training is considered a favourable variant of beginner training. Beginner training can be ar-
ranged in the following way for the first 4 weeks:
1st-2nd week Scope of a training unit
training frequency 3 minutes of rowing
3 x weekly 1-minute break
3 minutes of rowing
1-minute break
3 minutes of rowing
3rd-4th week Scope of a training unit
training frequency 5 minutes of rowing
4 x weekly 1-minute break
5 minutes of rowing
After this 4-week beginner training, you can train with the rowing machine for 10 minutes every
day without interruption. If, at a later stage, you prefer to do the 3 x weekly training of 20 –
30 minutes, a training-free day should be planned between two training days.
Gymnastics accompanying the training
Gymnastics can be considered an optimal compliment to rowing training. Begin the training with
a warm-up phase.
Activate your circulation for a few minutes by doing light rowing exercises (10 – 15 strokes per EN
minute). then begin with stretching exercises. then comes the actual rowing training. the training
is also ended with light rowing exercises. stretches complete the warm-down phase.
enGLIsH 25KETTLER | BIoMeCHAnICs
BIoMeCHAnICs
to ensure effective and healthy training, the correct position on the machine is essential. there-
fore, ensure that you perform your training as depicted in the following sketch.
1
2BIoMeCHAnICs | KETTLER
EN
enGLIsH 27KETTLER | Table de MaTières
Table de MaTières
PriNCiPes de base de FONCTiONNeMeNT ...................................... 29
NaViGaTiON d’eNTraÎNeMeNT ....................................................... 30
eXPliCaTiON des ParaMèTres d’eNTraÎNeMeNT ............................. 31
aJUsTeMeNT des UNiTÉs.................................................................. 32
FONCTiONs blUeTOOTH.................................................................. 32
eNTraÎNeMeNT eN rÉseaU ............................................................ 33
reMPlissaGe dU rÉserVOir d’eaU (UNiQUeMeNT REGATTA 500) ..... 33
l’eMPlaCeMeNT de l’aPPareil .......................................................... 34
rÉGlaGe de la CabiNe ................................................................... 34
iNsTallaTiON eT dÉPlaCeMeNT de l’aPPareil .................................. 35
iNsTrUCTiONs d’eNTraÎNeMeNT..................................................... 36
biOMÉCaNiQUe ............................................................................... 39
FR
28 FraNÇaisKETTLER | PriNCiPes de base de FONCTiONNeMeNT
PriNCiPes de base de FONCTiONNeMeNT
1 Activation de l’ordinateur d’entraînement
2 piles aa de 1,5 V sont requises pour alimenter l’ordinateur d’entraînement. il est protégé par
un film. Ouvrez le compartiment à piles et retirez le film. après quoi, vous pouvez démarrer l’or-
dinateur d’entraînement soit en appuyant sur la touche reset, soit en tirant le cordon de l’aviron.
2 Généralités
le fonctionnement de votre rameur est clair et simple. Vous pouvez commencer votre entraîne-
ment de manière claire et sans navigation de menu dans le mode d’entraînement central.
Utilisez, p. ex., un capteur de fréquence cardiaque bluetooth pour mesurer votre pouls ou connec-
tez-vous à un smartphone / une tablette pour accéder aux contenus supplémentaires via une
application fitness.
Vous trouverez des informations supplémentaires dans les sous-chapitres de la notice.
Témoin de pile Indicateur Bluetooth
Temps 500 m
Temps de l’entraîne-
ment
Niveau de freinage Pouls d’entraînement
(uniquement REGATTA 300)
Coups de rames/
FR Distance d’entraîne-
minute
ment
Activité par coup Consommation
d’énergie
Touche Reset
29 FraNÇaisNaViGaTiON d’eNTraÎNeMeNT | KETTLER
NaViGaTiON d’eNTraÎNeMeNT
l’écran de bienvenue apparaît après la mise en marche. après 3 secondes, il vous guide auto-
matiquement au mode d’entraînement, dans lequel vous pouvez commencer votre entraînement.
1 Début de l’entraînement
l’entraînement va commencer. l’écran affiche toutes les données d’en-
traînement. Toutes les valeurs partent de zéro, sauf le niveau de résis-
tance et l’affichage de pouls. dès que le premier coup de rame est
reconnu, l’entraînement commence et le temps d’entraînement démarre.
Modifiez la résistance manuellement au moyen d’un bouton tournant.
décidez, si vous vous connectez à l’ordinateur via bluetooth ou si vous
préférez vous entraîner librement. Vous trouverez plus d’informations
sur la connexion bluetooth dans le chapitre Fonctions bluetooth.
2 Entraînement
le mode d’entraînement vous permet d’avoir un aperçu de toutes les
données d’entraînement nécessaires. si vous arrêtez l’entraînement,
vous vous retrouvez au mode de pause. Vous pouvez terminer l’entraî-
nement en appuyant brièvement sur la touche reset. après quoi, vous
revenez au début de l’entraînement.
si vous portez une sangle de poitrine ou un capteur de fréquence car-
diaque bluetooth, l’ordinateur d’entraînement se connecte automatique-
ment au capteur. Vous trouverez plus d’informations dans le chapitre
Fonctions bluetooth ci-après.
3 Pause
dès que le rameur ne détecte plus de coups de rames pendant l’entraî-
nement, vous vous retrouvez au mode de pause, et les valeurs moyennes
du temps de 500 mètres, du nombre de coups de rames par minute et
de l’activité d’entraînement s’affichent. les données d’entraînement de
la consommation d’énergie, de la distance parcourue, du niveau de
résistance et du temps ne changent pas. l’affichage du pouls indique
constamment le pouls d’entraînement actuel. Poursuivez votre entraîne-
ment par un nouveau coup de rame.
FR
4 Veille
Vous pouvez éteindre l’ordinateur d’entraînement en appuyant lon-
guement sur la touche reset. l’ordinateur s’éteint automatiquement si
l’affichage d’entraînement n’est pas utilisé pendant plus de 4 minutes.
ranimez l’écran en appuyant de nouveau sur la touche reset.
Remarque : Après une pause excédant 4 minutes, les valeurs d’en-
traînement partent de zéro. Si la pause est plus courte, les données
de l’entraînement sont reprises.
FraNÇais 30Vous pouvez aussi lire