HemoCue WBC Operating Manual Bedienungsanleitung Manuel d'utilisation Gebruiksaanwijzing - Patient Focus Africa
←
→
Transcription du contenu de la page
Si votre navigateur ne rend pas la page correctement, lisez s'il vous plaît le contenu de la page ci-dessous
HemoCue® WBC
Operating Manual
Bedienungsanleitung
Manuel d’utilisation
Gebruiksaanwijzing
GB/US                                                                                              DE

Table of Content                                                                                  Inhaltsverzeichnis
  HemoCue WBC system................................................... 5
                  ®
                                                                                                    HemoCue® WBC-System.................................................. 5
  Components..................................................................... 6                 Bestandteile...................................................................... 6
  Start Up............................................................................. 8           Inbetriebnahme............................................................... 8
  Set-up.............................................................................. 12           Einstellung...................................................................... 12
    Audio signal.............................................................................12         Tonsignal..................................................................................12
  Measuring....................................................................... 14               Messung.......................................................................... 14
    Capillary blood.........................................................................14          Kapillarblut..............................................................................14
  Measuring....................................................................... 22               Messung.......................................................................... 22
    Control material or venous blood......................................... 22                        Kontrollmaterial oder venöses Blut...................................... 22
  Set-up.............................................................................. 24           Einstellung...................................................................... 24
    Printer function...................................................................... 24           Druckerfunktion..................................................................... 24
  Maintenance................................................................... 26                 Wartung.......................................................................... 26
  Troubleshooting Guide.................................................. 28                        Anleitung zur Fehlersuche............................................ 32
  Specifications.................................................................. 44               Technische Daten........................................................... 57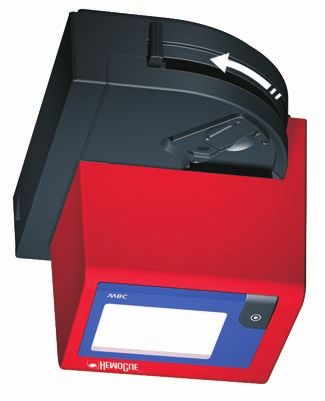
HemoCue® WBC system
HemoCue® WBC-System
Système HemoCue® WBC
HemoCue® WBC-systeem
Thank you for choosing the HemoCue WBC system. The system is indicated for use for quantitative determination of white blood cell (WBC) count
GB/US
in capillary or venous whole blood. The HemoCue WBC system is for In Vitro Diagnostic use only. The HemoCue WBC Analyzer is only to be used
with HemoCue WBC Microcuvettes. The HemoCue WBC system is indicated for use in clinical laboratories and for point-of-care settings.
All system components are designed and manufactured to provide maximum safety. Any other use of the system than indicated may
! impair the safety.
Vielen Dank dafür, dass Sie sich für das HemoCue WBC-System entschieden haben. Das System dient der Bestimmung der Anzahl an weißen
DE Blutkörperchen (WBK, englische Abkürzung WBC) in kapillarem oder venösem Vollblut. Das HemoCue WBC-System ist nur für den In-Vitro-
diagnostischen Gebrauch bestimmt. Der HemoCue WBC Analyzer darf nur in Verbindung mit HemoCue WBC Microcuvettes verwendet werden.
Das HemoCue WBC-System ist zur Verwendung in klinischen Laboratorien und im POCT vorgesehen.
Bei Entwicklung und Herstellung aller Systemkomponenten wird auf maximale Sicherheit geachtet. Wenn das System nicht wie angegeben
! verwendet wird, kann dies die Sicherheit beeinträchtigen.
Merci d’avoir choisi le système HemoCue WBC. L’utilisation du système est indiquée pour déterminer la quantité de globules blancs (WBC – white
FR blood cell) dans le sang capillaire ou le sang veineux total. Le système HemoCue WBC est destiné au diagnostic in vitro uniquement. L’appareil He-
moCue WBC Analyzer doit être utilisé exclusivement avec les consommables HemoCue WBC Microcuvettes. Le système HemoCue WBC est utilisée
en laboratoire ou directement au lit du patient.
Tous les composants du système sont conçus et fabriqués de manière à assurer une sécurité maximale. Tout autre usage du système peut
! entraîner un risque pour la sécurité.
Hartelijk dank dat u gekozen hebt voor het HemoCue WBC-systeem. Het systeem is bedoeld voor de kwantitatieve bepaling van de leukocytentel-
NL ling (WBC-telling) in capillair of veneus volbloed. Het HemoCue WBC-systeem is alleen bestemd voor in-vitro diagnostisch gebruik. De HemoCue
WBC Analyzer mag alleen worden gebruikt met HemoCue WBC Microcuvettes. Het HemoCue WBC-systeem is bedoeld voor gebruik in klinische
laboratoria en ’point-of-care’-situaties.
Alle systeemcomponenten zijn ontworpen en vervaardigd om maximale veiligheid te bieden. Als het systeem voor andere doeleinden
! wordt gebruikt dan is aangegeven, kan de veiligheid in gevaar komen.
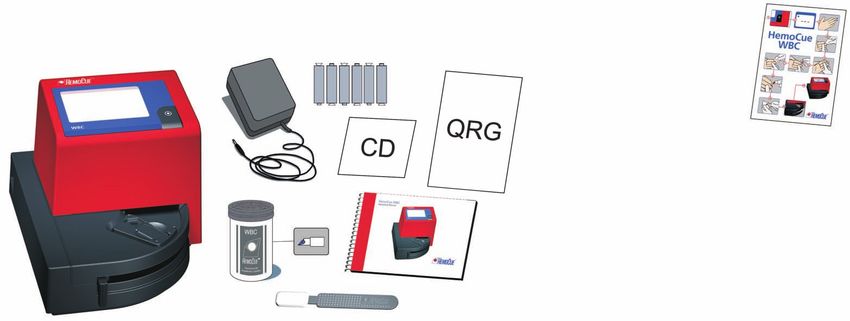
Components
Bestandteile
Éléments
Onderdelen

      1        2       3

                           5

               4

                       6
GB/US                                     DE                                       FR                                       NL

1.   HemoCue WBC Analyzer*           1.    HemoCue WBC Analyzer*              1.    HemoCue WBC Analyzer*              1.    HemoCue WBC Analyzer*
2.   AC adapter or                   2.    Netzteil oder                      2.    Adaptateur secteur ou              2.    Wisselstroomadapter of
3.   Six type AA batteries**         3.    Sechs AA-Batterien**               3.    6 piles de type AA**               3.    6 batterijen type AA**
4.   HemoCue WBC Microcuvettes**     4.    HemoCue WBC Microcuvettes**        4.    HemoCue WBC Microcuvettes**        4.    HemoCue WBC Microcuvettes**
5.   HemoCue WBC Operating           5.    HemoCue WBC Bedienungsan-          5.    Manuel d’utilisation HemoCue       5.    HemoCue WBC gebruiksaan-
     Manual, HemoCue WBC Quick             leitung, HemoCue WBC Kurzan-             WBC, Guide de référence rapide           wijzing, verkorte HemoCue
     Reference Guide and Instruc-          leitung und Handbuch-CD                  et CD d’instructions HemoCue             WBC gebruiksaanwijzing en
     tion CD                         6.    HemoCue Cleaner                          WBC                                      instructie-cd.
6.   HemoCue Cleaner                                                          6.    Tampon HemoCue Cleaner             6.    HemoCue Cleaner
                                     Öffnen Sie den Karton, entnehmen
Open the carton and lift out the     Sie Analyzer und Zubehör und stel-       Placer la boîte sur une surface stable   Open de doos, neem de analyser en
analyzer and accessories and place   len Sie sie auf eine stabile Unterlage   (sans vibrations) pour l’ouvrir et       de accessoires uit de doos en plaats
them on a stable surface (non-vi-    (nicht vibrierend).                      sortir l’analyseur et ses accessoires.   ze op een stabiele (niet-trillende)
brating).                                                                                                              ondergrond.
                                     * Die Abdeckung des Analyzers            * Ne pas ouvrir le boîtier de l’ana-
* Do not open the cover of the       nicht öffnen.                            lyseur.                                  * Maak het deksel van de analyser
analyzer.                                                                                                              niet open.
                                     ** Nicht enthalten.                      ** Non fournis.
** Not included.                     Informationen über HemoCue WBC           Pour plus d’informations sur les         ** Niet meegeleverd.
For infomation about HemoCue         Microcuvettes erhalten Sie von           HemoCue WBC Microcuvettes,               Voor informatie over de HemoCue
WBC Microcuvettes, please contact    Ihrem HemoCue-Lieferanten.               veuillez contacter votre distributeur    WBC Microcuvettes kunt u contact
your HemoCue distributor.                                                     HemoCue.                                 opnemen met uw HemoCue-leve-
                                                                                                                       rancier.
Start up
Inbetriebnahme
Mise en service
Starten

            1

            2

                      3
GB/US                                            DE                                           FR                                         NL

           Only use adapters, as listed                Verwenden Sie nur die im                     Utiliser uniquement les                        Gebruik alleen adapters
     !     under Specifications, in the          !     Abschnitt Netzteile der Tech-          !     adaptateurs mentionnés                   !     zoals vermeld onder
           Adapters section.                           nischen Daten angegebenen                    dans la liste des caractéristi-                ‘Specificaties’ in het
                                                       Netzteile.                                   ques, section Adaptateurs.                     hoofdstuk ‘Adapters’.
1.       If AC power is available, plug
         the supplied power adapter         1.       Wenn eine Wechselstromver-          1.       Si l’alimentation secteur est         1.       Als er netvoeding beschikbaar
         into the power inlet at the back            sorgung verfügbar ist, schlie-               disponible, brancher l’adapta-                 is, sluit u de netadapter aan
         of the Analyzer.                            ßen Sie das mitgelieferte                    teur secteur fourni dans la prise              op de stroomaansluiting op de
2.       If no power is available, insert            Netzteil an den Stromversor-                 située à l’arrière de l’analyseur.             achterkant van de analyser.
         six type AA batteries, 1.5 V. To            gungseingang an der Rückseite       2.       S’il n’y a pas d’alimentation         2.       Plaats, als er geen netvoeding
         open the battery lid on the left            des Analyzers an.                            secteur, insérer six piles de type             beschikbaar is, zes batterijen
         side of the Analyzer, press on     2.       Wenn keine Stromversorgung                   AA, à 1,5 V. Pour ouvrir le com-               van het type AA van 1,5 V.
         the ribbed marking engraved                 verfügbar ist, legen Sie die                 partiment des piles, situé sur la              U opent het batterijdeksel
         on the battery lid and slide it             sechs AA-Batterien mit 1,5 V                 gauche de l’analyseur, appuyer                 aan de linkerkant van de
         backwards until it opens. Gently            ein. Um den Deckel des Batte-                sur la marque gravée du capot                  analyser door te drukken op
         take out the battery holder.                riefachs auf der linken Seite des            et le faire glisser vers l’arrière.            de geribbelde markering op
         Place the batteries in the                  Analyzers zu öffnen, drücken                 Retirer doucement le support                   het batterijdeksel en dit naar
         battery holder observing the                Sie auf die gerippte Markierung              des piles. Placer les piles dans               achteren te schuiven totdat
         indication of polarity. Put the             auf dem Batteriefachdeckel                   le support, en respectant la                   het is geopend. Neem de
         battery holder back in the bat-             und schieben Sie ihn zurück,                 polarité. Replacer le support                  batterijhouder er voorzich-
         tery compartment and close the              bis er sich öffnet. Nehmen Sie               dans le compartiment et fermer                 tig uit. Plaats de batterijen
         lid. Consult local environmental            den Batteriehalter vorsichtig                le capot. Consulter les autorités              in de batterijhouder en let
         authorities for proper disposal             heraus. Legen Sie die Batte-                 locales compétentes en matière                 daarbij op de juiste richting
         of batteries.                               rien in den Batteriehalter und               d’environnement pour la mise                   van de batterijpolen. Plaats
3.       Pull the cuvette moving arm out             beachten Sie dabei die Hinweise              au rebut adéquate des piles.                   de batterijhouder terug in het
         to the loading position.                    zur Polarität. Legen Sie den        3.       Extraire le bras mobile de la                  batterijvak en sluit het deksel.
                                                     Batteriehalter wieder zurück                 cuvette dans sa position de                    Neem de geldende milieu-
                                                     ins Batteriefach und schließen               charge.                                        voorschriften in acht wanneer
                                                     Sie den Deckel. Beachten Sie die                                                            u oude batterijen weggooit.
                                                     örtlichen Bestimmungen zur                                                         3.       Trek de cuvettehouder uit
                                                     ordnungsgemäßen Entsorgung                                                                  naar de laadpositie.
                                                     von Batterien.
                                            3.       Ziehen Sie dann den beweg-
                                                     lichen Küvettenarm in die
                                                     Ladeposition heraus.
4   4

5   6

    10
GB/US DE FR NL
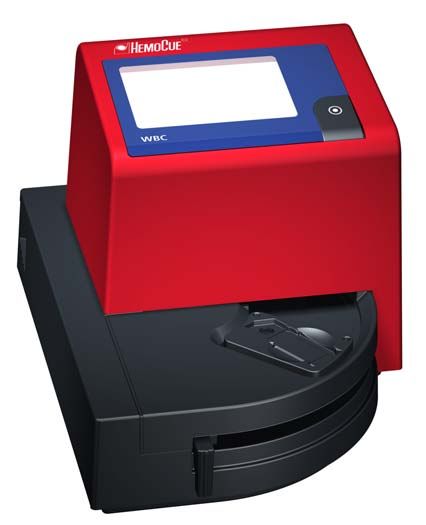
4. Press and hold the button until 4. Halten Sie die Taste gedrückt, 4. Appuyer sur la touche et la 4. Druk op de knop en houd deze
the display is activated (all bis die Anzeige aktiviert wird maintenir enfoncée jusqu’à ingedrukt totdat het display
symbols appear on the display). (alle Symbole werden auf l’activation de l’écran (tous is geactiveerd (alle symbolen
The Analyzer performs a self dem Display angezeigt). Der les symboles s’affichent). L’ana- verschijnen op het display). De
test, and after approximately Analyzer führt einen Selbsttest lyseur effectue un autocontrôle. analyser voert een zelftest uit.
10 seconds the display will aus und nach ca. 10 Sekunden Au bout de 10 secondes envi- Na ongeveer 10 seconden toont
show three flashing dashes werden auf dem Display drei ron, trois tirets clignotants et le het display drie knipperende
and the HemoCue symbol. This blinkende Striche sowie das symbole HemoCue apparaissent streepjes en het HemoCue-
indicates that the Analyzer is HemoCue-Symbol angezeigt. à l’écran. Cela indique que symbool. Dit geeft aan dat de
ready for use. Dies zeigt an, dass der Analyzer l’analyseur est prêt à l’emploi. analyser gereed is voor gebruik.
5. If the cuvette moving arm is einsatzbereit ist. 5. Si le bras mobile de la cuvette 5. Als de cuvettehouder zich in
in the measuring position, 5. Wenn sich der bewegliche est en position de mesure, le de meetpositie bevindt, wordt
the most recent result will be Küvettenarm in der Messposi- résultat le plus récent s’affiche. het meest recente resultaat
displayed. tion befindet, wird das letzte 6. Pour éteindre l’analyseur, getoond.
6. To turn the Analyzer off, press Ergebnis angezeigt. appuyer sur la touche et main- 6. Om de analyser uit te zetten,
and hold the button until the 6. Zum Ausschalten des Analyzers tenir la pression jusqu’à ce que drukt u op de knop en houdt
display reads OFF and then goes halten Sie die Taste gedrückt, l’écran affiche OFF et s’éteigne. u deze ingedrukt totdat in
blank. If the Analyzer is operat- bis auf der Anzeige zunächst L’analyseur s’arrête automati- het display OFF verschijnt en
ing on battery power, but not „OFF“ und dann gar nichts mehr quement lorsqu’il fonctionne het display vervolgens wordt
being used, it will automatically angezeigt wird. Wenn der Ana- sur piles et qu’il n’est pas utilisé uitgeschakeld. Als de analyser
turn off after approximately lyzer über Batterien betrieben pendant cinq minutes. En cas de op batterijen werkt, maar niet
five minutes and if operating on jedoch nicht verwendet wird, branchement secteur, il s’éteint wordt gebruikt, zal deze na
AC power, it will turn off after schaltet er sich nach etwa 5 Mi- au bout de deux heures. ongeveer vijf minuten automa-
two hours. nuten automatisch aus. Wenn tisch worden uitgeschakeld. Als
er über das Netzteil betrieben de analyser op de netvoeding
wird, schaltet er sich nach zwei werkt, zal de analyser na twee
Stunden aus. uur worden uitgeschakeld.
11Set-up Audio signal
Einstellung Tonsignal
Configuration Signal sonore
Set-up Geluidssignaal
1 2 3
12GB/US DE FR NL
If the audible signal is activated, Bei aktiviertem Tonsignal wird ein Si le signal sonore est activé, un Als het geluidssignaal is geacti-
a signal will be heard when the Tonsignal ausgegeben, wenn eine signal sera émis à l’issue de la veerd, klinkt het signaal wanneer
measurement is completed, or if an Messung abgeschlossen ist oder mesure, ou en cas d’affichage d’un de meting is voltooid of wanneer
error code is displayed. To activate wenn ein Fehlercode angezeigt code d’erreur. Procéder comme suit een foutmelding wordt weergege-
or deactivate the audible signal, fol- wird. Um das Signal zu aktivieren pour activer ou désactiver le signal ven. Voer de onderstaande stappen
low the steps below. oder zu deaktivieren folgen Sie den sonore. uit om het geluidssignaal te active-
folgenden Schritten. ren of deactiveren.
1. Make sure that the analyzer is 1. S’assurer que l’analyseur est
turned off. Press the button for 1. Vergewissern Sie sich, dass der hors tension. Appuyer sur la 1. Controleer of de analyser
approximately 10 seconds. Analyzer ausgeschaltet ist. touche pendant environ 10 uitgeschakeld is. Houd de
2. The display now shows a flash- Halten Sie die Taste etwa 10 secondes. knop ongeveer 10 seconden
ing bell symbol. Sekunden lang gedrückt. 2. L’écran affiche un symbole de ingedrukt.
3. Press the button rapidly to 2. In der Anzeige erscheint ein cloche clignotant. 2. In het display verschijnt een
change between signal on and blinkendes Tonsymbol. 3. Appuyer rapidement sur la knipperend kloksymbool.
off. 3. Drücken Sie schnell die Taste, touche pour activer/désactiver 3. Druk snel op de knop om het
um die Ausgabe des Tonsignals le signal sonore. signaal in of uit te schakelen.
When the setting is completed, ein- bzw. auszuschalten.
press the button for approximately À l’issue des réglages, appuyer sur Als de instelling is voltooid, drukt
3 seconds until the bell stops flash- Wenn Sie die Einstellung vorgenom- la touche pendant environ 3 secon- u ongeveer 3 seconden op de knop
ing. The analyzer will return to the men haben, halten Sie die Taste des jusqu’à ce que la cloche arrête totdat het symbool niet meer knip-
ready mode. etwa 3 Sekunden gedrückt, bis das de clignoter. L’analyseur se remet pert. De analyser keert nu terug
Tonsymbol nicht mehr blinkt. Der automatiquement en position de naar de Gereed-modus.
Analyzer wechselt dann wieder in mesure.
den Bereit-Modus.
13Measuring Capillary blood
Messung Kapillarblut
Mesure Sang capillaire
Meting Capillair bloed
1 2
3 4
14GB/US DE FR NL
Always handle blood specimens Gehen Sie stets sorgsam mit Blut- Pour éviter tout risque de contami- Behandel bloedmonsters altijd voor-
with care, as they might be infec- proben um, da diese infektiös sein nation, il est recommandé de mani- zichtig, aangezien deze mogelijk
tious. Consult local environmental könnten. Zur ordnungsgemäßen puler les échantillons de sang avec infectieus zijn. Neem de geldende
authorities for proper disposal. Entsorgung beachten Sie die Be- la plus grande précaution. Consulter milieuvoorschriften in acht bij het
Always wear protective gloves when stimmungen der örtlichen Umwelt- les autorités locales compétentes afvoeren van afval. Draag altijd be-
handling blood specimens. The mi- behörde. Tragen Sie beim Umgang en matière d’environnement pour schermende handschoenen tijdens
crocuvette is for single use only. mit Blutproben stets Schutzhand- connaître les méthodes d’élimina- het werken met bloedmonsters.
schuhe. Die Mikroküvetten sind tion adéquates. Toujours mettre De microcuvette is bestemd voor
1. To perform a test, the cuvette nur zur einmaligen Verwendung des gants de protection avant de eenmalig gebruik.
moving arm should be in its vorgesehen. manipuler des échantillons de sang.
loading position. The display La microcuvette est à usage unique. 1. Om een test met capillair bloed
will show three flashing dashes 1. Zur Durchführung eines Tests uit te voeren, moet de cuvet-
and the HemoCue symbol. Take sollte sich der bewegliche Kü- 1. Pour effectuer un test, le bras tehouder zich in de laadpositie
a HemoCue WBC Microcuvette vettenarm in seiner Ladepositi- mobile de la cuvette doit se bevinden. In het display verschij-
from the vial. on befinden. Auf der Anzeige trouver en position de charge. nen drie knipperende streepjes
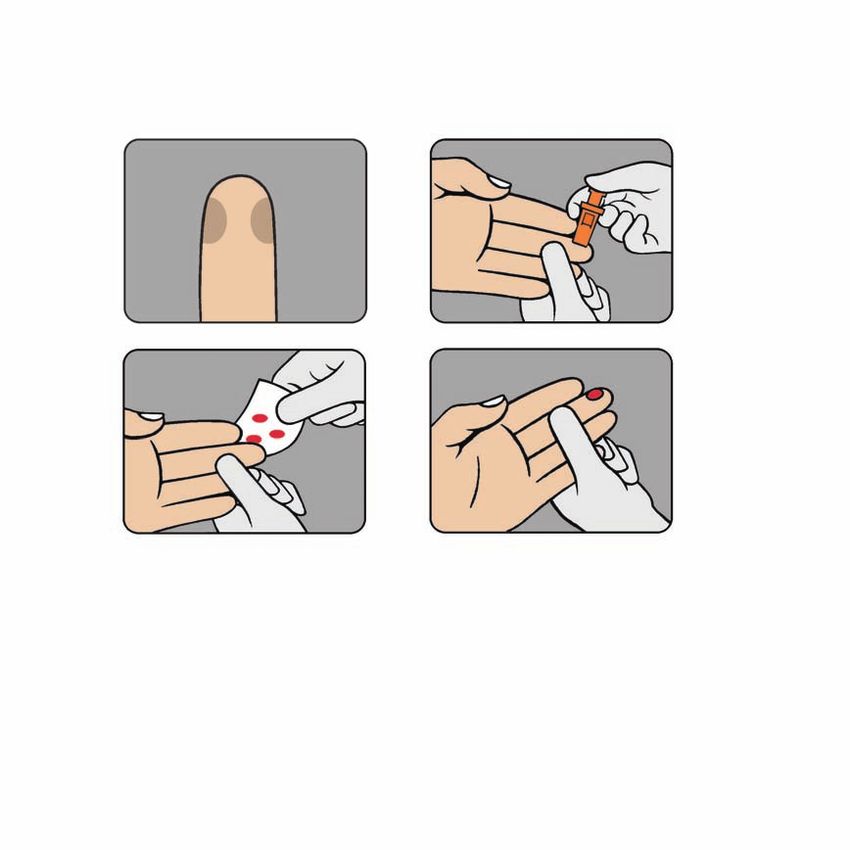
2. Make sure the patient’s hand erscheinen drei blinkende Stri- Trois tirets clignotants et le sym- en het HemoCue-symbool.
is warm and relaxed. Use only che und das HemoCue-Symbol. bole HemoCue apparaissent à Neem een HemoCue WBC
the middle or ring finger for Nehmen Sie eine HemoCue l’écran. Retirer le consommable Microcuvette uit de verpakking.
sampling. Avoid fingers with WBC Microcuvette aus der HemoCue WBC Microcuvette 2. Zorg dat de hand van de patiënt
rings on. Dose. du flacon. warm en ontspannen is. Gebruik
3. Clean fingertip with disinfec- 2. Stellen Sie sicher, dass die Hand 2. S’assurer que la main du patient alleen de middel- of ringvinger
tant and allow to dry com- des Patienten warm und ent- est chaude et détendue. Le voor het nemen van een mon-
pletely or wipe off with a dry, spannt ist. Verwenden Sie für prélèvement devra être effec- ster. Vermijd vingers met een
lint-free wipe. die Probenentnahme nur den tué sur le majeur ou l’annulaire. ring.
4. Using your thumb, lightly press Mittel- oder Ringfinger. Achten Éviter les doigts portant des 3. Maak de vingertop schoon met
the finger from the top of the Sie darauf, dass sich am Finger bagues. een desinfecterend middel
knuckle towards the tip. kein Ring befindet. 3. Nettoyer l’extrémité du doigt en laat de vingertop volledig
3. Reinigen Sie die Fingerkuppe avec un désinfectant et laisser drogen of veeg deze af met een
mit einem Desinfektionsmittel. sécher ou essuyer avec un chif- droge, pluisvrije doek.
Warten Sie, bis sie wieder ganz fon sec et non pelucheux. 4. Druk met uw duim licht op de
trocken ist, oder wischen Sie sie 4. Avec le pouce, presser douce- vinger vanaf de bovenzijde van
mit einem trockenen, fussel- ment le doigt, de l’articulation de knokkel in de richting van de
freien Tuch ab. vers l’extrémité. vingertop.
4. Drücken Sie den Finger mit Ihrem
Daumen mit leichtem Druck vom
Knöchel zur Spitze hin.
155 6
7 8
16GB/US DE FR NL
5. Sample at the side of the 5. Nehmen Sie die Blutprobe seit- 5. Prélever l’échantillon sur la face 5. Neem het monster aan de zij-
fingertip. lich an der Fingerspitze. latérale de l’extrémité du doigt. kant van de vingertop af.
6. While applying light pressure 6. Drücken Sie leicht zur Finger- 6. En pressant doucement vers 6. Oefen een lichte druk uit in
towards the fingertip, puncture spitze hin und punktieren Sie l’extrémité du doigt, piquer le de richting van de vingertop
the finger using a lancet*. den Finger mit einer Lanzette*. point de prélèvement avec une en prik in de vinger met een
7. Wipe away the first two or 7. Wischen Sie die ersten zwei lancette*. lancet*.
three drops of blood. oder drei Bluttropfen ab. 7. Essuyer les deux ou trois premiè- 7. De eerste 2 of 3 druppels bloed
8. Re-apply light pressure towards 8. Drücken Sie wieder leicht zur res gouttes de sang. wegvegen.
the fingertip until another drop Fingerspitze hin, bis ein wei- 8. Exercer de nouveau une légère 8. Handhaaf de lichte druk in de
of blood appears. terer Bluttropfen austritt. pression sur l’extrémité du doigt richting van de vingertop tot
pour faire apparaître une nou- er een volgende druppel bloed
* Spring loaded lancets with a * Lanzetten, die durch eine Feder velle goutte de sang. verschijnt.
puncture depth of at least 2 mm vorgespannt sind und eine Einstich-
are prefered to produce a sufficient tiefe von mindestens 2 mm haben, * Des lancettes à ressort d’une pro- * Gebruik voor voldoende bloed-
blood flow. werden bevorzugt, um eine ausrei- fondeur de prélèvement d’au moins stroom bij voorkeur lancetten met
chenden Blutfluss zu erzielen. 2 mm sont préférables pour obtenir een veer, die een punctiediepte heb-
un flux sanguin suffisant. ben van minstens 2 mm.
179 10 11
18GB/US DE FR NL
9. When the blood drop is large 9. Wenn der Bluttropfen groß 9. Quand la goutte de sang 9. Als de druppel groot genoeg
enough, fill the microcuvette genug ist, füllen Sie die Mikro- est assez grande, laisser la is, de microcuvette in één
in one continuous process. Do küvette ohne abzusetzen. Die microcuvette se remplir d’un keer vullen. NOOIT bijvullen.
NOT refill! NOTE: Make sure Küvette darf NICHT nachbefüllt seul trait. NE JAMAIS la remplir OPMERKING: Zorg ervoor dat
that the microcuvette is filled werden! HINWEIS: Stellen Sie si- une seconde fois ! REMARQUE : de microcuvette vanuit de top
from the tip, placed at about cher, dass die Mikroküvette von vérifier que l’extrémité de la wordt gevuld en in een hoek
a 45 degree angle towards the der Spitze aus gefüllt wird, die microcuvette est placée à un van ongeveer 45 graden ten op-
blood drop according to the ungefähr in einem 45-Grad-Win- angle d’environ 45 degrés vers zichte van de druppel staat (zie
picture on page 18. kel zu dem Bluttropfen gehalten la goutte de sang, comme sur de afbeelding op pagina 18).
10. Wipe off excess blood from the wird, siehe Bild auf Seite 18. l’image de la page 18. 10. Veeg het overtollige bloed van
outside of the microcuvette 10. Wischen Sie überschüssiges Blut 10. Nettoyer la surface externe de de buitenkant van de micro-
with a clean, lint-free wipe. Do außen an der Mikroküvette mit la microcuvette pour éliminer cuvette weg met een schone,
not touch the open end of the einem sauberen, fusselfreien toute trace de sang à l’aide d’un pluisvrije doek. Raak het open
microcuvette. Tuch ab, ohne dabei die Öff- chiffon propre et non pelu- uiteinde van de microcuvette
11. Look for air bubbles in the filled nung der Küvette zu berühren. cheux. Ne pas toucher l’extré- niet aan.
microcuvette. If present, discard 11. Überprüfen Sie die gefüllte mité ouverte de la microcuvette. 11. Controleer de gevulde micro-
the microcuvette and fill a new Küvette auf Luftblasen. Sollten 11. Vérifier que la microcuvette cuvette op luchtbellen. Als er
microcuvette from a new drop Luftblasen vorhanden sein, ent- remplie ne contient pas de luchtbellen zijn, dient u de
of blood. Small bubbles around sorgen Sie die Mikroküvette und bulles d’air. S’il y en a, jeter la microcuvette weg te gooien en
the edge can be ignored. füllen Sie eine neue Mikrokü- microcuvette et prélever un een nieuw exemplaar met een
NOTE: Make sure that the vette mit einem neuen Tropfen nouvel échantillon avec une nieuwe druppel bloed te vullen.
microcuvette is filled accord- Blut. Kleinere Luftbläschen an nouvelle microcuvette. De Kleine belletjes tegen de rand
ing to picture 9 on page 18 den Rändern sind ohne Bedeu- petites bulles d’air en péri- kunnen worden genegeerd.
since an improper filling angle tung. HINWEIS: Stellen Sie sicher, phérie peuvent être ignorées. OPMERKING: Zorg ervoor dat
might cause air bubbles to be dass die Mikroküvette gemäß REMARQUE : bien remplir la de microcuvette wordt gevuld
introduced. Bild 9 auf Seite 18 gefüllt wird, microcuvette conformément zoals in afbeelding 9 op pagina
da ein nicht ordnungsgemäßer à l’image 9 de la page 18. Un 18 is te zien, omdat door het
NOTE: If a second sample is to be Füllwinkel zum Einziehen von angle de remplissage inadapté vullen in een onjuiste hoek
taken, it is important that this is Luftblasen führen könnte. pourrait entraîner l’introduc- luchtbellen in de microcuvette
done after the measurement of the tion de bulles d’air. kunnen komen.
first sample is complete. Wipe away HINWEIS: Wenn eine zweite Probe
the remains of the drop of blood entnommen werden soll, achten Sie REMARQUE : si un second échan- OPMERKING: Als u een tweede
and fill the second microcuvette darauf, dass dies erst erfolgen darf, tillon doit être prélevé, il est impor- monster moet nemen, dient u altijd
from a new drop of blood as per nachdem die Messung der ersten tant de le faire après avoir terminé eerst de meting van het eerste mon-
steps 7–11 above. Probe abgeschlossen ist. Wischen Sie la mesure du premier. Nettoyer les ster te voltooien. Veeg de restanten
Reste des Bluttropfens weg und fül- restes de la goutte de sang et rem- van de druppel bloed weg en vul
len Sie die zweite Mikroküvette aus plir la seconde microcuvette d’une een tweede microcuvette met een
einem neuen Bluttropfen, wie in den nouvelle goutte de sang en suivant nieuwe druppel bloed, zoals hierbo-
Schritten 7–11 oben beschrieben. les étapes 7 à 11 qui précèdent. ven beschreven in de stappen 7–11.
1912 13
14 15 16
20GB/US DE FR NL
12. Place the filled microcuvette 12. Setzen Sie die gefüllte Mikrokü- 12. Placer la microcuvette remplie 12. Plaats de gevulde microcuvette
in the cuvette holder within vette innerhalb von 40 Sekun- dans le support de cuvette dans in de cuvettehouder. Dit dient
40 seconds after filling. den nach dem Füllen in den les 40 secondes qui suivent le binnen 40 seconden na het vul-
13. Gently push the cuvette moving Küvettenhalter ein. remplissage. len van de cuvette te gebeuren!
arm towards the measuring po- 13. Schieben Sie den beweglichen 13. Pousser doucement le bras mo- 13. Duw de cuvettehouder voor-
sition. It will automatically slide Küvettenarm vorsichtig in bile de la cuvette en position de zichtig naar de laadpositie. De
to the measuring position and Richtung der Messposition. mesure. Il glissera automatique- houder schuift automatisch
the measurement starts. Er gleitet automatisch in die ment en position de mesure. La door naar de laadpositie,
14. During the measurement Messposition und die Messung mesure démarre. waarna de meting begint.
beginnt. 14. Tijdens de meting ziet u in het
“ ”, three fixed dashes and 14. Während der Messung erschei-
14. Au cours de la mesure « »,
the HemoCue symbol will be trois tirets et le symbole
display ’ ’, drie niet-knipperen-
shown.
nen „ “, drei feststehende Stri- HemoCue apparaissent à l’écran. de streepjes en het HemoCue-
15. After approximately 3 minutes, che und das HemoCue-Symbol. 15. Au bout de 3 minutes environ, symbool.
the WBC value is displayed. 15. Nach etwa 3 Minuten wird der le taux de globules blancs s’af- 15. De WBC-waarde verschijnt
The result will remain on the WBK-Wert angezeigt. Das Er- fiche. Le résultat reste affiché na ongeveer 3 minuten. Het
display as long as the cuvette gebnis bleibt im Display stehen, tant que le bras mobile de la cu- resultaat blijft zichtbaar zolang
moving arm is in the measuring so lange sich der bewegliche vette est maintenu en position de cuvettehouder zich in de
position. Do not remeasure the Küvettenarm in der Messpositi- de mesure. Ne pas effectuer de meetpositie bevindt. Meet
filled microcuvette. on befindet. Die gefüllte Mikro- nouvelle mesure avec la micro- de gevulde microcuvette niet
16. Always handle blood speci- küvette kann nicht ein zweites cuvette remplie. opnieuw.
mens with care, as they might Mal gemessen werden. 16. Pour éviter tout risque de 16. Behandel bloedmonsters altijd
be infectious. Consult local 16. Gehen Sie stets sorgsam mit contamination, il est recom- voorzichtig, aangezien deze
environmental authorities for Blutproben um, da diese mandé de manipuler les échan- mogelijk infectieus zijn. Neem
proper disposal. infektiös sein könnten. Zur tillons de sang avec la plus de geldende milieuvoorschrif-
ordnungsgemäßen Entsorgung grande précaution. Consulter ten in acht bij het afvoeren van
beachten Sie die Bestimmungen les autorités locales compéten- afval.
der örtlichen Umweltbehörde. tes en matière d’environnement
pour connaître les méthodes
d’élimination adéquates.
21Measuring Control material or venous blood
Messung Kontrollmaterial oder venöses Blut
Mesure Solution de contrôle ou sang veineux
Meting Controlemateriaal of veneus bloed
1 2
2 3
22GB/US DE FR NL
Always handle blood specimens Gehen Sie stets sorgsam mit Blut- Pour éviter tout risque de contamina- Behandel bloedmonsters altijd voor-
with care, as they might be infec- proben um, da diese infektiös sein tion, il est recommandé de manipuler les zichtig, aangezien deze mogelijk
tious. Consult local environmental könnten. Zur ordnungsgemäßen échantillons de sang avec la plus grande infectieus zijn. Neem de geldende
authorities for proper disposal. Entsorgung beachten Sie die Bestim- précaution. Consulter les autorités milieuvoorschriften in acht bij het
Always wear protective gloves when mungen der örtlichen Umweltbe- locales compétentes en matière d’envi- afvoeren van afval. Draag altijd be-
handling blood specimens. The mi- hörde. Tragen Sie beim Umgang mit ronnement pour connaître les méthodes schermende handschoenen tijdens
crocuvette is for single use only. Blutproben stets Schutzhandschuhe. d’élimination adéquates. Toujours het werken met bloedmonsters.
Die Mikroküvetten sind nur zur ein- mettre des gants de protection avant de De microcuvette is bestemd voor
1. If the venous blood samples has maligen Verwendung vorgesehen. manipuler des échantillons de sang. La eenmalig gebruik.
been stored in a refrigerator, al- microcuvette est à usage unique.
low it to warm up to room tem- 1. Falls die venösen Blutproben im 1. Als het monster veneus bloed in
perature (15–35 °C, 59–95 °F) Kühlschrank aufbewahrt wurden, 1. Si les échantillons de sang veineux een koelkast is bewaard, dient
before mixing. Mix the venous müssen sie vor dem Mischen Raum- ont été stockés au réfrigérateur, het eerst op kamertemperatuur
sample tubes thoroughly on a temperatur erreichen (15–35 °C). les laisser atteindre la température (15–35 °C) te komen voordat
mechanical mixer for at least Mischen Sie die Probe mit einem ambiante (de 15 à 35 °C) avant de het wordt gemengd. Meng de
2 minutes or invert the tube mechanischen Mixer mindestens procéder au mélange. Mélanger buizen met het monster van
10–20 times by hand. 2 Minuten oder wenden Sie das les tubes d’échantillon de sang veneus bloed gedurende ten
For control materials always Röhrchen 10–20 Mal hin und her. veineux sur un mélangeur mécani- minste twee minuten grondig in
follow instructions for use pro- Befolgen Sie bei Kontrollmateri- que pendant au moins 2 minutes een mechanische mixer of keer
vided by the manufacturer. alien immer die Bedienungsanlei- ou retourner les tubes 10 à 20 fois de buis 10–20 keer verticaal met
2. Place a drop of blood or control tung des Herstellers. à la main. Pour les solutions de de hand. Volg voor controlema-
material onto a hydrophobic 2. Bringen Sie mit einer Pipette contrôle, toujours respecter les teriaal altijd de instructies die
plastic or glass slide using a pi- oder einem anderen geeigneten instructions d’emploi du fabricant. de fabrikant heeft geleverd.
pette or other suitable transfer Hilfsmittel einen Tropfen Blut 2. Placer une goutte de sang ou de 2. Breng met een pipet of ander
device. oder Kontrollmaterial auf einen solution de contrôle sur une sur- geschikt overbrengingsmiddel
3. Fill the microcuvette in one hydrophoben Objektträger aus face hydrophobe, par exemple een druppel bloed of controle-
continuous process. Do NOT Kunststoff oder Glas auf. une plaque en plastique ou en materiaal aan op een hydrofobe
refill! NOTE: Make sure that the 3. Befüllen Sie die Küvette in einem verre, en utilisant une pipette ou ondergrond, bijv. plastic folie.
microcuvette is filled from the Zug. Die Küvette darf NICHT nach- un autre dispositif de transfert. 3. Vul de microcuvette in één keer.
tip, placed at about a 45 degree befüllt werden! HINWEIS: Stellen 3. Remplir la microcuvette d’un seul NOOIT bijvullen. OPMERKING:
angle towards the blood drop Sie sicher, dass die Mikroküvette trait. NE JAMAIS la remplir une se- Zorg ervoor dat de microcuvet-
according to the picture on von der Spitze aus gefüllt wird, conde fois ! REMARQUE : vérifier te vanuit de top wordt gevuld
page 22. die ungefähr in einem 45-Grad- que l’extrémité de la microcuvette en in een hoek van ongeveer
Winkel zu dem Bluttropfen gehal- est placée à un angle d’environ 45 graden ten opzichte van de
Perform the analysis as per ten wird, siehe Bild auf Seite 22. 45 degrés vers la goutte de sang, druppel staat (zie de afbeelding
steps 10–16 on page 19–21. comme sur l’image de la page 22. op pagina 22).
Führen Sie nun die Analyse entspre-
chend den Schritten 10–16 auf den Effectuer l’analyse en suivant les éta- Voer de meting uit zoals beschreven
Seiten 19–21 durch. pes 10 à 16, décrites pages 19 à 21. in stappen 10–16 op pagina 19–21.
23Set-up Printer function
Einstellung Druckerfunktion
Configuration Mode impression
Set-up Printerfunctie
1 2 3
24GB/US DE FR NL
Only the current result can be trans- Nur das aktuelle Ergebnis kann un- Seul le résultat le plus récent peut Alleen het huidige resultaat kan
ferred to the printer directly after mittelbar nach der Messung an den être imprimé directement après la direct na de bepaling worden
the measurement. Drucker übertragen werden. mesure. uitgeprint.
1. Connect the cable* to the ana- 1. Bevor Sie die Analyse durch- 1. Brancher le câble* entre l’ana- 1. Sluit de kabel* aan op de
lyzer and ASCII printer* before führen, schließen Sie das lyseur et l’imprimante ASCII* analyser en de ASCII-printer*
performing the analysis. Kabel* an Analyzer und ASCII- avant d’effectuer l’analyse. voordat u de test uitvoert.
2. Perform the analysis. Drucker* an. 2. Effectuer l’analyse. 2. Voer de meting uit.
3. When the result is shown on 2. Führen Sie die Analyse durch. 3. Lorsque le résultat est affiché à 3. Wanneer het resultaat op het
the display, it will be printed 3. Sobald das Ergebnis auf dem l’écran, il est automatiquement display wordt getoond, drukt
automatically. Display angezeigt wird, wird es imprimé. de printer het resultaat auto-
automatisch ausgedruckt. matisch af.
* Not included. * Non fournis.
* Nicht enthalten. * Niet inbegrepen.
The following comport settings are Les paramètres de composition
used Für den COM-Anschluss werden die suivants sont utilisés : De volgende instellingen van de
Baud rate 9600 folgenden Einstellungen verwen- Débit en bauds 9600 COM-poort worden gebruikt.
Databits 8 det: Bits de données 8 Baud-rate 9600
Parity None Baudrate 9600 Parité Aucune Databits 8
Stopbits 1 Datenbits 8 Bits d’arrêt 1 Pariteit Geen
Flowcontrol None Parität keine Contrôle de flux Aucune Stopbits 1
Stoppbits 1 Flowcontrol Geen
Flusskontrolle keine
25Maintenance
Wartung
Maintenance
Onderhoud
1 2 3
4 4a 5
26GB/US DE FR NL
Before performing maintenance, Überprüfen Sie vor der Durchführung Vérifier, avant la maintenance, que Controleer, voorafgaand aan het on-
make sure that the analyzer is turned von Wartungsarbeiten ob der Analyzer l’analyseur est éteint et que rien derhoud, of de analyser uitgeschakeld
off and that the display is blank. ausgeschaltet ist. Das Display darf nichts n’apparaît sur l’écran. is en het display niets weergeeft.
anzeigen. 1. De cuvettehouder dient dagelijks
1. The cuvette holder should be 1. Der Küvettenhalter sollte täglich 1. Le support de cuvette doit être na gebruik te worden gereinigd.
cleaned after each day of use. nach Gebrauch gereinigt werden. nettoyé après chaque jour d’uti- Trek de cuvettehouder naar de
Pull the cuvette moving arm to Ziehen Sie den beweglichen Küvet- lisation. Tirer le bras mobile de la laadpositie.
its loading position. tenarm in seine Ladeposition. cuvette vers sa position de charge. 2. Til de cuvettehouder recht om-
2. Remove the cuvette holder by 2. Entfernen Sie den Küvettenhalter, 2. Retirer le support de cuvette en hoog om deze te verwijderen.
lifting it straight up. indem Sie ihn gerade herausheben. le soulevant sans l’incliner. 3. Reinig de cuvettehouder met
3. Clean the cuvette holder with 3. Reinigen Sie den Küvettenhalter 3. Nettoyer le support de cuvette alcohol (20–70 %) of een mild
alcohol (20–70 %) or mild deter- mit Alkohol (20–70 %) oder einem avec de l’alcool (20–70 %) ou un reinigingsmiddel. OPMERKING:
gent. NOTE: The cuvette holder milden Reinigungsmittel. HINWEIS: détergent doux. REMARQUE : De cuvettehouder kan niet in de
cannot be autoclaved. Der Küvettenhalter kann nicht Le support de cuvette ne passe autoclaaf worden gesteriliseerd.
4. If the optical parts becomes autoklaviert werden. pas à l’autoclave. 4. Als het optische gedeelte vuil
dirty, an error code will be 4. Wenn die optischen Teile verschmutzt 4. Si des pièces optiques se salissent, wordt, wordt een foutmelding
displayed. To clean the optical sind, wird ein Fehlercode angezeigt. un code d’erreur s’affiche. weergegeven. Om het optische
parts, push a HemoCue Cleaner* Um die optischen Teile zu reinigen, Pour les nettoyer, introduire un gedeelte schoon te maken, duwt
into the opening of the cuvette schieben Sie einen HemoCue Cleaner* tampon HemoCue Cleaner* dans u een HemoCue Cleaner* in de
holder. Move from side to in die Öffnung des Küvettenhalters. l’ouverture du support de cuvette. opening van de cuvettehouder.
side 5–10 times. If the cleaner Bewegen Sie ihn 5–10 Mal heraus Répéter l’opération de 5 à 10 fois. Beweeg de cleaner 5–10 keer
is stained, repeat with a new und wieder hinein. Sollte der Reiniger Si le tampon est taché, recommen- heen en weer. Als de cleaner
cleaner. Make sure that the verschmutzt sein, wiederholen Sie das cer l’opération avec un nouveau vuil is, deze procedure met een
cleaner reaches the parts accord- Verfahren mit einem neuen Reiniger. tampon. Le tampon doit bien at- nieuwe cleaner herhalen. Zorg
ing to 4a. Vergewissern Sie sich, dass der Reini- teindre les pièces, comme indiqué ervoor dat de cleaner tot aan het
5. Wait 15 minutes before replac- ger die Teile gemäß 4a erreicht. dans l’image 4a. gedeelte komt dat in afbeelding
ing the cuvette holder. Make 5. Warten Sie 15 Minuten, bevor Sie 5. Attendre 15 minutes avant de 4a wordt weergegeven.
sure that the cuvette moving den Küvettenhalter wieder ein- remettre le support de cuvette 5. Wacht 15 minuten voordat u de
arm is in its loading position setzen. Vergewissern Sie sich, dass en place. Vérifier que le bras cuvettehouder terugplaatst. Zorg
before replacing the cuvette sich der bewegliche Küvettenarm mobile de la cuvette se trouve en ervoor dat de cuvettehouder zich
holder. The cover may be in seiner Ladeposition befindet, position de charge avant de rem- in de laadpositie bevindt voordat
cleaned with alcohol (20–70 %) bevor Sie den Küvettenhalter wieder placer le support de la cuvette. u de cuvettehouder terugplaatst.
or a mild detergent. einsetzen. Die Oberfläche kann mit L’extérieur peut être nettoyé Het deksel kan worden schoonge-
Alkohol (20–70 %) oder einem milden avec de l’alcool (20–70 %) ou un maakt met alcohol (20–70 %) of
* One HemoCue Cleaner is included Reinigungsmittel gereinigt werden. détergent doux. een mild reinigingsmiddel.
with the Analyzer. Contact your local * Ein HemoCue Cleaner ist im Lieferum- * Eén HemoCue Cleaner wordt met de
distributor to order more. fang des Analyzers enthalten. Um weitere * Un tampon HemoCue Cleaner est analyser meegeleverd. Neem contact
Reiniger zu bestellen, wenden Sie sich fourni avec l’analyseur. Contacter le op met uw leverancier om nieuwe
bitte an Ihren Vertriebshändler vor Ort. distributeur local pour en commander. exemplaren te bestellen.
27GB/US
Troubleshooting Guide
If you are unable to resolve the problem by following this Troubleshooting Guide, please contact your local HemoCue distributor or HemoCue AB. The
Analyzer should be cleaned as described in the Maintenance section prior to service or disposal. Consult local environmental authorities for proper
disposal. The Analyzer has no serviceable parts. NOTE! Do not open the cover of the Analyzer.
Symptom Explanation Action
Err01 A portion of the image area is unable to be 1. Take a new microcuvette and repeat the measurement, as
analyzed. described in the Measuring section.
1. Due to measurement error. 2. NOTE! The blood sample should be verified with a suitable
2. Due to abnormal sample. laboratory method and be questioned as to the pathological
condition of the patient.
Err02 Uneven spatial distribution of detected cells. Take a new microcuvette and repeat the measurement, as
described in the Measuring section.
Err03 Image, or part of the image area is detected as Take a new microcuvette and repeat the measurement, as
out-of-focus. described in the Measuring section.
Err30 1. Optical parts dirty. 1a. Turn off the analyzer and clean the optical parts as
2. Optical parts wet after cleaning. described in the Maintenance section.
1b. If the problem continues, the analyzer needs service.
Contact your local distributor.
2. Wait 15 minutes before turning on the analyzer after
cleaning to make sure that the optical parts are dry.
Err33 Empty microcuvette, not filled with sample. Take a new microcuvette and repeat the measurement, as
described in the Measuring section and make sure that the
microcuvette is filled with sample.
Err34 Stray light detected. a. Turn off the analyzer and make sure the analyzer is not
exposed to any bright light sources.
b. If the problem continues, the analyzer needs service.
Contact your local distributor.
Err35 The battery power is too low. Turn off the analyzer.
a. Replace the batteries, six type AA, as described in the Start
Up section.
b. Use the power adapter as described in the Start Up section.
28Symptom Explanation Action
Err60 General hardware error. a. Turn off the analyzer and turn it on again after 30 seconds.
Take a new microcuvette and repeat the measurement, as
described in the Measuring section.
b. If the problem continues, the analyzer needs service.
Contact your local distributor.
Err61 Self test error during start up of analyzer. a. Turn off the analyzer and turn it on again after 30 seconds.
Take a microcuvette and perform the measurement, as
described in the Measuring section.
b. If the problem continues, the analyzer needs service.
Contact your local distributor.
Err62 Blanking test failed for other reasons than Err30, a. Turn off the analyzer and turn it on again after 30 seconds.
Err34. Take a new microcuvette and repeat the measurement, as
described in the Measuring section.
b. If the problem continues, the analyzer needs service.
Contact your local distributor.
WbC Empty cuvette holder. Take a microcuvette and perform the measurement, as
described in the Measuring section.
LLL 1. Measured value is below 0.3 x10⁹ /L 1. NOTE! Results exceeding the LLL limit should be verified
(300/mm3, 300/µL). with a suitable laboratory method and be questioned as to the
2. Empty microcuvette, not filled with sample. pathological condition of the patient.
2. Take a new microcuvette and repeat the measurement, as
described in the Measuring section and make sure that the
microcuvette is filled with sample.
HHH Measured value exceeds 30.0 x10 9 /L NOTE! Results exceeding the HHH limit should be verified with
(30000/mm3, 30000/µL). a suitable laboratory method and be questioned as to the
pathological condition of the patient.
29Symptom Explanation Action
No characters on the display. 1. Power is not received. 1a. Check that the power adapter is properly connected to the
2. If on battery power, the batteries need to be analyzer and the AC power supply, as described in the Start Up
replaced. section.
3. The display is out of order. 1b. Check that the cable is not damaged.
2. Replace the batteries, six type AA, as described in the Start
Up section.
3. The analyzer needs service. Contact your local distributor.
The display gives erroneous 1. The display is out of order. 1, 2. The analyzer needs service. Contact your local distributor.
characters. 2. The microprocessor is out of order.
The display shows “FIR”. General analyzer software error. a. Remove and replace all cables and/or batteries, and restart,
as described in the Start Up section.
b. The analyzer needs service. Contact your local distributor.
The display shows ” ”. 1. The batteries need to be replaced. 1. Turn off the analyzer and replace the batteries, six type AA,
2. If on AC power, the power adapter or the as described in the Start Up section.
circuit board is out of order. 2a. Check that the correct power adapter is used and properly
connected and working, as described in the Start Up section.
2b. The analyzer needs service. Contact your local distributor.
The display does not switch The cuvette holder sensor is out of order. The analyzer needs service.
from “”and “WbC” to three Contact your local distributor.
flashing dashes and “ ”
(ready for measuring).
The cuvette holder is not The magnet in the cuvette holder is missing. The analyzer needs service.
moving into the correct Contact your local distributor.
position.
Measurement on patient 1. Improper sampling technique. 1. Take a new microcuvette and repeat the measurement, as
samples are higher or lower 2. The microcuvettes are beyond their expiration described in the Measuring section.
than antipicipated. date, damaged or have been improperly stored. 2. Check the expiration date and the storage conditions of the
microcuvettes.
30Symptom Explanation Action
Measurement on control 1. Improper sampling technique. 1. Take a new microcuvette and repeat the measurement, as
materials are out of range, 2. The microcuvettes are beyond their expiration described in the Measuring section.
either too high or too low. date, damaged or have been improperly stored. 2. Check the expiration date and the storage conditions of the
3. The control material is beyond its expiration microcuvettes.
date or has been improperly stored. 3. Check the expiration date and the storage conditions of
4. The control material has not been mixed the control material. If the problem continues, contact the
properly and/or is not at room temperature. manufacturer of the control material.
5. The control material is not suitable for use with 4. Make sure that the control material is mixed properly and
the HemoCue WBC system. at room temperature. If the problem continues, contact the
manufacturer of the control material.
5. Contact your local distributor for control material
information.
31GB/US
Specifications
Intended Purpose/Intended Use Storage and Handling
The HemoCue WBC system is indicated for use for quan- HemoCue WBC Microcuvettes
titative determination of white blood cell (WBC) count The Microcuvettes are to be stored at 15–35 °C
in capillary or venous whole blood. The HemoCue WBC (59–95 °F),• Pipette or other transfer device (venous samples) The values above may vary due to a wide range of fac-
• Lint-free tissue (non-fraying) tors, such as sex, diurnal variations, exercise, physical
stress or trauma, pregnancy, indigestion of food, and
Quality Control cigarette smoking.
The HemoCue WBC Analyzer has an internal qual-
ity control, the “self test”. Every time the analyzer is Measuring Range
turned on, it will automatically verify the measurement Displayed range: 0.3–30.0 x10 9 /L (300–30000/mm3,
performance. When passing the self test, the display 300–30000/µL). Results above the measuring range will
will show the HemoCue symbol and three flashing be displayed as HHH. Results below the measuring range
dashes, indicating that the analyzer is ready to perform will be displayed as LLL.
a measurement. An error code will be displayed if the
self test fails. Another part of the built in self test (QC) Limit of Detection
is performed for each measurement, including both Functional Sensitivity is estimated as the mean concen-
checks of the HemoCue WBC Analyzer but also several tration for a spiked sample whose CV is 20 %. The Func-
condition checks of the HemoCue WBC Microcuvette and tional Sensitivity has been determined to be 0.3 x10 9 /L.
the sample itself. The operator’s ability to handle the (James O. Westgaard, Basic Method Validation)
microcuvette and apply the sample correctly is also in- Limit of Blank is defined as the highest measurement
cluded in these self tests. No additional quality controls result that indicates that the analyte is not present in the
performed by the operator are required for verification sample. Limit of Blank has been determined to be 0.06
of the system functionality. Note that local, state, or x10 9 /L (CLSI Document EP17-A).
other accreditation agencies may require additional
quality control testing. If additional quality control Limitations of the Method/Procedure
checks are required, R&D Systems R&D HC WBC Control a) The measurement should be made as soon as possi-
may be used. Please refer to the R&D HC WBC Control, as ble, but within 40 seconds after the blood has been
well as the HemoCue WBC Operating Manual regarding drawn into the microcuvette.
handling and procedures.Please refer to local guidelines b) Do not remeasure the filled microcuvette.
for recommended frequency of use. c) Mixing samples for an extended period may affect
the result.
Expected Values (Dacie and Lewis Practical Haematology) d) Results above the measuring range will be displayed
Adults 4.0–10.0 x10 9 /L as HHH. Results below the measuring range will be
Children 1 year 6.0–16.0 x10 9 /L displayed as LLL.
Children 2–6 years 5.0–15.0 x10 9 /L e) Studies have shown that patient samples with >2 %
Children 6–12 years 5.0–13.0 x10 9 /L nucleated red blood cells (NRBCs) may give falsely
Infants 1 month 5.0–19.0 x10 9 /L elevated white blood cell count.
Infants 2 months 5.0–15.0 x10 9 /L
Infants 3–6 months 6.0–18.0 x10 9 /L
45Specific Performance Characteristics Additionally, a study has been performed to determine
Linearity the precision using fresh blood samples. The study was
The method used in the HemoCue WBC system has ac- performed on venous whole blood samples tested in
cording to the CLSI Document EP06-A been demonstrated duplicate.
to be linear between 0.3–30.0 x10⁹ /L (300–30000/mm3,
300–30000/µL), within 0.2 x10⁹ /L difference in 0.3–3.5
x109 /L and within 6 % difference in 3.6–30.0 x10⁹ /L. x10 9 /L N CVduplicates %
Within-run and Total Precision Sysmex XS-1000i HemoCue WBC
Within-run and Total Precision was determined according 0.3–1.0 12 5.0 10.4
to the CLSI Document EP05-A2. The results given below
come from four batches of HemoCue WBC Microcuvettes, 1.1–3.5 52 3.7 4.1
and five HemoCue WBC Analyzers. Commercially
3.6–10.0 209 1.9 3.5
available controls at three different levels were used.
The WBC count was measured in duplicate twice a day, 10.1–20.0 88 2.1 2.5
morning and afternoon, during 20 consecutive days.
20.1–30.0 35 1.8 2.2
Level N x10 /L
9
Within-run Total Total 396 2.4 3.2
Precision Precision
CV % CV %
1 400 2.5 4.06 5.4
2 400 7.2 2.92 3.5
3 400 19.0 1.63 1.9
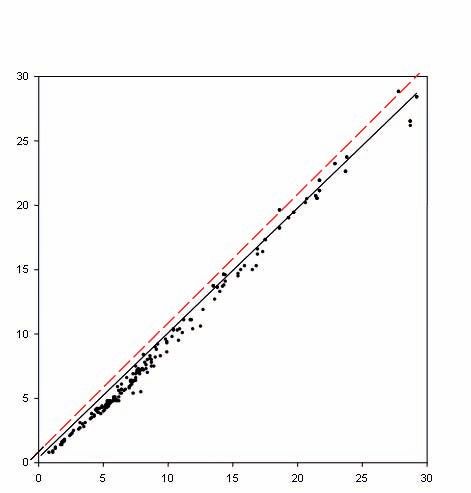
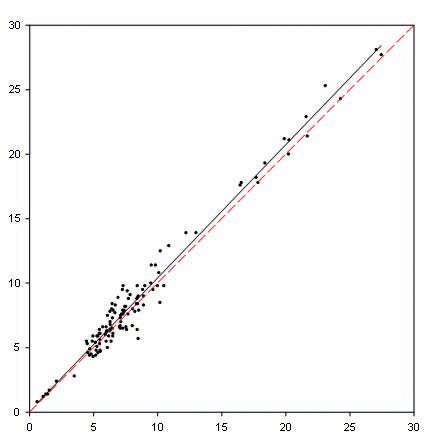
46Validation Studies
Results of the validation studies, based on the intended
use of the system, are shown in Figure 1, 2, 3 and 4. Sin-
gle replicate on the HemoCue WBC system and the mean
of duplicate on the comparative method are presented
in the plots.
Coefficients: Coefficients
b 0 = – 0.045 b 0 = – 0.263
b1 = 1.006 b1 = 1.042
r2 = 0.991 r2 = 0.995
N = 280 N = 116
HemoCue WBC, x10 9 /L
HemoCue WBC, x10 9 /L
------- X = Y ------- X = Y
Sysmex XS-1000i, x10 9 /L Sysmex XS-1000i, x10 9 /L
Figure 1 Figure 2
Point-of-Care Clinical Laboratory
47When a capillary skin puncture is performed, several An additional study has been performed at a clinical
defense systems in the body are activated very quickly. reference laboratory in the U.S. including a large number
These defense systems cause an increase in the number of blood samples in order to evaluate the HemoCue WBC
of WBCs in the blood closest to the wound, leading to system for expected demographic variations (age, gen-
greater differences in results from several samples taken der, geographics) in the population, see Figure 4 below.
from the same finger stick.
A study was performed, on the HemoCue WBC system in
which possible influences of capillary sampling technique
were included, see Figure 3 below.
Coefficients Coefficients
b 0 = 0.066 b 0 = – 0.451
b1 = 1.033 b1 = 0.970
r2 = 0.972 r2 = 0.994
N = 119 N = 178
HemoCue WBC, x10 9 /L
HemoCue WBC, x10 9 /L
------- X = Y ------- X = Y
Sysmex XS-1000i, x10 9 /L Beckman Coulter, x10 9 /L
Figure 3 Figure 4
Capillary Sampling Technique Demographic Sample Population
48Vous pouvez aussi lire