SURFACE - Garvan Acoustic
←
→
Transcription du contenu de la page
Si votre navigateur ne rend pas la page correctement, lisez s'il vous plaît le contenu de la page ci-dessous
GARVAN
ARCHITECTURAL
ACOUSTIC
SOLUTIONS

                                                                  SURFACE
                                                                                               ®

                                                                              acoustic walls

                                    EN WALL INSTALLATION WITH GARVAN HANGER
                                    IT MONTAGGIO A INNESTO PARETE CON GARVAN HANGER
                                    FR INSTALLATION MURALE AVEC ACCOUPLEMENT GARVAN HANGER
A C O U S T I C   W E L L N E S S   DE WANDEINBAU MIT GARVAN HANGER

EN INSTALLATION INSTRUCTIONS - IT ISTRUZIONI DI MONTAGGIO
FR INSTRUCTIONS D’INSTALLATION - DE MONTAGEANLEITUNGEN
                                             Version: 1.0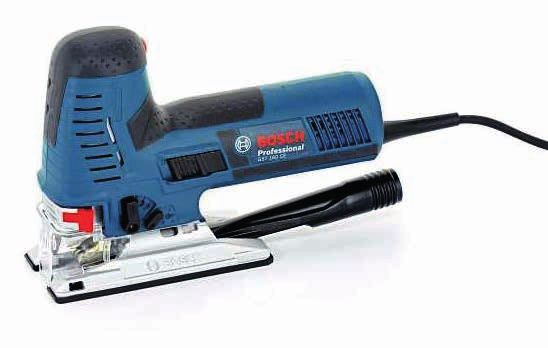
ATTENTION!
     HANDLE                                   EN Handle the panels with great care. Try to
                                              avoid lifting the panels only on one side and

    WITH CARE!                                crushing them, in order to prevent possible
                                              damage or creases that could be visible once
                                              the panels are installed.
                                              IT Manipolare i pannelli con molta cura cercando
                                              di evitare di sollevarli solamente da un lato e di
                                              schiacciarli, per non creare possibili danni o pieghe
                                              che potrebbero risultare visibili una volta installati.
                                              FR Manipulez les panneaux avec le plus grand
                                              soin, en essayant d’éviter de les soulever d’un
                                              seul côté et de les écraser, afin de ne pas créer
                                              d’éventuels dommages ou plis qui pourraient
                                              être visibles une fois les panneaux installés.
                                              DE Behandeln Sie die Paneele mit großer Sorgfalt.
                                              Vermeiden Sie es, die Paneele nur auf einer Seite
                                              anzuheben und zu quetschen, um mögliche
                                              Schäden oder Falten zu vermeiden, die nach dem
                                              Einbau der Paneele sichtbar werden könnten.

                                                           ATTENTION!

 TOLERANCE!                                   EN The dimensions shown in the drawings are
                                              subject to tolerances of ± 2 mm.

                                              IT Le quote riportare nei disegni sono soggette
                                              a tolleranze di ± 2 mm.

                                              FR Les dimensions indiquées sur les dessins
                                     ± 2 mm   sont soumises une tolérance de ± 2 mm.

                                              DE Die in den Zeichnungen angegebenen Abmes-
                                              sungen unterliegen eine Toleranz von ± 2 mm.

M a de in Italy   - 3+1+1 YEAR WARRANTY                                                            2
1
 EN Using a laser for constructions, identify the positioning
 guidelines according to your own project.
 IT Con l’ aiuto di un laser da cantiere individuare le linee guida del
 posizionamento come da proprio progetto.
 FR À l’aide d’un laser de construction, identifiez les lignes
 directrices de positionnement selon votre projet.
 DE Die Leitlinien für das Verlegen nach eigenem Projekt mithilfe
 eines Baulasers bestimmen.

                                  2
 EN Drill the holes in the wall in consideration of the GARVAN
 HANGER included in the package.
 IT Eseguire i fori in parete nel rispetto dell’ innesto GARVAN
 HANGER incluso nella confezione.
 FR Percez les trous dans le mur conformément à l’accouplement
 GARVAN HANGER inclus dans l’emballage.
 DE Bohrlöcher in die Wand bohren und auf die im Lieferumfang
 enthaltene GARVAN HANGER-Kupplung achten.

                                  3
 EN Fix the GARVAN HANGER to the wall using two nogs as shown
 on the side.
 IT Fissare l’innesto GARVAN HANGER con due tasselli in parete
 come indicato a lato.
 FR Fixez l’accouplement GARVAN HANGER au mur avec deux
 chevilles d’expansion, comme indiqué à côté.
 DE Die GARVAN HANGER-Kupplung an die Wand wie auf der Seite
 gezeigt mit zwei Dübeln festlegen.

                                  4
 EN Adjust the GARVAN HANGER until it is in the correct
 position and tighten the screws of the nogs.
 IT Regolare nella posizione corretta il GARVAN HANGER e serrare
 le viti dei tasselli.
 FR Réglez le GARVAN HANGER dans la bonne position et
 serrez les vis des chevilles.
 DE Den GARVAN HANGER in die richtige Position stellen und die
 Schrauben der Dübel festziehen.

M a de in Italy        - 3+1+1 YEAR WARRANTY                              3
5
EN Bring the panel closer to the wall holding it firmly with both
hands.
IT Avvicinare il pannello alla parete tenendolo saldo con entrambe
le mani.
FR Approchez le panneau du mur en le tenant fermement des
deux mains.
DE Das Paneel mit beiden Händen festhalten und das an der
Wand nähern.
6
EN Press the panel lightly against the wall. Slide the panel
down while keeping the adherence with the GARVAN HANGER,
which will drill a hole in the panel and keep it in place.
IT Fare una leggera pressione del pannello verso la parete. Fare
scorrere verso il basso il pannello mantenendo l’aderenza al
GARVAN HANGER che perforerà il pannello e lo tratterrà a se.
FR Appliquez une légère pression du panneau vers le mur.
Faites glisser le panneau vers le bas en gardant l’adhésion au
GARVAN HANGER qui va ainsi perforer le panneau et le garder
en position.
DE Das Paneel gegen der Wand lehnen und leichten Druck
ausüben. Das Paneel nach unten ziehen, wobei die Haftung am
GARVAN HANGER beibehalten wird, so dass der HANGER das
Paneel bohren und halten kann.
7
EN If installing multiple panels, start by positioning and aligning
all the GARVAN HANGER.
IT Nel caso di installazione multipla posizionare e allineare prima
tutti i GARVAN HANGER.
FR Dans le cas d’une installation multiple, positionnez d’abord
et alignez tous les accouplements GARVAN HANGER.
DE Im Falle der Montage mehrerer Paneelen: Alle GARVAN HANGER
zunächst verlegen und ausrichten.
8
EN After completing the work, check the panels’ alignments
with a laser for constructions and, if required, move the panels
by the necessary millimetres to bring them into the desired
position.
IT A lavoro completato verificare con un laser da cantiere gli
allineamenti dei pannelli e dove necessario riposizionarli
muovendoli dei millimetri necessari.
FR Une fois le travail terminé, vérifiez l’alignement des
panneaux avec un laser de construction et repositionnez-les
en les déplaçant des millimètres nécessaires.
DE Die Ausrichtungen mit einem Baulaser am Abschluss der
Arbeit überprüfen. Bei falschen Ausrichtungen die Paneelen um die
benötigten Millimiter weg ziehen und sie erneut verlegen.
M a de in Italy - 3+1+1 YEAR WARRANTY 4EN CUSTOM CUTTING - IT TAGLIO FUORI SAGOMA
FR DÉCOUPE DE PANNEAUX SURDIMENSIONNÉS - DE UNREGELMÄSSIGE PANEELSCHNITTE
EN After reporting the panel measurements on the back of the
panel, cut it using a “Acoustic Parquet® and Surface® custom
cutting tool” available among the GARVAN TOOLS.
IT Dopo aver riportato le misure sul retro del pannello tagliarlo
con “Acoustic Parquet® and Surface® custom cutting tool”
acquistabile tra i GARVAN TOOLS.
FR Après avoir marqué les mesures à l’arrière du panneau,
coupez-le avec “Acoustic Parquet® and Surface® custom
cutting tool”, qui peut être achetée avec les GARVAN TOOLS.
DE Nachdem die Maße auf der Rückseite des Paneels notiert
worden ist, das Paneel durch eine mit “Acoustic Parquet® and
Surface® custom cutting tool”, die unter den GARVAN TOOLS Custom cutting tool P.6
erhältlich ist.
M a de in Italy - 3+1+1 YEAR WARRANTY 5EN CUSTOM CUTTING - IT TAGLIO FUORI SAGOMA
FR DÉCOUPE DE PANNEAUX SURDIMENSIONNÉS - DE UNREGELMÄSSIGE PANEELSCHNITTE
Acoustic Parquet® and Surface® custom cutting See “installation instruction” sheet for cutting instruction
Taglio fuori sagoma Acoustic Parquet® e Surface® Guarda le istruzioni di taglio nella scheda “istruzioni di montaggio”
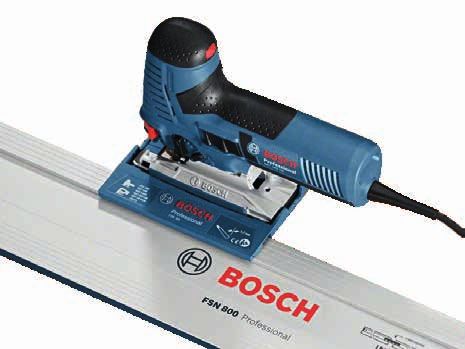
Complete Kit bosch GST 160 CE bosch FSN SA bosch FSN 1600 bosch T 313 AW
Barrel-Grip Jig Saw + adapter barrel-grip jig saw adapter guide 160 cm 3 x fiber blade
+ guide + fiber blade seghetto alternativo adattatore guida 160 cm 3 x lama x fibra
L=15,2 cm
GAR065 GAR060 GAR061 GAR062 GAR063
(3 x pack)
M a de in Italy - 3+1+1 YEAR WARRANTY 6M a de in Italy - 3+1+1 YEAR WARRANTY 7
Via Vittori, 21/1-2
                                                              TECHNICAL INFO LINE
                                    48018 Faenza (Ra) Italy
                                    Tel. +39 (0546) 682097
                                                              +39 0546 682097
                                    www.garvanacoustic.com    garvan@garvanacoustic.com
A C O U S T I C   W E L L N E S S   MADE IN ITALY             OFFICIAL 3+1+1 YEAR WARRANTY
Vous pouvez aussi lire