USER MANUAL GEBRAUCHSANWEISUNG MANUAL DO UTILIZADOR MANUEL DE L'UTILISATEUR - ENGLISH - DEUTSCH - PORTUGUÊS - FRANÇAIS
←
→
Transcription du contenu de la page
Si votre navigateur ne rend pas la page correctement, lisez s'il vous plaît le contenu de la page ci-dessous

USERMANUAL
GEBRAUCHSANWEISUNG
MANUALDO UTILIZADOR
MANUELDEL'UTILISATEUR
      ENGLISH – DEUTSCH – PORTUGUÊS – FRANÇAIS
BEEQ User Manual | V6 | 2021
2

1. Índice
2.        Preface | ENGLISH ............................................................................................................................... 9
      2.1.        National Requirements .............................................................................................................. 9
3.        Basic Safety Information .................................................................................................................... 9
      3.1.        Rider requirements .................................................................................................................... 9
      3.2.        Intended Use ................................................................................................................................ 9
      3.3.        Emergency stop, emergency shut-off.................................................................................. 10
      3.4.        Transport, Storage and Environmental Conditions ............................................................ 11
      3.5.        Total Weight Authorized on the bike ...................................................................................... 11
      3.6.        Child Seat and Bike Trailers .................................................................................................... 11
      3.7.        Check Before Use...................................................................................................................... 12
4.        The Bikes and its components ........................................................................................................ 13
5.        Adjusting your BEEQ ready to ride................................................................................................. 14
      5.1.        Adjusting the Handlebars........................................................................................................ 14
      5.2.        Adjusting the Saddle ................................................................................................................ 15
      5.3.        Adjusting the wheels................................................................................................................ 15
      5.4.        Adjusting the gear cables ....................................................................................................... 16
      5.5.        Chain Tension ............................................................................................................................. 16
      5.6.        Brake Levers Position.............................................................................................................. 17
      5.7.        Fitting the Pedals ...................................................................................................................... 17
      5.8.        Tightening torque values ......................................................................................................... 18
6.        Operation of the EPAC....................................................................................................................... 19
      6.1.        Display ......................................................................................................................................... 19
      6.2.        Walk assist mode (Sliding Aid) .............................................................................................. 19
      6.3.        Troubleshooting ......................................................................................................................... 19
7.        Maintenance and Cleaning .............................................................................................................. 20
      7.1.        Battery ........................................................................................................................................ 20
      7.2.        Battery Charging ...................................................................................................................... 20
      7.3.        Using Original Parts ................................................................................................................. 21
      7.4.        Maintenance ............................................................................................................................... 21
      7.5.        Maintenance of bike chains .................................................................................................... 21
      7.6.        Cleaning and Lubrification ...................................................................................................... 22
      7.7.        Service and Maintenance Schedule ...................................................................................... 22
8.        Errors and Troubleshooting.............................................................................................................23
9.        Emissions............................................................................................................................................ 24
10.           Warranty ......................................................................................................................................... 24
      10.1.       General warranty and guarantee conditions ..................................................................... 24
11.       Allgemeines | DEUTSCH ................................................................................................................... 27
      11.1.       Ländervorgaben ........................................................................................................................ 27
12.       Grundlegende Sicherheitshinweise ............................................................................................... 27

                                                                                                                            BEEQ User Manual | V6 | 2021
      3
12.1.       Fahreranforderungen............................................................................................................... 27
      12.2.       Bestimmungsgemäße Verwendung ...................................................................................... 27
      12.3.       Not-Stop, Not-Abschaltung ................................................................................................... 28
      12.4.       Transport, Lagerung und Umgebungsbedingungen .......................................................... 29
      12.5.       Für das Fahrrad zugelassenes Gesamtgewicht ................................................................ 29
      12.6.       Kindersitz und Fahrradanhänger .......................................................................................... 29
      12.7.       Vor Gebrauch prüfen ............................................................................................................... 30
13.      Die Bikes und ihre Komponenten ................................................................................................... 31
14.           Einstellen Ihres fahrbereiten BEEQ ..........................................................................................33
      14.1.       Einstellen des Lenkers ............................................................................................................33
      14.2.       Sattel einstellen ........................................................................................................................33
      14.3.       Räder einstellen ........................................................................................................................33
      14.4.       Schaltzüge einstellen .............................................................................................................. 35
      14.5.       Kettenspannung ....................................................................................................................... 35
      14.6.       Position der Bremshebel........................................................................................................ 35
      14.7.       Pedale einstellen....................................................................................................................... 36
      14.8.       Anzugsmomente ....................................................................................................................... 36
15.           Funktionsweise des EPAC ........................................................................................................... 37
      15.1.       Display ......................................................................................................................................... 37
      15.2.       Gehhilfe-Modus (Schiebehilfe) ............................................................................................. 38
      15.3.       Troubleshooting ........................................................................................................................ 38
16.      Wartung und Reinigung.................................................................................................................... 38
      16.1.       Akku ............................................................................................................................................ 38
      16.2.       Laden des Akkus ....................................................................................................................... 39
      16.3.       Verwenden Sie Originalteile .................................................................................................. 40
      16.4.       Instandhaltung .......................................................................................................................... 40
      16.5.       Wartung der Fahrradketten .................................................................................................... 41
      16.6.       Reinigung und Schmierung ..................................................................................................... 41
      16.7.       Service- und Wartungsplan .................................................................................................... 41
17.      Fehler und Störungsbehebung ...................................................................................................... 43
18.           Emissionen ..................................................................................................................................... 44
19.      Garantie ............................................................................................................................................... 44
      19.1.       Allgemeine Gewährleistungs- und Garantiebedingungen ............................................. 44
20.           Prefácio | PORTUGUÊS ................................................................................................................ 47
      20.1.       Requisitos Nacionais ............................................................................................................... 47
21.      Informação de Segurança Básica.................................................................................................. 47
      21.1.       Requisitos para o ciclista ....................................................................................................... 47
      21.2.       Utilização prevista ................................................................................................................... 47
      21.3.       Paragem de emergência, desativação de emergência ................................................... 48
      21.4.       Transporte, Armazenamento e Condições Ambientais ................................................... 49

                                                                                                                            BEEQ User Manual | V6 | 2021
  4
21.5.       Peso Total Autorizado na bicicleta....................................................................................... 49
      21.6.       Assento para Criança e Reboques de Bicicleta ................................................................ 49
      21.7.       Verifique antes de usar........................................................................................................... 50
22.           As bicicletas e os seus componentes....................................................................................... 51
23.           Ajustar a sua BEEQ ...................................................................................................................... 53
      23.1.       Ajuste do guiador ..................................................................................................................... 53
      23.2.       Ajuste do selim ......................................................................................................................... 53
      23.3.       Ajuste das rodas ...................................................................................................................... 53
      23.4.       Ajustar os cabos das mudanças........................................................................................... 55
      23.5.       Tensão da corrente .................................................................................................................. 55
      23.6.       Posição das manetes dos travões ....................................................................................... 55
      23.7.       Ajuste dos pedais ......................................................................................................................56
      23.8.       Valores de binário de aperto ..................................................................................................56
24.           Funcionamento da EPAC..............................................................................................................57
      24.1.       Ecrã – Unidade de controlo ....................................................................................................57
      24.2.       Modo de apoio à caminhada (Walk Assist)......................................................................... 58
      24.3.       Códigos de Erro ........................................................................................................................ 58
25.           Manutenção e Limpeza................................................................................................................ 58
      25.1.       Bateria ........................................................................................................................................ 58
      25.2.       Carregamento da bateria ........................................................................................................59
      25.3.       Utilização de Peças Originais .................................................................................................60
      25.4.       Manutenção ................................................................................................................................60
      25.5.       Manutenção das correntes da bicicleta ............................................................................... 61
      25.6.       Limpeza e Lubrificação............................................................................................................ 61
      25.7.       Plano de manutenção............................................................................................................... 61
26.           Erros e Resolução de problemas .............................................................................................. 63
27.           Emissões ........................................................................................................................................ 64
28.           Garantia .......................................................................................................................................... 64
      28.1.       Garantia geral e condições de garantia .............................................................................. 64
29.           Préface | FRANÇAIS ...................................................................................................................... 67
      29.1.       Exigences nationales ............................................................................................................... 67
30.           Informations de sécurité de base .............................................................................................. 67
      30.1.       Exigences du cycliste ............................................................................................................... 67
      30.2.       Utilisation conforme ................................................................................................................. 67
      30.3.       Arrêt d'urgence......................................................................................................................... 68
      30.4.       Conditions de transport, de stockage et d'environnement.............................................. 69
      30.5.       Poids total autorisé sur le vélo.............................................................................................. 69
      30.6.       Siège d'enfant et remorques de vélo.................................................................................... 69
      30.7.       Vérifications avant utilisation .................................................................................................70
31.      Les vélos et leurs composants....................................................................................................... 71

                                                                                                                            BEEQ User Manual | V6 | 2021
  5
32.        Ajustez votre BEEQ ....................................................................................................................... 73
   32.1.       Réglage du guidon..................................................................................................................... 73
   32.2.       Réglage du siège ....................................................................................................................... 73
   32.3.       Réglage de la roue .................................................................................................................... 73
   32.4.       Ajustez les câbles de changement de vitesse ...................................................................75
   32.5.       Tension de la chaîne .................................................................................................................75
   32.6.       Position des leviers de frein ...................................................................................................75
   32.7.       Réglage des pédales ................................................................................................................ 76
   32.8.       Valeurs de couple de serrage ................................................................................................ 76
33.        Opération du VAE........................................................................................................................... 77
   33.1.       Écran - Unité de contrôle ........................................................................................................ 77
   33.2.       Le mode d'assistance à la marche (Walk Assist)..............................................................78
   33.3.       Codes d'erreur ...........................................................................................................................78
34.        Entretien et nettoyage ..................................................................................................................78
   34.1.       Batterie ........................................................................................................................................78
   34.2.       Chargement de la batterie ...................................................................................................... 79
   34.3.       Utilisation de pièces d'origine ............................................................................................... 80
   34.4.       Maintenance .............................................................................................................................. 80
   34.5.       Entretien des chaînes de vélo ................................................................................................ 81
   34.6.       Nettoyage et lubrification ........................................................................................................ 81
   34.7.       Plan de maintenance ............................................................................................................... 82
35.        Erreurs et dépannage.................................................................................................................. 83
36.        Émissions ....................................................................................................................................... 84
37.        Garantie .......................................................................................................................................... 84
   37.1.       Conditions générales de garantie et de garantie ............................................................. 84
38.   EU-Declaration of Conformity / EG-Konformitätserklärung                                 / Declaração de
Conformidade-EU/ Déclaration de conformité UE ............................................................................. 86

                                                                                                                         BEEQ User Manual | V6 | 2021
  6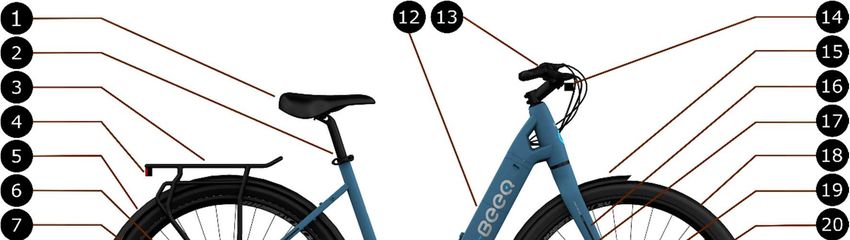
WARNING                                            WARNHINWEIS

  USE YOUR BEEQ WISELLY, MAKE YOURSELF VISIBLE TO        BENUTZEN SIE IHR BEEQ MIT BEDACHT, MACHEN SIE
                      DRIVERS,                                  SICH FÜR AUTOFAHRER SICHTBAR,
  USE APROPIATE CLOTHING AND WEARING A HELMET IS          VERWENDEN SIE GEEIGNETE KLEIDUNG UND DAS
               STRONGLY RECOMMENDED                           TRAGEN EINES HELMES WIRD DRINGEND
    AND OBLIGATORY FOR CHILDREN UNDER 12 YEARS.             BEI KINDERN UNTER 12 JAHREN EMPFOHLEN.
 IN THE CASE OF A CRASH, PERFORM A FULL SERVICE ON          FÜHREN SIE IM FALLE EINES UNFALLS EINE
                      YOUR BIKE.                         UMFASSENDE REVISION IHRES FAHRRADS DURCH.
IF YOU DETECT A PROBLEM, DO NOT USE YOUR BIKE BEFORE       WENN SIE EINE AUFFÄLLIGKEIT FESTSTELLEN,
                       REPAIR.                         BENUTZEN SIE IHR FAHRRAD NICHT, SOLANGE ES NICHT
         CHECK YOUR BIKE BEFORE EACH USE                               REPARIERT WURDE.
                                                         PRÜFEN SIE IHR FAHRRAD VOR JEDEM GEBRAUCH
READ THIS MANUAL CAREFULLY BEFORE THE FIRST USAGE
OF YOUR BEEQ, AND CHECK HOW TO SETUP AND MAINTAIN        LESEN SIE DIESE ANLEITUNG SORGFÄLTIG VOR DEM
                     YOURE-BIKE.                           ERSTMALIGEN GEBRAUCH IHRES BEEQ DURCH
      CONTACT YOUR BEEQ RETAILER FOR ADVICE.           UND CHECKEN SIE, WIE SIE IHR E-BIKE EINSTELLEN UND
                                                                           PFLEGEN.
                                                        KONTAKTIEREN SIE IHREN BEEQ-HÄNDLER FÜR EINE
             GO OUT AND ENJOY YOUR BEEQ!!                                 BERATUNG.

 For detailed operations for your BEEQ model,
    please refer to the online specification           NICHTS WIE HINAUS INS VERGNÜGEN MIT IHREM BEEQ!!
 (https://www.beeq-bicycles.com/the-range).
                                                        Ausführliche Informationen zu Ihrem BEEQ-
                                                        Modell finden Sie in der Online-Spezifikation
                                                        (https://www.beeq-bicycles.com/the-range).

                                                                                 BEEQ User Manual | V6 | 2021
         7
AVISO                                               ATTENTION

UTILIZE A SUA BEEQ DE FORMA SENSATA, SEJA VISÍVEL     UTILISEZ VOTRE BEEQ AVEC PRECAUTION, SOYEZ VISIBLE
                AOS CONDUTORES,                                       DES CONDUCTEURS.

 USE ROUPAS ADEQUADAS E O USO DE UM CAPACETE É          LE PORT DE VETEMENTS ADAPTES ET DU CASQUE EST

            FORTEMENTE RECOMENDADO                                 FORTEMENT RECOMMANDE
                                                      ET OBLIGATOIRE POUR LES ENFANTS DE MOINS DE 12 ANS.
     E OBRIGATÓRIO PARA CRIANÇAS COM IDADES
                                                     EN CAS D'ACCIDENT, EFFECTUEZ UN ENTRETIEN COMPLET DE
              INFERIORES A 12 ANOS.
                                                                         VOTRE VÉLO.
EM CASO DE ACIDENTE, REALIZE UM SERVIÇO COMPLETO
                                                     SI VOUS DÉTECTEZ UN PROBLÈME, N'UTILISEZ PAS LE VÉLO
                 À SUA BICICLETA.
                                                                     AVANT DE LE RÉPARER.
 SE DETETAR UM PROBLEMA, NÃO UTILIZE A BICICLETA
                                                         VÉRIFIEZ VOTRE VÉLO AVANT CHAQUE UTILISATION
               ANTES DE A REPARAR.
VERIFIQUE A SUA BICICLETA ANTES DE CADA UTILIZAÇÃO    LISEZ ATTENTIVEMENT CE MANUEL AVANT LA PREMIÈRE
                                                                        UTILISATION DE
LEIA ESTE MANUAL ATENTAMENTE ANTES DA PRIMEIRA          VOTRE BEEQ ET VÉRIFIEZ COMMENT CONFIGURER ET
                   UTILIZAÇÃO                                       ENTRETENIR VOTRE VÉLO.
   DA SUA BEEQ, E VERIFIQUE COMO CONFIGURAR E              CONTACTEZ VOTRE VENDEUR BEEQ POUR DES
             MANTER A SUA BICICLETA.                                  RECOMMANDATIONS.
   CONTACTE O SEU VENDEDOR BEEQ PARA OBTER
                RECOMENDAÇÕES.
                                                                   PROFITEZ DE VOTRE BEEQ !!

                                                     Pour des opérations détaillées sur votre modèle
             DESFRUTE DA SUA BEEQ!!
                                                     BEEQ, reportez-vous aux spécifications en ligne
                                                      (https://www.beeq-bicycles.com/the-range).
Para operações detalhadas para o seu modelo
   BEEQ, consulte as especificações online
 (https://www.beeq-bicycles.com/the-range).

                                                                            BEEQ User Manual | V6 | 2021
    8
2. Preface | ENGLISH

Thank you for purchasing your BEEQ!

This instruction manual is addressed at the riders and operators of the bikes assisted by an
electric motor described herein.

The bikes described in this instruction manual are assisted by an electric motor. They
correspond to the requirements of DIN EN 15194 Electrically power assisted cycles, amongst
others.

After turning on the bike, it assists according to the selected level only when you pedal, it also
as a mode for a walk-assist.

For safety reasons, it is most important that you read this User Guide BEFORE you operate the
bike. Improper handling can reduce its riding performance and most importantly, pose danger
to your safety and health!

For detailed operations for your BEEQ model, please refer to the online specification
(https://www.beeq-bicycles.com/the-range).

      2.1. National Requirements

There may be deviating requirements for each country regarding the standard features of
bikes. In particular there may be specific requirements regarding lighting, reflectors and other
components to be able to use the bike on the road. The responsibility to comply with this
regulation is to the rider.

3. Basic Safety Information

       3.1.     Rider requirements

There are no regulations to which riders of bikes assisted by an electric motor are subject, so,
in this case it’s recommended a minimum age of 15 years plus experience with pedal cycles.

The use of this bicycle must be done in strict compliance with the regulations in force, in
particular the Road Code.

In other respects, the rider must possess sufficient physical and mental ability to use a pedal
cycle.

       3.2.     Intended Use

To verify that the bike you just purchased corresponds to the usage that is intended, we have
the following table that associates the bikes to a category of riding conditions in order to use
them in full safety. (According to Standard Classification for Bicycle Usage ASTM 2043)

                                                                         BEEQ User Manual | V6 | 2021
  9
WARNING
              The non-respect of the usage criteria described here can cause risk to the
              user and a restriction of the warranty conditions.

      CATEGORY                              TYPE OF USE                               MODELS
                         This is a set of conditions for the operation of a
                         bicycle on a regular paved surface where the tires        Urban Models
                         are intended to maintain ground contact
                         This is a set of conditions for the operation of a
                         bicycle that includes Condition 1 as well as unpaved
                         and gravel roads and trails with moderate grades. In     Trekking Models
                         this set of conditions, contact with irregular terrain
                         and loss of tire contact with the ground may occur.
                         Drops are intended to be limited to 15cm (6") or less.
                         This is a set of conditions for operation of a bicycle
                         that includes Condition 1 and Condition 2 as well as
                         rough trails, rough unpaved roads, and rough terrain       Wild Models
                         and unimproved trails that require technical skills.     Full Suspension
                         Jumps and drops are intended to be less than 61cm
                         (24").
                         This is a set of conditions for operation of a bicycle
                         that includes Conditions 1, 2, and 3, or downhill
                         grades on rough trails at speeds less than 40 km/h       Non applicable
                         (25 mph), or both. Jumps are intended to be less than
                         122cm (48").

Changing settings and carrying out repairs to the bike shall only be deemed to be in accordance
with the intended use if they are carried out as described in this instruction manual.

Adhering to the recommended operating, maintenance and monitoring measures, and reading,
understanding and observing this instruction manual are all deemed to be in accordance with
the intended use.

   3.3. Emergency stop, emergency shut-off

The bike does not have a separate emergency stop or emergency shut-off.

The power will shut off as soon as the force upon the pedals stops. The bike will be
mechanically braked or stopped with the brakes.

If the pushing aid is activated the drive is interrupted as soon as the corresponding button is
no longer pressed.

The drive system will not turn itself off during braking and thus remains available at all times.

              WARNING
              When support mode is turned on the drive system reacts to the smallest
              impulse introduced through the pedals.
              Apply the brakes when getting to the bike to prevent an unintended start and
              lower the risk of an accident.

              The bike should only be turned on if the rider is able to brake, i.e. can reach at
              least one brake

              Do not perform work on the bike, without turning off the system.

                                                                            BEEQ User Manual | V6 | 2021
 10
3.4. Transport, Storage and Environmental Conditions
During transport and storage, the bike must be kept upright. Lying the package down or on end
is not sufficient to avoid damage to the frame and the wheels. The bike must be kept dry during
transport and storage. The drive battery, charger and electronics of the bike require the
temperature of storage to be kept at 5 °C to 25 °C.
The temperatures of the motor, drive battery and charger are monitored. The drive
system turns itself off as soon as a temperature outside of the permitted temperature range
is reached.
Direct sunlight can lead to the temperature in the drive system significantly exceeding the
permitted temperature.
WARNING
Do not expose the drive battery to permanent direct sunlight. Higher temperatures can
damage the drive battery and cause a fire.
3.5. Total Weight Authorized on the bike
The total weight that a bike is authorized to carry includes the weight of the bike, the weight of
the rider, and the weight of luggage and accessories. You can find the information for your bike,
label on the seat tube.
3.6. Child Seat and Bike Trailers
You can carry a child up to the age of seven years on the child seat. The rider must be at least
16 years old. The total weight allowed must be respected.
WARNING
Only use child seats that satisfy the standard EN 14344.
These child seats must safely support the child’s feet.
Never leave your child unattended in the child seat when you park your bike. The bike
could fall over and severely injure the child.
We do not recommend the use of bike trailers, the total weight must be observed, the
braking and handling can be seriously affected.
When using a child seat/trailer, this adversely affects the handling of the bike. The
additional weight can cause the bike to sway and significantly increases the braking
distance. Adapt your handling accordingly
If you change to a coil seatpost its recommended to cover any coil springs under the
saddle if a child-seat is fitted to prevent trapping of fingers.
Check the mounting options or consult your specialist. If the child seat is mounted incorrectly
a serious accident may occur.
BEEQ User Manual | V6 | 2021
11Do not exceed the maximum permissible gross weight of the bike and the maximum load
carrying capacity of the rear rack (If applicable). If you do, this could damage the rear rack and
frame and cause a serious accident.
3.7. Check Before Use
We’ve taken a lot of care during the assembly of your BEEQ, but parts may still come loose or
change of function during transportation for example.
You should therefore do a check of the following points:
Is the tire pressure correct? (You can check the recommended tire pressure engraved
on the sidewall of the tires)
Are the brakes working correctly?
Are the batteries sufficiently charged?
Is the handlebar stem and seat post correctly inserted and tightened?
Are the wheel hubs mounting nuts correctly tightened?
Is there any screws, nuts and quick-release devices not properly tightened?
Does the frame or fork present any deformation or damage?
Is the bell working correctly?
BEEQ User Manual | V6 | 2021
124. The Bikes and its components
In order to understand this manual, it’s a good idea to know the components of your bike and
learn some bike vocabulary.
The following pictures describes the main components that equip your BEEQ.
URBAN/TREKKING
Pedelec example
N° Components N° Components
1 Saddle 14 Front lighting
2 Seat post 15 Front mud guard
3 Luggage racks 16 Fork/Suspension
4 Rear lighting 17 Fix for front mudguard
5 Rear mud guard 18 Tire
6 Cassette/Internal gear 19 Brake caliper
7 Kickstand 20 Disc Brake
8 Derailleur/Internal gear 21 Rim
9 Chain 22 Front mud guard
10 Chain guard 23 Integrated Battery HIDDEN POWER
11 Motor 24 Pedal
12 Frame 25 Crank
13 Cockpit (Stem & Handlebar)
BEEQ User Manual | V6 | 2021
13WILD
Wild pedelec exemple
N° Components N° Components
1 Saddle 7 Derailleur
2 Seat post 8 Cockpit (Stem & Handlebar)
3 Frame 9 Crank
4 Integrated Battery HIDDEN POWER 10 Motor
5 Chain 11 Suspension Fork
6 Cassette
5. Adjusting your BEEQ ready to ride
Every BEEQ is has its own features and geometry, next you may find information to help get it
adjusted to each rider.
5.1. Adjusting the Handlebars
The handlebars will be initially adjusted for a general position. To reach a more comfortable
position, it is done by just loosing, adjusting and clamping the necessary screw connection.
The maximum torque on the clamping screws is 5Nm to 7Nm, provided that the component
does not indicate any other specifications.
Please observe that when adjusting/changing the handlebar, the response to steering
and braking can be adversely affected.
BEEQ User Manual | V6 | 2021
145.2. Adjusting the Saddle
The saddle post must be inserted to at least
the circular safety mark engraved on the
tube.
Minimum insertion
An ideal saddle height is when the knee is
at a soft bend when you are sat on the
saddle with your foot on the pedal at its
lowest point. Adjust the saddle to this
height.
Saddle position
The saddle should be parallel to the ground for maximum comfort. The tightening torque for
the saddle mounting screw and saddle post mounting screw should not be less than 18 Nm.
5.3. Adjusting the wheels
The wheels are fully tightened (in some models the front wheel is supplied disassembled), if
adjust is needed or you need to remove the wheel, tighten the screws (or quick release) to
make sure the front and back wheels are fixed to the front fork and frame. Check torque table
for values.
If a quick release is used, the minimum force to unlock should be at least 70Nm. The correct
position of quick release, when locked should be close to the frame/fork with the mark “Close”
visible.
To install the wheel (Front/Rear) please follow these steps:
THRU-AXLE with Quick-Release/Allen Key
1. Position the wheel on the dropouts
2. Slide the axle trough the hub (lever in the open position)
3. Rotate the axle clockwise to screw on the frame/for or n the supplied nut (hold tight,
no tools needed), find the best closing force. (If it’s an Allen key tighten to 10Nm and
it’s done)
4. Open the lever to the angle of 45º before close
5. Choose the closing position. The axle doesn’t rotate
6. Close the lever
7. The force required to close should leave an imprint on your hand
BEEQ User Manual | V6 | 2021
159mm Quick-Release
1. Position the wheel on the dropouts, the axle should be on the wheel.
2. Rotate the axle clockwise, find the best closing force.
3. Close the lever
4. The force required to close should leave an imprint on your hand
To remove the wheel please do the reverse operation.
For detailed operations for your
BEEQ model, please refer to the
online specification
(https://www.beeq-
bicycles.com/the-range).
Quick release tightning
The recommended tire pressure is 2 bar, you can use a minimum of 1,5bar and the maximum
pressure engraved on the bike tire.
5.4. Adjusting the gear cables
The gears of our bikes are adjusted during the assembly, so, you should not need to adjust it.
In the case the gears will not engage cleanly the settings in the gear lever housing will need
correcting. Unscrew the gear cable housing on the gear lever housing by hand in small steps
and check the functionality every time after a correction has been made.
In order to turn the gear cable housing, it must be pulled out a little from its position. Ensure
that it is now sitting properly before testing the functionality.
If the gear cables cannot be adjusted in this way the assembly of the gear cables should be
checked by a trained technician.
For detailed operations for your BEEQ model, please refer to the online specification
(https://www.beeq-bicycles.com/the-range).
5.5. Chain Tension
The chain tension must be adjusted so that vertical play of one or two centimeters is present
in the unsupported chain span between the chainring and sprocket wheel.
If play is verified, to remove the slack, proceed as follows:
Loosen the rear wheel nuts.
BEEQ User Manual | V6 | 2021
16 Pull the wheel back into the dropouts until only the permissible amount of play is
present in the bike chain.
Tighten all screw connections carefully clockwise.
5.6. Brake Levers Position
The brake levers come already assembled in an optimal position for the general rider, but if
you feel you need to adjust it, we advise to do as follows:
Loosen the screws that hold the brake levers, then adjust the angle to a position that
best suits your needs in the riding position. (It’s recommended that the fingers follow
the same angle as the forearm)
If needed adjust the distance of the brake lever to the grip, in order to use the lever
easily with two fingers (If feel more comfortable using three fingers adjust
accordingly)
Please note:
Right lever: Rear Brake
Left lever: Font Brake
Brake lever position
WARNING
Brake levers which push through the handlebar grip could lead to you not being able to
brake in time. This could result in a fall or an accident. Check the brakes
are working properly before each ride.
In wet weather conditions the braking distances increases.
Do not touch the braking rotors after heavy use, the disc will be hot and may cause
injuries.
5.7. Fitting the Pedals
To install the pedals, please follow these steps:
Apply a small amount of grease on the threads of each pedal
Tighten the right pedal marked as “R” in a clockwise direction on the crank of the drive
side.
Tighten the left pedal marked as “L” in a anti-clockwise direction on the crank of the
non-drive side.
The recommended torque of the pedal is 30Nm.
BEEQ User Manual | V6 | 2021
17WARNING
If you install clipless pedals, please refer to the manufacturer user manual for
installation procedures.
Be sure you are familiar to the clipping and unclipping process, there’s a risk of fall or
injuries.
5.8. Tightening torque values
To guarantee the reliability of your bike, it is imperative that you tighten the screws of all
components carefully and regularly check them. Use a torque wrench in order to check these
values. Always tighten in a progressive manner in order not to apply a torque higher than the
recommended values.
Never go over the recommended maximum torque value in any case.
On some parts, the recommended torque values are indicated on the part itself. Always respect
these recommended levels. If you cannot find the correct torque rate for your component,
check the specific notice that was provided with your bike, or ask your retailer for advice.
Component Screws and bolts Torque value
Transmission
Fixation screw 8-10 Nm
Rear derailleur Cable screw 6-7 Nm
Tension screw 3-4 Nm
Gear lever Fixation screw 5 Nm
Cassette Tightening screw 35-45 Nm
Crank Fixation screw on motor axle 45-50 Nm
Pedal Pedal axle 25 -30 Nm
Cockpit
Seat post with 1 fitting block 18-20 Nm
Saddle on seat post
Seat post with 2 fitting blocks 8 Nm
Seat post Seat post clamp 5 Nm
Screw on the handlebar 5-6 Nm
Screw on the pivot 6-8 Nm
Stem
Angle screw 14-15 Nm
Screw on the stem cover 4-5 Nm
Grips Fixation screw 3 Nm
Accessories
Classic luggage rack Fixation screw on the frame 8-10 Nm
Fixation screw on the fork 5 Nm
Mud guard Fixation screw on the support 3 Nm
Fixation screw on luggage rack/frame 5 Nm
Pedals Fixation on crank 18-22 Nm
Kick-stand Fixation screw 10-14 Nm
Brakes
Brake caliper Fixation screw on the frame/fork 6-8 Nm
Brake lever on handlebar Fixation screw on the brake lever 4-5 Nm
Fixation screw on the hub 5-7 Nm
Disc brake
Centerlock lock ring 35-45 Nm
Drive System
Crank Fixation screw on the motor 57-64 Nm
Spider Fixation screw on the motor 25-30 Nm
Chainring Fixation screw on spider 10 Nm
BEEQ User Manual | V6 | 2021
186. Operation of the EPAC
6.1. Display
The ebike is equipped with a display to switch the pedelec on and off, activate and control
support from the electric motor or switch on the headlights
For detailed operations for your model, please refer to the online specification
(https://www.beeq-bicycles.com/the-range).
6.2. Walk assist mode (Sliding Aid)
The sliding aid is available for starting or pushing the wheel. The drive of the pedelec supports
the movement of the wheel. The sliding aid can be activated up to a speed of < 6 km/h. You use
the sliding aid when sliding the wheel, when starting off or when assisted starting on a hill. If
you push the wheel, you move beside the wheel. Use the sliding aid as a starting aid when
sitting on the bike. In both cases, the activated sliding aid moves the pedelec.
WARNING
The sliding aid moves the pedelec. Grasp the handlebar grips and be ready to apply the
brakes. When sitting on the bike, do not press the pedals. Your power and the sliding aid
could accelerate the pedelec very strongly. The second pedal also moves and can injure
you when you climb up! Do not use the sliding aid for slow driving.
For detailed operations for your model, please refer to the online specification
(https://www.beeq-bicycles.com/the-range).
6.3. Troubleshooting
If the pedelec presents some kind of error, it will appear in the form of an error code.
For detailed operations for your model, please refer to the online specification
(https://www.beeq-bicycles.com/the-range).
Note the error codes!
Error codes can indicate serious errors in the pedelec system. These errors
prevent safe operation of the pedelec. Accidents with personal injury and
damage to the pedelec may occur. Stop using the pedelec. Inform yourself
about the meaning of the error code and observe the solution approach. If the
meaning of the error code is unclear, stop the drive and turn off the wheel.
Contact the manufacturer, the dealer or your garage for information on the next
steps
BEEQ User Manual | V6 | 2021
197. Maintenance and Cleaning
7.1. Battery
The battery is one of the key elements of your BEEQ, and by following some simple rules you
can optimize its lifespan:
Do not stock your battery without any charge for prolonged periods; the battery can go
into a deep discharge which will shorten its lifespan.
The battery can be stocked without use or charging for up to a year, but it must be left
charged to 70%.
If stored for a long period of time, its recommended to charge it every 6 months.
Even if it can bear being stocked in temperatures of -20°C to +60°C, you will optimize
its lifespan if you keep it at an ambient temperature (20°C).
Respect the temperature conditions for usage which are -5°C to 40°C.
Never leave your battery exposed to high temperatures or in direct sunlight for a long
period (for example in the back of a car in full sunlight).
Ensure that the contact points are always clean and do not insert metallic objects.
The battery is conceived in order to be recyclable.
Do not throw them away in normal rubbish or the tip. There is a specific treatment (ask
your local retailer for advice).
Be careful, the transport of Lithium-ion batteries is subject to strict rules.
7.2. Battery Charging
The bike is supplied with a charger, which is designed to work with a 230 V and 50 Hz power
supply and must not be used on any other. (Check the label on the charger)
The ambient temperature must be within the range of 0 °C to 40 °C. The charger will get very
hot during charging. Ensure the charger is used in a clean and highly inflammable environment.
WARNING
The drive battery may only be charged with the supplied charger. Noncompliance can
lead to a fire or explosion.
If moisture penetrates the charger there is a risk of electric shock.
The charger's power cable should be connected to a household earthed power socket.
The charger's cable is inserted into the charging socket of the drive battery on the down tube.
Mechanical encoding is used to ensure the connections are not confused. The cable and the
drive battery are magnetic and will guide the cable into the correct position.
Charging will start automatically. The current battery status will be shown on the display
during charging. The battery status display will flash to show that it is charging. The charger
will flash infrequently to show that charging is ongoing.
Once the green indicator light is continuously displayed the battery is fully charged.
Keep the drive battery and the charger away from children.
The statutory requirements regarding handling, transport and disposal of the drive
battery should be observed.
BEEQ User Manual | V6 | 2021
207.3. Using Original Parts
It is strongly recommended to use the original parts for all components that are critical for
safety.
The use of parts that are non-compliant with your bike, as well as any modification to the frame
or parts can cause risks for the user of the bike as well as a restriction of the guarantee.
If you wish to change your cranks to increase their length, you should first check that they will
not pass too close to the chain stays. Please also check that your shoe will not touch the wheel
or the mud guard when the cranks are in a horizontal position and you turn the handlebar. This
same check should also be carried out if you increase the width of the front tire.
What’s more, if you increase the length of your cranks, you will decrease their distance from
the ground, so you are at risk of touching the ground if pedaling when cornering or on rough
terrain, and therefore risk a fall. Ask your retailer for advice.
7.4. Maintenance
The following inspection and servicing measures can be regularly carried out by the
operator/rider. If in doubt follow the advice of a specialist in a bike shop.
Tire pressure should be adjusted to the rider preferences, with a minimum of 1,5bar
and a maximum pressure marked on the side of the tire.
Wear and tear on the tires should be inspected
The drive chain and the chain rings should be cleaned with appropriate cleaning agents
and lubricated (Use specific bike lubricants only)
The gear cables should be checked and, if required, corrected
Wear and tear on the brake pads and brake discs should be inspected
Pressure in the suspension elements should be checked
List of the different wear parts:
Elements of the brakes (pads, discs).
Tires, inner tubes, rims.
Cables and cable hoses.
Elements of the transmission (chain, chain ring, cassette, derailleur tensioner, chain
guide).
Grips.
Bearings.
Freehub body
Regularly check all wear parts, especially parts for the brakes and the transmission in order
to not take risks. If you have any doubt about the level of wear on any part, please check the
manufacturer’s notice or check with your retailer. Prevention is better than cure, so don’t wait
till the last moment!
7.5. Maintenance of bike chains
Bike chains are wear parts. Bike chains with hub gears wear out after roughly 2000km, and
after roughly 1000 km with derailleur gears.
BEEQ User Manual | V6 | 2021
21WARNING
If the bike chain is worn, it can break and cause a crash. If your bike chain is worn, have
it replaced by your specialist cycle shop before using the bike again.
7.6. Cleaning and Lubrification
The bike must be protected against environmental influences such as dirt, perspiration and
salt when using the bike during winter or in the sea air. The bike should be cleaned with a
wrung-out cloth. A small amount of mild detergent may be added to the cleaning water. Finally,
the bike should be protected with a small amount of maintenance product.
WARNING
It is always important to ensure that all friction surfaces of the brakes do not come into
contact with any lubricants or other maintenance products.
If the disc pads are polluted, it can strongly reduce the braking performance.
If brake pads are polluted, they must be replaced immediately.
The electric drive system is only protected against ordinary splashes of water. It must
not be cleaned with high pressure water devices, jets of water or compressed air.
This could result in a short circuit, loss of function, fire and explosion
7.7. Service and Maintenance Schedule
It is advisable to have your BEEQ serviced regularly after the bedding-in phase, which is
normal to occur, because of the relaxing of the cables tension, etc. The schedule given in the
table below is a rough guide for cyclists who ride their pedelec between 1,000 and 2,000 km or
50 to 100 hours of use a year.
If you consistently ride more or if you ride a great deal on poor road surfaces, the service
intervals will shorten accordingly.
Before
Component Action every Monthly Annually Other
ride
Lightning Check function X
Tires Check pressure X
Check tread and side walls X
Brake cables/pads/lines Inspect visually X
Brakes (disc brakes) Check lever travel, brake pads, X
seals, test brakes in stationary
Replace liquid (Use mineral brake
oil)
Suspension fork/rear shock Check recommendation from (b)
manufacturer
Fork (rigid) Check for cracks and replace, if At least every 2
needed years
Bottom bracket Check for play X
Dismount and re-grease (b)
Chain Check and lube, if needed X
Check wear and replace if needed (b)
Derailleur gears (b) after 900kms or
40 hours of use
Telescopic seat post Check recommendation from (b)
manufacturer
BEEQ User Manual | V6 | 2021
22Crank Check and retighten if needed X
Painted/anodized/carbon Polish (b) every 6 months
surfaces
Wheels/spokes Check wheel trueness and tension X
True or retighten (b) if needed
Hubs Check for play X
Regrease (b)
Handlebars and stem (made Check and replace if needed (b) annually for
of aluminum and carbon) MTB and trekking,
every 2 years for
others
Headset Check for play X
Regrease (b)
Pedals (all) Check for play X
Pedals (clipless) Check for play X
Regrease lock system (b)
Seat post/stem Check tightness X
Dismount and re-lubricate (b)
Carbon: clean and apply new (b)
assembly paste (NO GREASE)
Rear derailleur Clean and lubricate X
Quick release/thru-axle Check tightness X
Cables (gear/brakes) Disassemble and lubricate (b)
Replace if needed (b) annually for
MTB and trekking,
every 2 years for
others
If you have previous experience in bicycle mechanics, and have the appropriate tools and
lubricants/oils (for example: torque wrenches and bleeding kit for hydraulic disc brakes), you
should be able to do the actions marked with X. If in this case, you have any doubts or questions
when encountering a defect or procedure, please contact a specialized bicycle shop or dealer.
The actions marked with (b) are recommended to be performed at a specialized bicycle shop
or dealer.
8. Errors and Troubleshooting
The system will not turn on:
Check the condition of the system
Check if the charging socket is dirty (oil, grime) or if there is moisture present. The
system can only be turned on properly if the charging socket is clean and dry.
Check the battery charge level.
Speed is not shown correctly
Check if the position of the magnet is correct
Check if the speed sensor cable is defective
Motor does not provide sufficient power/system range insufficient
Ride until two charges are completely empty. Then constantly charge the battery from
0% - 100% without interruption.
For information:
· Take environmental influences, fitness condition and tire pressure into
account
· Optimal efficiency is between 70-80 rpm
BEEQ User Manual | V6 | 2021
23Support is intermittent whilst riding/the system
intermittently turns itself off during operation/support is
inconsistent
Check if the position of the magnet is correct
Check the charging level of the battery
Magnet position
For detailed error codes for your model, please refer to the online specification
(https://www.beeq-bicycles.com/the-range).
Should the error continue to manifest despite carrying out the actions listed
above please contact an authorized retailer.
9. Emissions
The electromagnetic compatibility protection requirements are complied with in accordance
with DIRECTIVE 2014/30/UE. The bike and the charger may be used in residential areas without
restriction. The A-weighted emission sound pressure level is lower than 70 dB (A).
10. Warranty
10.1. General warranty and guarantee conditions
We guarantee that the system-integrated components are free of defects within the warranty
period. If, exceptionally, a defect should occur in the components during this time, it will be
repaired free of charge. Free warranty repair will only be provided upon presentation of the
original invoice; purchase receipt issued and stamped by the Seller, provided that the invoice
contains the name of the Buyer, the name and address of the Seller, the model
designation and, if applicable, the serial number of the purchased product and the date of
purchase. We reserve the right to refuse warranty repair if this information is incomplete or
has been subsequently removed or modified. We also reserve the right to replace the defective
product with another equivalent product of the same or better quality as the defective product,
instead of repairing the defective product.
Warranty period
The warranty period is two years from the date of purchase as evidenced by the documents
mentioned above.
BATTERY
For the battery the warranty is for 2 years or 500 complete charging cycles, whichever
happens first.
Use of the guarantee
The repair takes place in service points authorized by us. Any costs incurred for the safe
transport of the product to the service point and back shall be borne by the purchaser.
BEEQ User Manual | V6 | 2021
24Area of application
The scope refers to all countries of the European Union.
Warranty exclusions
Our warranty does not cover:
- Regular inspections, maintenance and repair or replacement for parts after normal wear and
tear
- The replacement, repair or delivery of consumables
- Troubleshooting of any type of software parts subject to wear and tear, consumables and
accessories used with this product
- The repair of defects caused by changes made to the product without our permission.
- Adaptations of the products to technical and/or safety norms or standards which are
necessary because the product does not comply with the safety norms or standards in the
country of use outside the country of purchase or because of changes to these safety norms
or standards after purchase
- Compensation for damage caused because the product does not comply with the technical
standards and norms given in the country of use outside the country of purchase.
A warranty repair is not transferable, means it if the product has been resold privately in the
meantime (warranty applies only to first buyers) and if errors or damage have been caused
by:
- Improper handling, excessive use or handling or operation of the product in a manner
inconsistent with the instructions contained in the operating instructions or manuals for the
operating personnel and or relevant user documents, including but not limited to improper
storage, falls or severe vibrations;
- Corrosion, dirt, water or sand;
- Repairs or modifications carried out by an unauthorized specialist workshop;
- Use of spare parts that are not suitable for the product.
- Connection of the product to equipment not intended for this connection
- Insufficient packaging when shipping the product to an authorized service center;
- Accidents, natural disasters and all other causes that we cannot control or foresee, including,
but not limited to lightning, water, fire, sedition and inadequate ventilation and air conditioning.
Other
The repair may be delayed outside the original country of purchase if the repair product is not
yet sold there or is sold in a country-specific version and as a result certain spare parts for
the product are not available in that country. We assume no liability for further claims. This
shall not apply where liability is mandatory, e. g. in cases of intent, gross negligence, injury to
life, limb or health, or breach of fundamental contractual obligations. If the product is returned
for warranty purposes, the product must be carefully packed, insured and accompanied by
proof of purchase and a description of the defect. This guarantee does not affect the respective
country-specific legal claims to which the buyer is entitled against his seller in the event of
defects, nor the rights to which the buyer is entitled in his country from product liability against
the manufacturer or other mandatory legal norms. In the absence of national legislation to this
effect, the buyer may rely solely on this warranty. Furthermore, neither we nor any other
organization involved shall be liable for any indirect or consequential damages arising out of
any failure to comply with any express or implied warranty of this product.
BEEQ User Manual | V6 | 2021
25Vous pouvez aussi lire