COFFRET DE RÉPARATION DES PLASTIQUES BRAZING PLASTICS REPAIR KIT - GYS
←
→
Transcription du contenu de la page
Si votre navigateur ne rend pas la page correctement, lisez s'il vous plaît le contenu de la page ci-dessous
COFFRET DE RÉPARATION DES PLASTIQUES

               BRAZING PLASTICS REPAIR KIT

       NOTICE D’UTILISATION …………………………… 2 - 3

       USER’S MANUAL ……………………………………… 4 - 5

       BEDIENUNGSANLEITUNG …………………………. 6 - 7

                        https://youtu.be/PVRajZ5vruk

                           Vidéo de démonstration
                            Demonstration video
                            Demonstrationsvideo

050932-13/02/2020-V2
Vérifier la nature du plastique à réparer. 90% des plastiques utilisés dans l'industrie automobile sont des Polyéthylènes (PE) ou Polypropylènes (PP) et sont parfaitement réparables avec le concept de réparation par brasage. D'autres plastiques le sont également : Thermodurcissable : PUR-RIM-RRIM-EEBC-EMA-PE Thermoplastiques : PP-TEEE-TPE-TPO-TEO-PP/EPDM-TPU-TPUR Les constructeurs indiquent la nature des plastiques sur les pièces. Le concept de réparation par brasage consiste à fondre dans la masse, grâce à un fer électrique et sa panne spécialement conçue, un fin grillage en Inox 18/8 (ref. 052949 – Grilles inox 25cm x 12.5 cm ). Ce grillage servira de renfort à la réparation, assurera solidité et flexibilité à la réparation. La finition et le remplissage du trou ou de la cassure se fera avec notre apport recommandé (ref. 052956 – Baguettes de brasage plastique ) qui est un apport en Polypropylène renforcé de fibre de verre et fibre de carbone. Cet apport se brase et s'applique comme une soudure d'étain Mise en oeuvre : Connecter le fer à souder sur une alimentation 230V. Potentiomètre du variateur électronique au maximum pour en accélérer la chauffe (550°C). La T° se réduira pour la réparation de fines épaisseurs ou certains plastiques dont la T° de fusion est inférieure. Mode opératoire : Pour la qualité de la réparation, il est préférable de travailler éléments démontés (pare-chocs). En effet dans le cas d'une fissure ou d'une fêlure, un renfort arrière est souhaitable pour consolider la réparation. Néanmoins, un trou en façade avant peut être réparé sans démontage. Pour ce faire, il suffit de poncer un ½ mm de matière autour du trou afin d'éviter une surépaisseur, de poncer sur 3 ou 4 cm autour du trou, d'en chanfreiner les bords et de fondre la grille inox dans la masse. Une fois cette opération terminée, il suffit de remplir avec l'apport ref. 052956. Préparation du support : Nettoyer et dégraisser la pièce. Ne pas utiliser de nettoyant solvanté. De l'eau savonneuse sera préférable à tout autre produit de nettoyage. Découper un morceau de grille, de façon à couvrir la fissure ou la cassure en laissant déborder de 3 cm de chaque coté de la réparation à effectuer. La grille inox viendra en face arrière du pare-chocs et fera office de renfort. Poncer la zone de réparation avec un papier abrasif grain 40. Eviter une trop grande vitesse de rotation qui aurait pour effet de faire fondre la matière. Un léger ponçage suffit, afin d'enlever la peinture ou autres produits de recouvrement. 050932-13/02/2020-V2
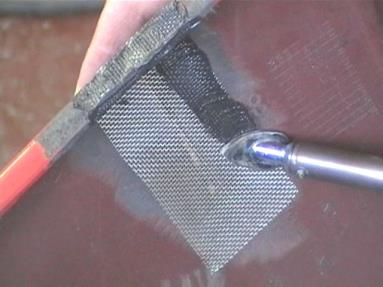
Positionner la feuille inox sur la cassure, tout en prenant soin que les bords de la fissure soient
parfaitement en alignement. Faites fondre la toile inox dans la masse avec la panne plate prévue à
cet effet (Photo 1).
Ne pas appuyer sur le fer. La T° de 550°C de la panne est suffisante pour faire remonter la matière
en fusion dans les trous du grillage. Cette opération effectuée, d'ores et déjà et pour un coût
dérisoire votre pare-chocs a déjà une excellente résistance à l'arrachement et aux chocs (Photo 2 ).
Ne jamais utiliser un autre renfort que les grilles fournies par JBDC. En effet, par souci d'économie,
vous pourriez être tenté d'utiliser un fin grillage d'acier, voire un fin grillage d'aluminium que l'on
trouve assez facilement dans le commerce.
Le grillage acier, après avoir chauffé s'oxydera rapidement et vous risquez de voir remonter des
traces d'oxydation sous peintures, de plus après quelques semaines, le renfort se sera désagrégé,
ce qui aura pour conséquence de fragiliser votre réparation.
Le grillage aluminium n'a aucune résistance mécanique et se déchire facilement à la moindre
sollicitation.
Cette opération étant terminée, laissez refroidir (vous pouvez refroidir à l'air avec une soufflette). En
face avant, poncez largement autour de la cassure. Chanfreiner les bords de la cassure. Vous pouvez
chanfreiner en utilisant l'extrémité de la panne, coté pointu, en fondant le plastique.
Soufflez, nettoyez, dégraissez (de l'eau savonneuse suffit) rincez, dépoussiérez.
Remplissez le chanfrein avec notre baguette d'apport ref. 052956.
Préchauffez la baguette (photo 3), jusqu'a ce qu'elle soit en fusion sur la moitié de l'épaisseur (ce
geste est important, il permet à l'apport de bien se marier par capillarité avec le support).
Déposez la baguette, coté fondu partiellement sur la pièce à réparer.
Opérez comme pour un étamage à l'étain (photo 4).
Laissez refroidir ou soufflez.
Ponçage : enlever l'excédent de matière avec un papier abrasif Grain 40 ou 80. En ponçage de
finition, pour éviter le peluchage, nous vous conseillons d'utiliser les abrasifs ABRALON. Le ponçage
de finition terminé, nettoyage, soufflage et Primer Plastique d'accrochage.
Pour supprimer les défauts d'aspects ou manque de matière, un mastic spécial plastique peut être
utilisé.
Remarque : Certains plastiques tels que les éléments de carrosserie sont également soudables
avec les baguettes de brasage ref. 052956, mais vous ne pourrez pas fondre notre grille inox dans la
masse.
Dans ce cas après avoir parfaitement poncé et dégraissé les bords de la cassure, faire un étamage
avec les baguettes de brasage.
Recouvrez entièrement la zone de réparation.
Posez la grille inox sur la zone étamée et la fondre dans la matière déposée et rechargez de
nouveau.
Information :
SMC - Fibre de verre – UP - FRP ne se soudent pas. Ils se collent (Utilisez UV PATCH et
FASTSEALER)
ABS – PA - PC/PBT - PPO ne se soudent pas par brasage, mais peuvent se coller.
ATTENTION : NE JAMAIS LAISSER LE FER SOUS TENSION TETE EN BAS, RISQUE
DE SURCHAUFFE DU CORPS ET DE DETERIORATION.
EN CAS DE VENTILATION INSUFFISANTE, PORTER UN MASQUE RESPIRATOIRE.Check the type of plastic to be repaired
The easiest way to identify the type of plastic you are working on is to
look at the ID symbol on the backside of the part. Ex : PP/EPDM - PE –
PP - …
There are 2 types of plastics Bumpers
o Thermoplastic
o Thermoset
Thermoplastics symbols are: PP-PE-PP/EPDM -TEEE-TPE-TPO-TPU-TPUR
Thermoset symbols are : PUR-RIM-RRIM-EEBC
Thermoplastic or Thermoset bumpers should be repaired in a different
way.
The Car Manufacturers indicate the nature of the plastics on the
parts.
The concept of brazing repair consists in melting a stainless steel mesh inside the plastic, using an electric soldering iron with a
specially designed tip, and a fine stainless steel mesh 18/8 (ref. 052949 – Stainless Steel mesh 25cm x 12.5cm).
This mesh will actually reinforce the repair, and ensure the solidity and the flexibility of the bumper. The finishing and the
filling of the holes or breaks will be done by adding the recommended plastics brazing material (ref. 052956 – Plastic Brazing
Sticks), which is Polypropylene reinforced with glass fibre and carbon fibre. This filling material is applied just like a tin
soldering.
Operating instructions :
Connect the soldering iron to a 230V electrical supply. Set the potentiometer of the electronic variator to the maximum in order
to accelerate the heating (550°C). The temperature will be reduced when working on thin sheets of plastic or when working on
plastics which melting fusion point is lower.
Instructions of use :
It order to optimize the quality of the work, it is recommended to work on elements dismantled from the car. Indeed, in case
of a break or a crack in the bumper, a back reinforcement is recommended to make the repair stronger. However, a hole in the
front of the bumper can be repaired without taking off the bumper. To do so, 1/2mm of material should be grinded around the
hole in order to avoid higher thickness around the hole; grind 3 to 4 cm around the hole, bevelling the edges, and melt the
stainless steel mesh in the plastic. Once this operation is finished, fill with the brazing sticks (filler ref. 052956).
Preparation of the surface of the bumper :
Clean and remove any grease on the part. Do not use cleaning products with solvents. Soapy water will be preferred to
any other cleaning product. Cut a piece of mesh, in order to cover the whole of the break or crack, and extend 3cm on either
side of the repair to be performed. The stainless steel mesh will come on the back of the bumper and will act as reinforcement.
Grind the area to be repaired using abrasive paper with grain 40. Avoid a too fast rotation speed, which would make the plastic
material melt. A slight grinding is enough, in order to remove the paint or any other covering product.
050932-13/02/2020-V2Position the stainless steel mesh onto the break, taking care that the edges of the crack are perfectly
aligned. Make the stainless steel mesh melt into the plastic, using the soldering iron tip specifically
designed for this purpose (photo 1).
Do not press too hard on the soldering iron. The temperature of 550°C of the tip is quite sufficient
to make the melted plastic go back up through the stainless steel mesh. Once this operation has
been performed, and for a very limited cost, your bumper already has quite a good resistance to
stress and shocks (photo 2).
Never use another mesh than the one provided by JBDC. Indeed, in order to save money, you may
be tempted to use a fine steel mesh, or even an aluminium mesh which is commonly found on the
market.
the steel mesh, when being heated will oxidize quickly and the risk is to have traces of oxidation
coming back up under the paint; furthermore, the mesh will degrade with time, fragilizing the
repair that you have just performed.
the aluminium mesh has no particular mechanical resistance, and it will tear off under stress.
Once this operation is finished, leave the mesh to cool down (you can use compressed air to cool
faster). In the front of the bumper, grind largely around the break. Chamfer the edges of the break.
You can chamfer using the extremity of the soldering tip, on the sharp side, by melting the plastic.
Blow off, clean and remove grease (soapy water is enough, rinse); take off the dust.
Fill the chamfer with the JBDC brazing sticks ref. 052956.
Pre-heat the brazing stick (photo 3) until it is melted on half of the thickness (this recommendation
is important, as it allows a good match by capillarity with the bumper).
Apply the brazing stick, melted side against the part to be repaired.
Operate jus like brazing with tin (photo 4).
Leave the surface to cool down and blow.
Sanding : take off the excess material using sanding paper grain 40 or 80. For finishing sanding, in
order to obtain a perfect surface, it is recommended to use ABRALON abrasive. Once the finishing
sanding is performed, clean, blow, and apply plastic primer.
In order to remove aspect defaults or lack of material, a specific plastic mastic can be used.
Comment : some plastics like the car body elements can be repaired with the brazing sticks
process, but it will not be possible to make the steel mesh melt deep into the plastic.
In this case, after perfectly sanding and removing grease on the edge of the break, braze with the
JBDC brazing sticks.
Cover entirely the area to be repaired.
Apply the steel mesh on the brazed area and insert it in the melted material deposited; then charge
again with brazing material.
Information :
SMC – Glass fiber – UP - FRP do not solder together. They should be glued (Use UV PATCH and
FASTSEALER)
ABS – PA - PC/PBT - PPO do not seal with brazing process, but can be glued.
BEWARE : NEVER LEAVE THE SOLDERING IRON SWITCHED ON WITH THE TIP
FACING DOWN, AS THE BODY OF THE SOLDERING IRON MAY OVERHEAT AND
DETERIORATE. IN CASE OF BAD AIR EXTRACTION, WEAR A BREATHING MASK.Bestimmung des Kunststofftypen Bei 90% der in der Automobilindustrie verwendeten Kunstoffe handelt es sich um Polyethylene (PE) oder Polypropylene (PP), die mit dem Reparaturlötverfahren komplett reparabel sind. Der einfachste Weg den Kunststofftypen Ihres Werkstückes zu bestimmen, ist, das entsprechende Symbol auf der Werkstückrückseite nachzuschauen: z.B. PP/EPDM – PE – PP – usw. Es gibt 2 verschiedene Stoßstangentypen aus Kunststoff: Thermoplastische Duroplastische Symbole für thermoplastische Werkstoffe sind: PP-PE-PP/EPDM –TEEE- TPE-TPO-TPU-TPUR Symbole für duroplastische Werkstoffe sind: PUR-RIM-RRIM-EEBC Thermoplastische und duroplastische Stoßstangen müssen auf unterschiedliche Art bearbeitet werden. Die Hersteller vermerken den Kunststofftyp stets auf den jeweiligen Werkteilen. Beim Reparaturlötverfahren wird ein dünnes Edelstahlgitter 18/8 mit Hilfe eines elektrischen Lötkolbens und einer speziell konzipierten Spitze mit dem Kunststoff des Werkstückes fixiert (Art.-Nr. 052949 – Edelstahlgitter 25cm x 12.5 cm). Dieses Gitter verstärkt den Reparaturbereich und gewährleistet die Festigkeit und die Flexibilität der Stoßstange. Die Endbearbeitung und das Ausfüllen des Loches oder Risses erfolgt mit einem empfohlenen Zusatzwerkstoff (Art.-Nr. 052956 – Kunststoff-Lötstab) aus Polypropylen, das durch Glas- und Fiberfasern verstärkt ist. Dieser Zusatzwerkstoff wird wie beim Weichlöten aufgetragen. Inbetriebnahme: Schließen Sie den Lötkolben an ein 230V Stromnetz an und stellen Sie das Drehpotentiometer der Temperatureinstellung auf Maximum, um das Erhitzen auf 550°C zu beschleunigen. Bei Reparaturen an dünnen Werkstücken und Kunststoffen mit niedrigerem Schmelzpunkt entsprechend die Temperatur reduzieren. Gebrauchsanweisungen: Um die Qualität der Reparatur zu optimieren, ist es empfehlenswert die Werkstücke (z.B. Stoßstange) in ausgebautem Zustand zu bearbeiten. Bei Rissen und Brüchen wird empfohlen eine zusätzliche, rückseitige Gitterverstärkung anzubringen, um den Reparaturbereich zu festigen. Ein Loch auf der Stoßstangenvorderseite kann dagegen ohne Ausbau bearbeitet werden. Bearbeiten Sie den Reparturbereich mit einem Schleifgerät vor, indem Sie 0,5 mm des Materials in einem 3-4 cm großen Radius um die Beschädigung abtragen und die Ränder abschrägen, um eine spätere Verdickung in diesem Bereich zu vermeiden. Fixieren Sie nun das dünne Edelstahlgitter (Art.-Nr. 052949) mit dem Kunststoff. Vorbereitung des Werkstückes: Reinigen und entfetten Sie das Werkstück. Verwenden Sie dazu keine lösemittelhaltigen Reinigungsmittel. Einfaches Seifenwasser ist vollkommen ausreichend. Schneiden Sie das zu verwendende Gitterstück so zurecht, dass es den kompletten Riss bzw. Bruch bedeckt und ca. 3cm an jeder Seite übersteht. Das Edelstahlgitter wird auf der rückseitigen Stoßstangenseite angebracht und dient als Festigung des Reparaturbereiches. Rauen Sie die Oberfläche des Reparaturbereiches mit Schleifpapier- Körnung 40 - an. Vermeiden Sie dabei allzuschnelle Abriebbewegungen, da dies den Kunststoff zum Schmelzen bringen könnte. Ein leichter Abrieb reicht vollkommen aus, um Farbe oder andere Schichten zu entfernen. 050932-13/02/2020-V2
Platzieren Sie das Edelstahlgitter auf dem Riss und achten Sie darauf, dass die Ränder parallel zur
Reparaturstelle liegen. Fixieren Sie mithilfe der entsprechenden Lötkolbenspitze das Gitter mit dem
Kunststoff des Werkstückes (Foto 1).
Üben Sie keinen zu starken Druck auf den Lötkolben aus. Die 550°C der Lötkolbenspitze genügen
vollkommen, um den Kunststoff durch das Gitter aufschmelzen zu lassen. Bereits nach dieser
kostengünstigen Reparturmaßnahme besitzt Ihre Stoßstange ausreichend Festigkeit gegenüber
Belastung und Stößen (Foto 2).
Verwenden Sie ausschließlich Edelstahlgitter von JBDC! Im Handel können Sie für gewöhnlich dünne
Stahl- oder Aluminiumgitter kaufen, aber:
Nach dem Erhitzen von Stahl ist dieses anfällig für Rost und bereits wenige Wochen nach der
Behandlung können erste Rostspuren auftreten. Durch den Oxidationsprozess wird der Stahl
zudem porös, was die Gesamtkonstruktion der Reparatur schwächt.
Das Aluminiumgitter besitzt keinen mechanischen Widerstand und zerreißt schnell bei der
geringsten Belastung.
Ist die Reparaturarbeit beendet, lassen Sie das Gitter abkühlen (verwenden Sie Druckluft um den
Abkühlprozess zu beschleunigen). Ebnen Sie mithilfe des Schleifgerätes die Oberfläche am
Reparaturbereich und schrägen Sie die Kanten ab. Tipp: Verwenden Sie die Kante der
Lötkolbenspitze um den Kunststoff zu schmelzen und die Kanten abzuschrägen.
Arbeitsstelle durch Blasen von Kunststoff-, Metallpartikeln und Staub reinigen und mit Seifenwasser
reinigen und entfetten (Schwamm ausspülen).
Fixieren Sie nun das Gitter final unter Verwendung eines JBDC Kunststoff-Lötstabes (Art.-Nr.
052956):
Ebnen Sie den Reparaturbereich mit der heißen Lötkolbenspitze (Foto 3) und tragen Sie den
erwärmten Kunststoff des Stabes dick auf dem Gitter auf. Nur so kann eine gute Verbindung zur
Stoßstange hergestellt werden.
Positionieren Sie den Lötstab dazu mit der teilgeschmolzenen Seite auf dem zu
repariererenden Werkstück.
Verfahren Sie weiter wie beim Weichlöten (Foto 4).
Lassen Sie die Oberfläche abkühlen oder benutzen Sie Druckluft, um den Abkühlprozess zu
beschleunigen.
Feinschliff: Entfernen Sie überschüssiges Material mit entsprechendem Schleifpapier- Körnung 40
oder 80. Für den Feinschliff und ein optimales Finish wird die Verwendung des Schleifmittels
ABRALON empfohlen. Reinigen und blasen Sie die Oberfläche ab. Tragen Sie nun Plastik-Primer auf.
Verwenden Sie einen speziellen Plastikspachtel, um Material- und Oberflächenfehler auszubessern.
Hinweis: Bei einigen Kunststoff-Karosserieteilen ist eine Reparatur mit dem Kunststoff-Lötstab nur
bedingt möglich, da sich das Edelstahlgitter nicht tief in den Kunststoff einschmelzen lässt.
Schleifen und entfetten Sie in diesem Fall zunächst die Ränder des zu reparierenden Bereiches und
benutzen Sie dann den Kunststoff-Lötstab wie beim Weichlöten. Achten Sie unbedingt darauf, dass
der gesamte Reparaturbereich mit Kunststoff bedeckt ist.
Legen Sie nun das Edelstahlgitter auf und fixieren Sie dieses mithilfe der Lötkolbenspitze mit dem
aufgetragenen Kunststoff. Tragen Sie danach eine weitere Kunststoffschicht mit dem Lötstab auf.
Information:
SMC - Fiberglas – UP - FRP können nicht verlötet werden, sondern müssen miteinander verklebt
werden (Benutzen Sie ein UV PATCH und FASTSEALER).
ABS – PA - PC/PBT – PPO können nicht mit Kunststoff verlötet werden, sondern müssen verklebt
werden.
ACHTUNG: LASSEN SIE DEN ANGESCHLOSSENEN LÖTKOLBEN NIE MIT NACH
UNTEN GERICHTETER SPITZE LIEGEN, DA DIESER ÜBERHITZEN UND IN
SEINER LEISTUNG BEEINTRÄCHTIGT WERDEN KÖNNTE.
TRAGEN SIE BEI UNZUREICHENDER BELÜFTUNG EINE ATEMMASKE.Vous pouvez aussi lire