SPROSSENWAND METALL / HOLZ - Sport-Tec
←
→
Transcription du contenu de la page
Si votre navigateur ne rend pas la page correctement, lisez s'il vous plaît le contenu de la page ci-dessous
SPROSSENWAND METALL / HOLZ
                  ANLEITUNG
     Art.-Nr.   16240 · Kategorie:   Sprossenwand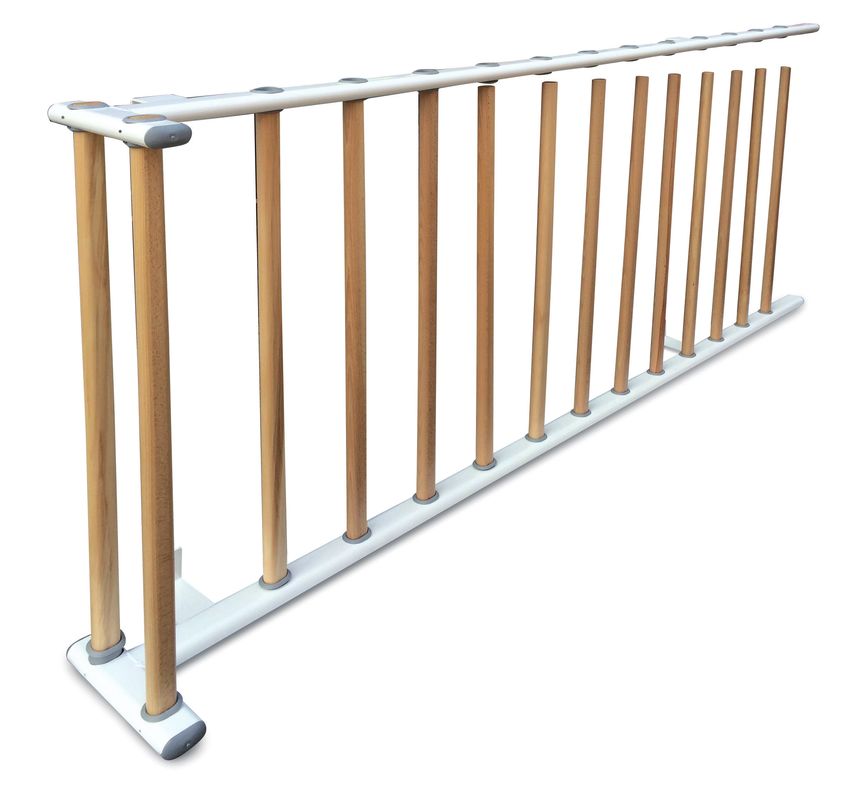
ART. 112220PKD

INSTRUCTIONS POUR L’ASSEMBLAGE
ATTENTION: Les espaliers doivent être fixés à un mûr de briques ou en ciment.
L’installation doit être faite par un professionnel ou par une personne qualifiée.

INSTRUCTIONS FOR THE ASSEMBLY
CAUTION: The wall bar should be fixed to a brick or cement wall. The device has to be
installed by a skilled and trained person.

ANLEITUNG ZUM AUFBAU
ACHTUNG: Die Sprossenwand sollte an einer massiven Mauer befestigt werden.
Die Montage der Sprossenwand muss durch eine fachkundige und geschulte Person
vorgenommen werden.

                                       ESPALIERS 112220PKD             112220

                                       WALL BAR 112220PKD             112220

                                       SPROSSENWAND 112220PKD                   112220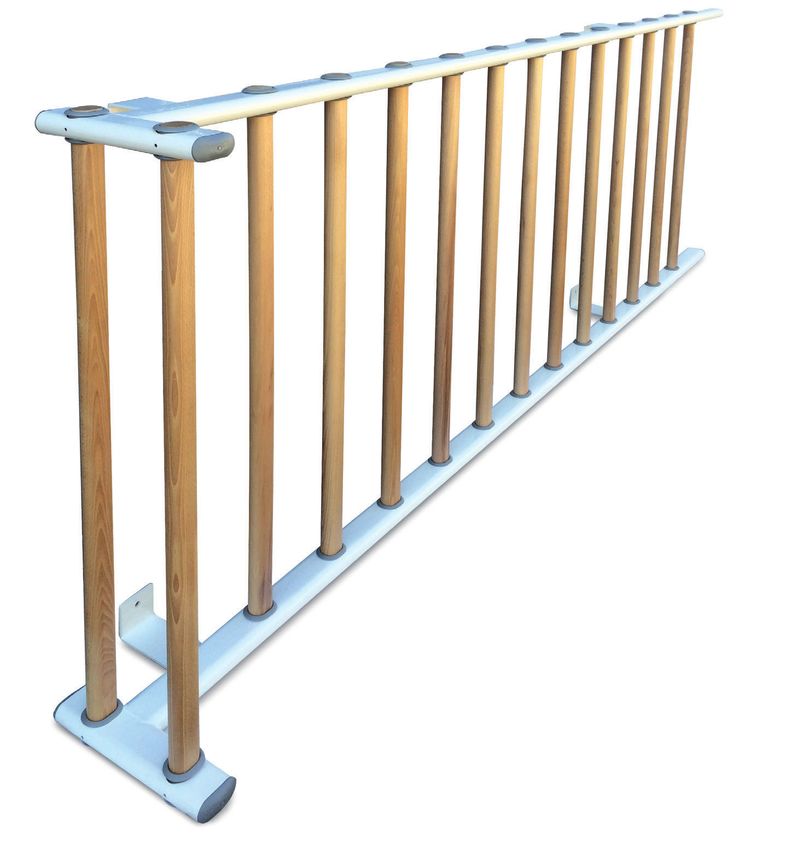
Merci d’avoir acheté cet espalier FERROX.
Cet équipement fait partie de la gamme de produits de qualité FERROX. Afin d’en faire un usage optimal, veuillez lire ce guide
attentivement.
En respectant ces précautions et en faisant preuve de bon sens, vous apprécierez les bienfaits de votre nouvel équipement en
toute sécurité et pendant de longues heures.
Lisez l’ensemble des instructions avant d’utiliser l’espalier. Ces consignes ont pour but d’assurer votre sécurité et de protéger
l’équipement.

Déballage de l’équipement
L’espalier est fourni dans une seule boîte.
Veillez à ouvrir la boîte et à assembler les composants en respectant l’ordre indiqué dans ce guide.
L’espalier a fait l’objet d’une inspection et de tests rigoureux avant d’être expédié. Faites-vous aider lors du montage.
• Sortez soigneusement les pièces de la boîte et posez-les sur le sol, à proximité de l’endroit où vous prévoyez d’utiliser
 l’équipement.
• Veillez à assembler les composants en respectant l’ordre indiqué dans ce manuel.
En cas d’éléments manquants, contactez le revendeur auprès duquel vous avez acheté l’équipement.
Vous devez lire et respecter les consignes contenues dans ce guide. Si vous montez et utilisez l’espalier sans respecter les
consignes suivantes, la garantie limitée pourrait être annulée.

Sécurité des personnes au cours du montage
• Suivez chaque étape des consignes de montage. Procédez à l’installation et suivez les étapes dans l’ordre. Ne passez pas
 d’étapes. Si vous passez des étapes, vous pourriez réaliser par la suite que vous devez démonter des composants et que vous
 avez éventuellement endommagé l’équipement.
• Assemblez et utilisez l’espalier Ferrox sur une surface plane et solide.

      MISE EN GARDE :
      CA               Assurez-vous que la structure du mur choisi sera en mesure de supporter l’espalier ainsi que le poids des
                       personnes souhaitant s’en servir.
                       • Ne jamais dépasser le poids maximum de 120 kg
      MISE EN GARDE :
      CA               L’espalier doit être fixé à un mur en brique ou en ciment.
                       Pour les matériaux autres que la brique, il est fortement recommandé de contacter un professionnel.
      MISE EN GARDE :
      CA               La partie inférieure de l’espalier doit être en contact avec le sol.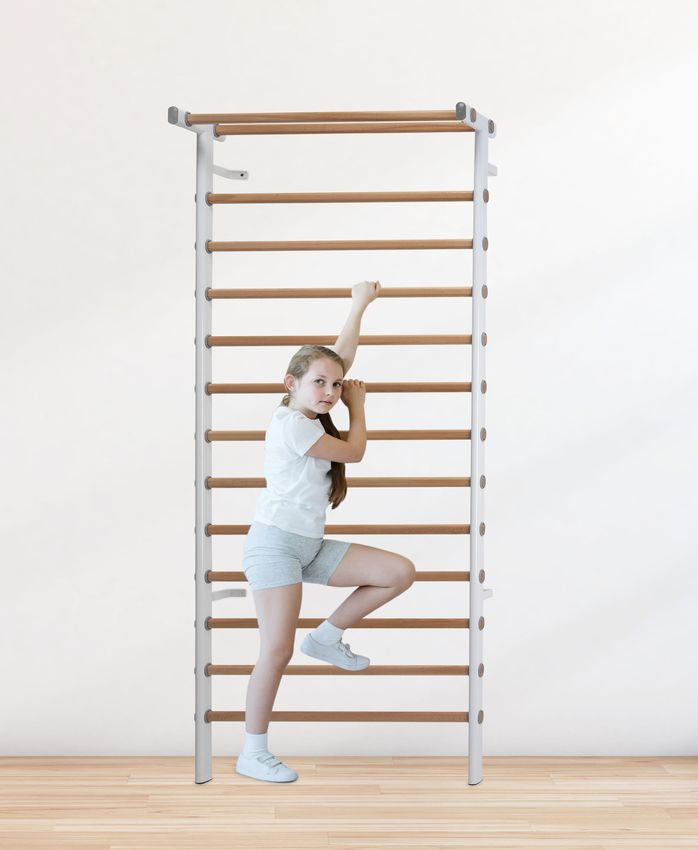
Before you begin
Thank you for purchasing the FERROX Wall bar. This unit is part of the line of FERROX quality products. To maximize your use of the
equipment, please read this guide thoroughly.
By following these precautions and using common sense, you will have many safe and pleasurable hours of healthful exercise with your
new equipment.
Read all instructions before using the wall bar. These instructions are written to ensure your safety and to protect the unit.

Unpacking the Equipment
The wall bar comes in one box.
Be careful to open the box and assemble components in the sequence presented in this guide
The Wall bar is carefully tested and inspected before it is shipped. Ask for assistance during the assembly process.
    • Carefully unpack the pieces and lay them on the floor near the location where you plan to use the equipment.
    • Be careful to assemble components in the sequence presented in this manual.
If any items are missing, contact the dealer from whom you purchased the unit.
You must review and follow the instructions in this guide. If you do not assemble and use the Wall bar according to the following
guidelines, you could void the limited warranty.

Personal Safety During Assembly
• Follow each step in the assembly instructions. Install and follow the steps sequentially. Do not skip ahead. If you skip ahead, you may
learn later that you have to disassemble components and that you may have damaged the equipment.
• Assemble and operate the Ferrox wall bar on a solid, level surface.

        CAUTION:          Make sure the structure of the wall you have chosen will be able to support the unit plus the weight of the people
                          who intend to use the wall bar.
                          • Max. Weight Limit 120kg/240lbs should never be exceeded
        CAUTION:          The wall bar should be fixed to a brick or solid cement wall.
                          For materials other than brickwork, it is highly recommended to contact a professional.

        CAUTION:          The lower part of the wall bar should be in contact with the floor

Herzlichen Dank für Ihren Kauf der FERROX Sprossenwand! Dieses Gerät ist ein Qualitätsprodukt von FERROX. Bitte lesen Sie diese
Anleitung sorgfältig durch, um optimal von dem Gerät zu profitieren.

Wenn Sie diese Vorsichtsmaßnahmen einhalten und das Gerät verantwortungsbewusst benutzen, werden Sie viele vergnügliche
Stunden gesunder Bewegung mit Ihrer neuen Sprossenwand verbringen.
Lesen Sie vor dem Gebrauch der Sprossenwand alle Anweisungen. Diese Anweisungen wurden zur Gewährleistung Ihrer Sicherheit und
für den Schutz des Geräts erstellt.

Auspacken des Geräts
Die Sprossenwand wird in einem Lieferkarton geliefert.
Gehen Sie beim Öffnen des Lieferkartons vorsichtig vor und montieren Sie die Komponenten in der in dieser Anleitung empfohlenen
Reihenfolge.

Die Sprossenwand wurde vor dem Versand sorgfältig geprüft und inspiziert. Lassen Sie sich bei der Montage von einer zweiten Person
helfen.
         • Packen Sie die einzelnen Teile vorsichtig aus und legen Sie sie in der Nähe des Installationsortes auf den Boden.
         • Achten Sie sorgfältig darauf, die Komponenten in der in dieser Anleitung empfohlenen Reihenfolge zu montieren.
Sollten Gegenstände fehlen, wenden Sie sich bitte an den Händler, bei dem Sie das Gerät gekauft haben.
Sie müssen die Anweisungen in dieser Anleitung lesen und befolgen. Wenn Sie die Sprossenwand nicht gemäß den folgenden Richtlin-
ien montieren und verwenden, kann es sein, dass die Garantie und Haftung erlischt.

Persönliche Sicherheit während der Montage
• Befolgen Sie jeden Schritt in der Montageanleitung. Installieren und befolgen Sie die Schritte der Reihe nach. Überspringen Sie keine
 Schritte. Wenn Sie eine Anweisung überspringen, kann es sein, dass Sie Komponenten später wieder zerlegen müssen und das Gerät
 möglicherweise beschädigt haben.
• Montieren und benutzen Sie die Ferrox Sprossenwand auf einer festen, ebenen Fläche.

        VORSICHT: Vergewissern Sie sich, dass die Struktur der Wand, die Sie ausgewählt haben, das Gewicht des Geräts
                            zusammen mit dem Gewicht der Personen aushalten kann, die beabsichtigen, die Sprossenwand zu benutzen.
                            • Das Höchstgewicht von 120 kg/240 lbs darf niemals überschritten werden

        VORSICHT: Die Sprossenwand muss an einer Ziegel- oder festen Zementwand befestigt werden.
                            Wir empfehlen Ihnen dringend, sich an einen Fachinstallateur zu wenden.

        VORSICHT: Der untere Teil der Sprossenwand muss sich in Kontakt mit dem Boden befinden.

                                                                                                                                               3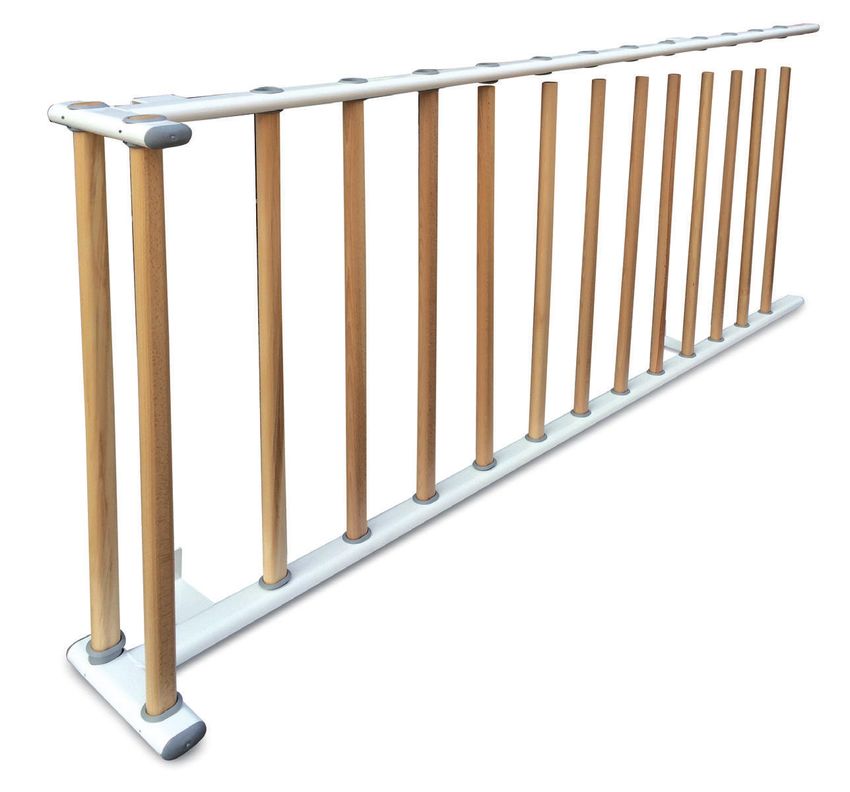
Consignes de sécurité importantes                      Important Safety Instructions for
    pour l’utilisation de l’équipement                     Using the Equipment
    • N’utilisez pas l’équipement à des fins différentes   • Use the equipment only for its intended purpose
     des recommandations de ce guide.                        as described in this guide.
    • N’utilisez pas d’accessoires non recommandés         • Do not use accessory attachments that are not
     par FERROX : ils pourraient entraîner des               recommended by FERROX: such attachments
     blessures.                                              might cause injuries.
    • N’utilisez jamais l’équipement s’il est tombé ou     • Never operate the unit when it has been dropped
     endommagé. Renvoyez-le à un centre d’entretien          or damaged. Return the equipment to a service
     afin qu’il soit examiné et réparé.                      center for examination and repair. • Make sure
    • Assurez-vous que toutes les fixations sont sûres       that all fasteners are secure and in good working
     et en bon état.                                         condition.
    • Vérifiez toujours la présence d’éventuels            • Always check the unit for any damage before each
     dommages sur l’équipement avant chaque                  use.
     utilisation.                                          • Do not allow children on/or near the equipment.
    • Ne laissez pas les enfants monter sur                • Do not use outdoors.
     l’équipement ou s’en approcher.                       • Use care when getting on or off the unit.
    • N’utilisez pas l’équipement en extérieur.
    • Faites preuve de vigilance en montant sur
     l’équipement ou en en descendant.

    Préparation du montage
                                                           Preparation for the assembly
    MISE EN GARDE :
    Vous aurez besoin d’aide pour installer cet            CAUTION: To set up this unit, you will need
    équipement. N’essayez pas de le monter seul.           assistance. Do not attempt assembly by yourself.

    Outils nécessaires
                                                           Required Tools
    Voici les outils recommandés que vous devez vous       Recommended Tools that you need to obtain before
    procurer avant le montage de l’équipement:             assembling the unit include:

    MONTAGE DE L’ESPALIER FIXATION AU MUR                  ASSEMBLING WALL BAR
    • Maillet en caoutchouc                                • Rubber Mallet • Cordless screw gun
    • Visseuse sans fil
    • Perceuse à percussion

4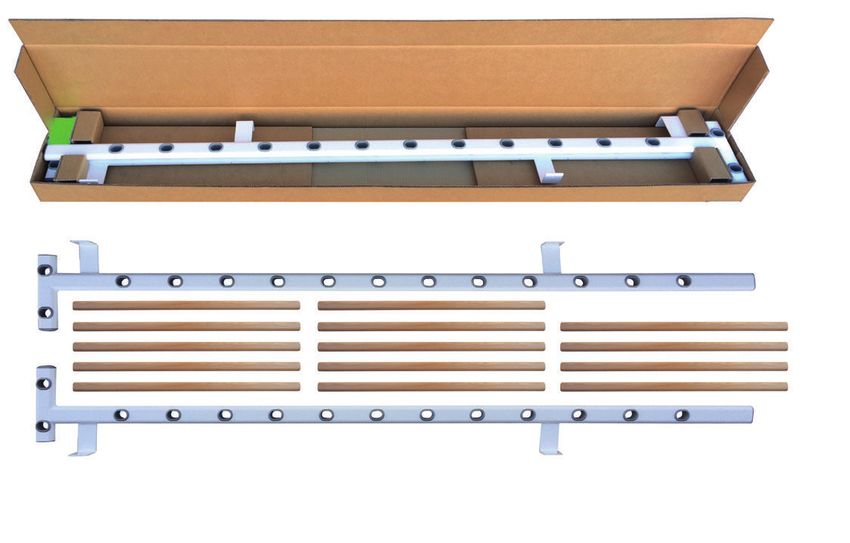
1

Wichtige Sicherheitshinweise zur
Verwendung des Geräts
• Benutzen Sie das Gerät nur für seinen in dieser
  Anleitung beschriebenen Verwendungszweck.
• Verwenden Sie keine Zubehörteile, die nicht von
  FERROX empfohlen werden. Derartiges Zubehör
  kann Verletzungen verursachen.
• Benutzen Sie das Gerät nicht, wenn es
  heruntergefallen oder beschädigt worden ist.
  Schicken Sie das Gerät in diesem Fall zur Prüfung
  und Reparatur an ein Servicezentrum.
• Achten Sie darauf, dass alle Befestigungsteile fest
  sitzen und sich in einem guten Betriebszustand
  befinden.
• Überprüfen Sie das Gerät vor jedem Gebrauch auf
  Beschädigungen.
• Erlauben Sie Kindern nicht, das Gerät zu benutzen
  oder sich in seiner Nähe aufzuhalten.
• Verwenden Sie das Gerät nicht im Freien.
• Gehen Sie beim Aufsteigen auf das Gerät und
  beim Absteigen von dem Gerät mit Vorsicht vor.

Vorbereitung für die Montage
VORSICHT: TSie benötigen Hilfe zur Montage
dieses Geräts. Versuchen Sie nicht, die Montage
allein durchzuführen.

Erforderliche Werkzeuge
Empfohlene Werkzeuge, die Sie zurecht legen
müssen, bevor Sie mit der Montage des Geräts
beginnen:

ASSEMBLING WALL BAR
• Rubber Mallet • Cordless screw gun

          13

                                                            5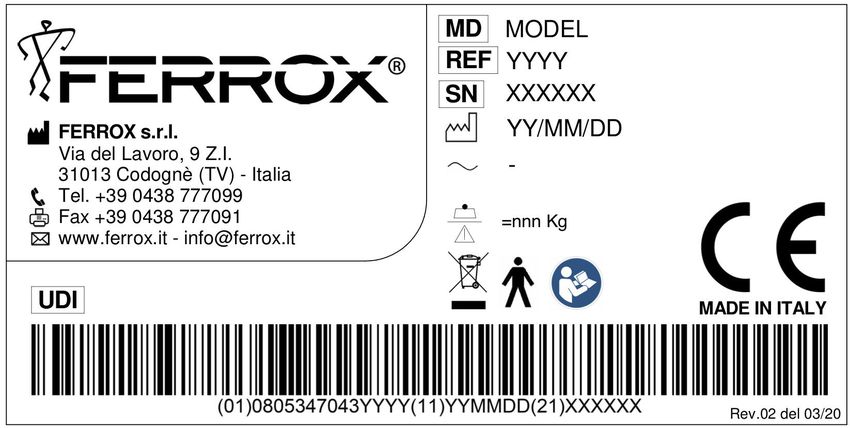
2
              L’APPAREIL COMPREND LES ÉLÉMENTS SUIVANTS: 1 boîte
              THE UNIT COMPRISES: 1 enveloppe
              DIE LIEFERUNG BEINHALTET: 1 Karton

                                   nel collo/inclus dans la boîte included
                                                                   /       in box /im Lieferkarton enthalten

      1

    4,2 x38                                                                                                    8 x 70 12 x 60

              Liste des pièces :
              • 2 montants verticaux (supports) avec bague en plastique préassemblée
              • 14 barreaux en bois
              • 28 vis à bois 4,2 x 38
              • 4 vis 8 x 70 + 4 chevilles Ø 8

              Parts list:
              • 2 upright mounts (supports) with pre assembled plastic ring nut
              • 14 wooden rungs
              • 28 wooden screws 4,2x38
              • 4 screws 8x70 + 4 dowels Ø 8

              Teileliste:
              • 2 vertikale Haltegestelle (Träger) mit vormontierten Kunststoffschuhen
              • 14 Holzsprossen
              • 28 Holzschrauben 4,2 x 38 mm
              • 4 Schrauben 8 x 70 mm + 4 Dübel Ø 8 mm

6
INSTRUCTIONS DE MONTAGE
Le montage de l’espalier Ferrox demande environ 30 minutes à des installateurs professionnels. Si vous
assemblez ce type d’équipement pour la première fois, prévoyez une durée nettement plus longue.
Il est fortement recommandé de vous adresser à des installateurs
professionnels !
Toutefois, si vous vous procurez les bons outils, êtes aidé et suivez les étapes de montage dans l’ordre,
le processus demandera du temps mais s’avèrera assez facile.
L’espalier est fourni dans une seule boîte.
Veillez à ouvrir la boîte et à assembler les composants en respectant l’ordre indiqué dans ce guide.
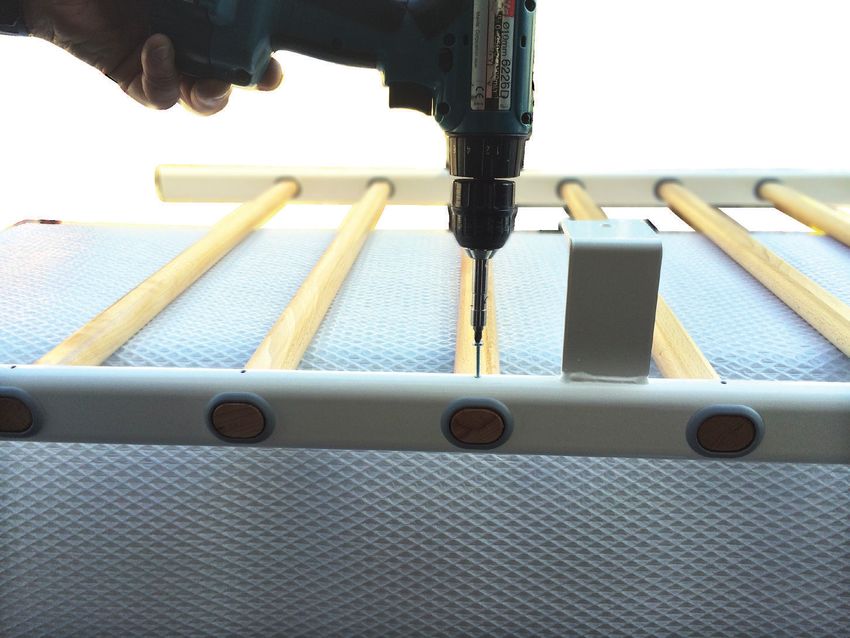
Placez l’un des deux supports verticaux (montants en acier) sur le sol (celui de droite, par exemple)
et insérez tous les barreaux jusqu’à ce qu’ils soient en contact avec le sol. L’utilisation d’un maillet en
caoutchouc est recommandée pour cette étape. Regardez le schéma ci-dessous.
ASSEMBLING ISTRUCTIONS
The assembly of the Ferrox Wall bar takes professional installers about 1⁄2 hour to complete. If this is
the first time you have assembled this type of equipment, plan on significantly more time.
Professional installers are highly recommended!
However, if you acquire the appropriate tools, obtain assistance, and follow the assembly steps
sequentially, the process will take time, but is fairly easy.
The wall bar comes in one box.
Be careful to open the box and assemble components in the sequence presented in this guide
Place one of the two upright supports (steel mounts) on the floor (for example the right one) and insert
all the rungs, one by one, until they are in contact with the floor. It is recommended to use a rubber
Mallet at this stage. See below
MONTAGEANLEITUNG
Professionelle Installateure benötigen für die Montage der Ferrox Sprossenwand ungefähr 1,5 h. Wenn
Sie diese Art von Gerät zum ersten Mal montieren, sollten Sie deutlich mehr Zeit einplanen.
Wir empfehlen Ihnen dringend, die Montage von professionellen Installateuren
durchführen zu lassen!
Wenn Sie jedoch die genannten Werkzeuge verwenden, sich von einer zweiten Person helfen lassen und
die Montageschritte der Reihe nach befolgen, ist der Prozess zeitaufwändig, jedoch recht einfach.
Die Sprossenwand wird in einem Karton geliefert.
Gehen Sie beim Öffnen des Lieferkartons vorsichtig vor und montieren Sie die Komponenten in der in
dieser Anleitung empfohlenen Reihenfolge.
Legen Sie einen der zwei vertikalen Träger (Stahlgestelle) auf den Boden (zum Beispiel den rechten
Träger) und setzen Sie eine Sprosse nach der anderen ein, bis sie den Boden berühren. Es wird
empfohlen, für diesen Montageschritt einen Gummihammer zu verwenden. Siehe unten
7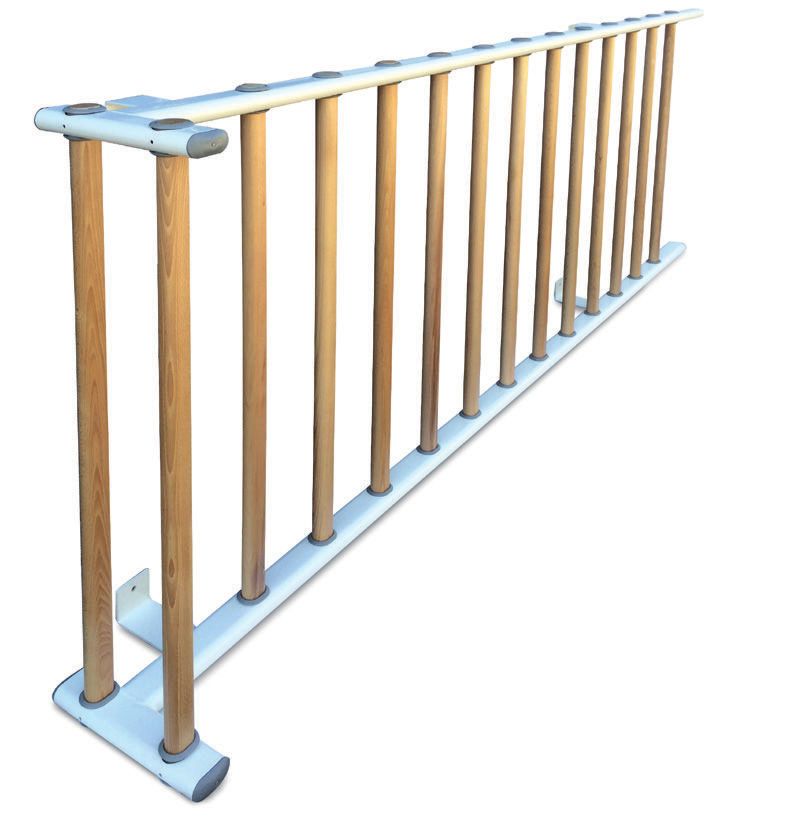
3

    Afin de ne pas perdre d’éléments en
    plastique, il est conseillé de maintenir les
    supports verticaux en position verticale.

    Not to spoil the plastic elements, you
    should operate holding the upright
    supports in upright position.

    Um eine Beschädigung der
    Kunststoffschuhe zu vermeiden, halten
    Sie die Holzsprossen beim Einsetzen
    senkrecht.

                                                   4
              Une fois que tous les barreaux
              ont été insérés, faites-les
              correspondre au support
              vertical de gauche en veillant à
              l’orientation des deux supports
              verticaux, comme indiqué.

              Once all of the rungs have been
              inserted, match them with the
              left upright support, paying
              attention to the orientation of the
              two upright supports as shown
              foreward.

              Sobald alle Sprossen eingesetzt
              worden sind, setzen Sie den
              linken Träger auf, wobei Sie auf
              die korrekte Ausrichtung der zwei
              vertikalen Träger achten müssen
              (siehe unten).

8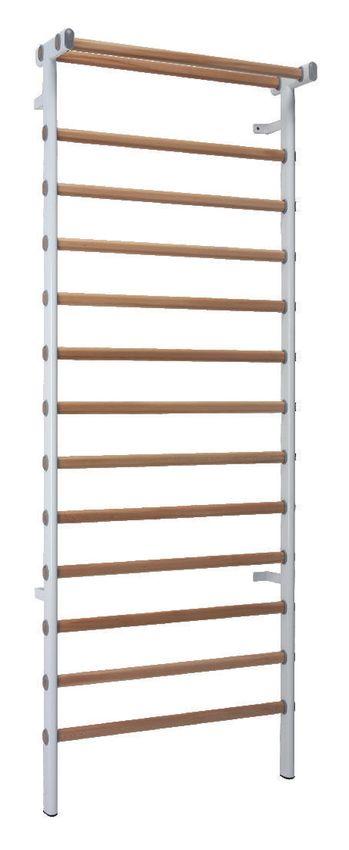
5

4
    Le montant vertical doit être légèrement incliné de manière à commencer
    l’insertion du premier barreau, sur la gauche de la figure, dans le premier trou.
    Dès que le premier barreau est inséré dans le premier trou, vous devez
    associer le deuxième barreau au deuxième trou, et ainsi de suite. Utilisez le
    maillet en caoutchouc si nécessaire.

    The upright support should be slightly tilted in order to start inserting the first
    rung, on the left side of the figure, into the first hole on the left side of the
    figure.
    As soon as the first rung is inserted into the first hole, you should match the
    second rung with the second hole and carry on this way until the end. Use the
    rubber Mallet as needed.

    Zum Einführen der ersten Sprosse im linken Bereich der Abbildung muss der
    zweite Träger leicht geneigt werden. Sobald die erste Sprosse in das erste
    Loch eingesetzt worden ist, müssen Sie die zweite Sprosse zum zweiten
    Loch ausrichten und so weiter bis zum Ende vorgehen. Verwenden Sie den
    Gummihammer nach Bedarf.

                                                                                              9
4 6
Ajustez les montants verticaux afin
que tous les barreaux soient alignés
avec la partie supérieure de la bague
en plastique à l’extérieur des montants
verticaux droit et gauche.
Adjust the upright supports so that all
the rungs line up with the upper part of
the plastic ring nut outside both the right
and left upright support.
Richten Sie die vertikalen linken und
rechten Träger so aus, dass alle
Sprossen am oberen Teil der Außenseite
der Kunststoffschuhe enden.
10Assurez-vous que toutes les bagues collent à la surface des montants 7
verticaux.
Check that all of the ring nuts adhere to the upright support surface
Vergewissern Sie sich, dass alle Kunststoffschuhe mit der Oberfläche des
vertikalen Trägers fluchten.
4,2 x38
Placez l’équipement sur une table et serrez toutes les vis fournies.
L’espalier est maintenant prêt à être fixé au mur au moyen des chevilles et
des vis.
Put the composition on a table and screw all the screws supplied
The wall bar is now ready to be fixed to the wall using the dowels and the
screws
Legen Sie die Sprossenwand auf einen Tisch und schrauben Sie die
mitgelieferten Schrauben ein.
Die Sprossenwand kann jetzt mithilfe der Dübel und der Schrauben an der
Wand befestigt werden.
11FIXATION AU MUR
FIXING TO THE WALL BEFESTIGUNG AN DER WAND
8
Installez l’espalier à 90°
exactement.
Set the wall bars exactly to 90 °.
Die vertikalen Balken der
Sprossenwand müssen sich in
einem Winkel von genau 90° zum
Boden befinden.
90°
90°
90°
Assurez-vous que :
- les supports de montage sont à plat sur le mur ;
- les extrémités arrière des barreaux touchent le sol.
Make sure that:
- The mounting brackets lie flat on the wall
- The bottom ends of the runks touch the floor
Stellen Sie Folgendes sicher:
- Die Montagehalterungen liegen flach an der Wand an.
- Die unteren Enden der Sprossenwand berühren den Boden.
129
Marquez les trous à percer.
Mark the drillholes.
Markieren Sie die Bohrlöcher.
x4
10
Pour vous faciliter le travail,
mettez l’espalier sur le côté.
To facilitate the work, push the
wall bars to the side.
Stellen Sie die Sprossenwand
zur Seite, damit Sie ungehindert
bohren können.
1311
900
290
775 259
60
220,5
2400
2230
675
131
226,5
Percez les trous à l’aide d’un foret de Ø 12 mm.
Drill the marked holes with a Ø 12 mm drill
Bohren Sie die markierten Löcher mit einem 12 mm-Bohrer.
1412
Insérez les chevilles en plastique.
Vissez l’espalier au mur à l’aide de la clé métallique.
Insert the plastic dowels
Screw the wall bar to the wall with metal braces.
Stecken Sie die Kunststoffdübel in die Löcher.
Schrauben Sie die Sprossenwand mit den Metallhalterungen an die Wand.
290
259
1516
226,5 131
220,5
775
900
675
2230
2400CLASSIFICATION ET UTILISATION CLASSIFICATION AND USE
ESPALIER AVEC MONTANTS EN WALLBAR WITH UPRIGHT STEEL
ACIER 112220 PKD SUPPORT 112220 PKD
UTILISATION PREVU INTENDED USE
Espalier unique ou double avec montants en acier et Single or double wall bars with steel uprights and related
accessoires conçus pour l’élaboration de systèmes accessories for setting up elementary pulley therapy
basiques de pouliethérapie. systems.
Exercices d’étirements et de torsion du bassin visant à Exercises elongating and twisting the pelvis to improve
favoriser l’élasticité des muscles. muscle elasticity.
TYPE DE PATIENT TYPE OF PATIENT
Patients atteints de pathologies rhumatismales sans Patients with non-significant rheumatic pathologies.
gravité.
PLACE OF USE
MILIEU D’UTILISATION
Small physiotherapy clinics.
Cabinets de kinésithérapie de petite taille.
OPERATORS QUALIFIED TO USE THE PRODUCT
PROFESSIONELS HABILITES A L’UTILISATION
All healthcare professionals, physiotherapists and similar
Tous les professionnels de santé, kinésithérapeutes et
secteurs apparentés. All domestic or professional users.
Tous les utilisateurs domestiques ou professionnels. The instructions given to the patient by the reference
Les instructions transmises au patient par le professionnel healthcare professional suffice.
de santé de référence suffisent.
CONTRAINDICATIONS
CONTRE-INDICATIONS Not suitable for use in any way other than the intended
Non adapté à une utilisation autre que celle pour laquelle le purpose.
dispositif est conçu.
OTHER INDICATIONS
AUTRES INDICATIONS - It must be fastened to the wall by a professional.
- La fixation au mur doit être effectuée par un - Do not exceed the workload indicated
professionnel. - Check accessories (ropes and braces) for wear
- Ne pas dépasser la charge de travail indiquée.
- Vérifier l’usure des accessoires.
20KLASSIFIKATION UND NUTZUNG
SPROSSENWAND MIT VERTIKALEM
STAHLGESTELL 112220 PKD
VORGESEHENE VERWENDUNG
Einzelfeld-Sprossenwand oder Doppelfeld-Sprossenwand
mit Stahlstützen und entsprechendem Zubehör, geeignet
für die Realisierung von elementaren Schlingentherapie-
Systemen.
Dehnungs- und Beckenverdrehübungen zur Förderung der
Muskelelastizität.
ARTS DES PATIENTEN
Patienten mit rheumatischen Erkrankungen, die nicht
signifikant sind.
VERWENDUNGSORT
Kleine Physiotherapie-Praxis.
ZUR VERWENDUNG BERECHTIGT
Alle Fachkräfte des Gesundheitswesens, Physiotherapeuten
und verwandte Bereiche.
Alle privaten und professionellen Nutzer.
Die vom behandelnden Gesundheitspersonal an den
Patienten erteilten Anweisungen sind ausreichend.
KONTRAINDIKATIONEN
Nicht geeignet für eine andere Verwendung als die, für die
das Gerät vorgesehen ist.
WEITERE HINWEISE
- Die Befestigung an der Wand muss von einem Fachmann
vorgenommen werden.
- Die angegebene Arbeitsbelastung nicht überschreiten.
- Prüfung auf Verschleiß des Zubehörs (Seile und
Schutzabdeckungen)
21TARGHETTA DI IDENTIFICAZIONE - PLAQUE D’IDENTIFICATION - IDENTIFICATION LABEL - IDENTIFIZIERUNGSSCHILD
INPUT: / - / - IP: /
= 140Kg
Simbolo
o Sigla Descrizione Description Description Beschreibung
Dispositivo Medico Dispositif Médical Medical Device Dies ist ein
Medizinprodukt
Identificativo catalogo Identifiant catalogue Catalogue Number Katalognummer
Numero di serie Numéro de série Serial Number Seriennummer
Identificazione Identification du Manufacturers name Names des Herstellers
fabbricante fabriquant
Data di fabbricazione Date de fabrication Date of manufacture Herstellungsdatum
Portata massima Charge de travail en Safety work load Sichere Arbeitslast
sécurité
Consultare le istruzioni Consulter le mode Read the manual Anteilung lesen
per l’uso d’emploi
Marchio di conformità CE Marque de conformité CE CE mark CE – Kennzeichen
MDR 2017/745 MDR 2017/745 MDR 2017/745 MDR 2017/745
Identificazione unica del Identification Unique des Unique Device Einmalige
dispositivo Dispositifs Médicaux identification Produktkennung
22REV. 1.0Mar2021
Stabilimento e sede legale:
via del Lavoro Z.I.
31013 Codogné (TV) Italia
Tel. +39 0438 777099 - 778370
Fax +39 0438 777091
ST-09-119
P.IVA: IT 03613220262
e-mail: info@ferrox.it
www.ferrox.it© Sport-Tec GmbH, 2021-04 Sport-Tec GmbH Tel.: +49 (0) 6331 1480-0 Physio & Fitness Fax: +49 (0) 6331 1480-220 Lemberger Str. 255 E-Mail: info@sport-tec.de D-66955 Pirmasens Web: www.sport-tec.de
Vous pouvez aussi lire