I-See HD - GEBRUIKSAANWIJZING USER MANUAL GEBRAUCHSANLEITUNG ISTRUZIONI D'USO MANUAL DE INTRUCCIONES MANUEL DE L'UTILISATEUR
←
→
Transcription du contenu de la page
Si votre navigateur ne rend pas la page correctement, lisez s'il vous plaît le contenu de la page ci-dessous
i-See HD

  GEBRUIKSAANWIJZING
     USER MANUAL
 GEBRAUCHSANLEITUNG
   ISTRUZIONI D’USO
MANUAL DE INTRUCCIONES
MANUEL DE L’UTILISATEUR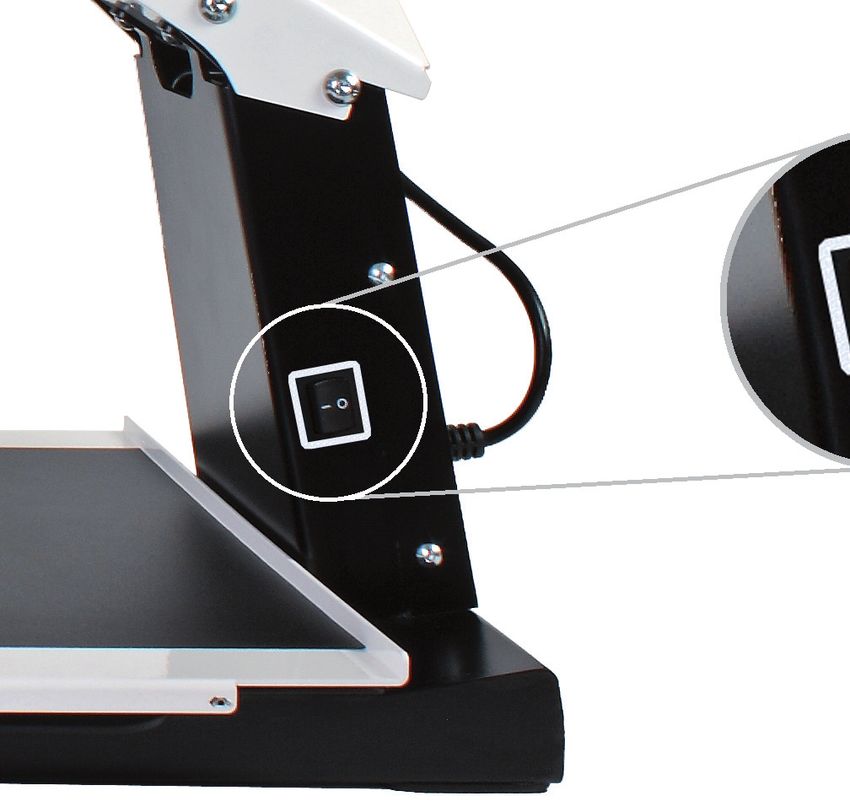

Nederlands................................    5    NL

English...................................... 13   EN

Deutsch.................................... 21     DE

Italiano..................................... 29   IT

Español..................................... 37    ES

Français.................................... 45    FR

i-See HD_Manual_INT_V2.2
Inhoudsopgave
1 Introductie.............................................................. 6    NL
2 Inhoud verpakking..................................................... 6
3 Installatie............................................................... 6
3.1 TFT scherm bevestigen.............................................. 6
3.2 Scherm kantelen...................................................... 7
3.3 Scherm in hoogte verstelbaar...................................... 7
3.4 Kabels bevestigen.................................................... 8
4 Gebruik.................................................................. 8
5 Bediening................................................................ 9
5.1 Aan-/uitschakelaar................................................... 9
5.2 Beeldweergave.......................................................10
5.3 Vergroten - verkleinen..............................................10
5.4 Voorkeursvergroting.................................................10
5.5 Autofocusblokkering.................................................10
5.6 Helderheid............................................................10
5.7 Leeshulp..............................................................10
5.8 Tableau................................................................11
5.9 Remhendel............................................................11
6 Richtlijnen.............................................................11
7 De i-See HD recyclen.................................................11
8 Technische specificaties...............................................12

                                                                            5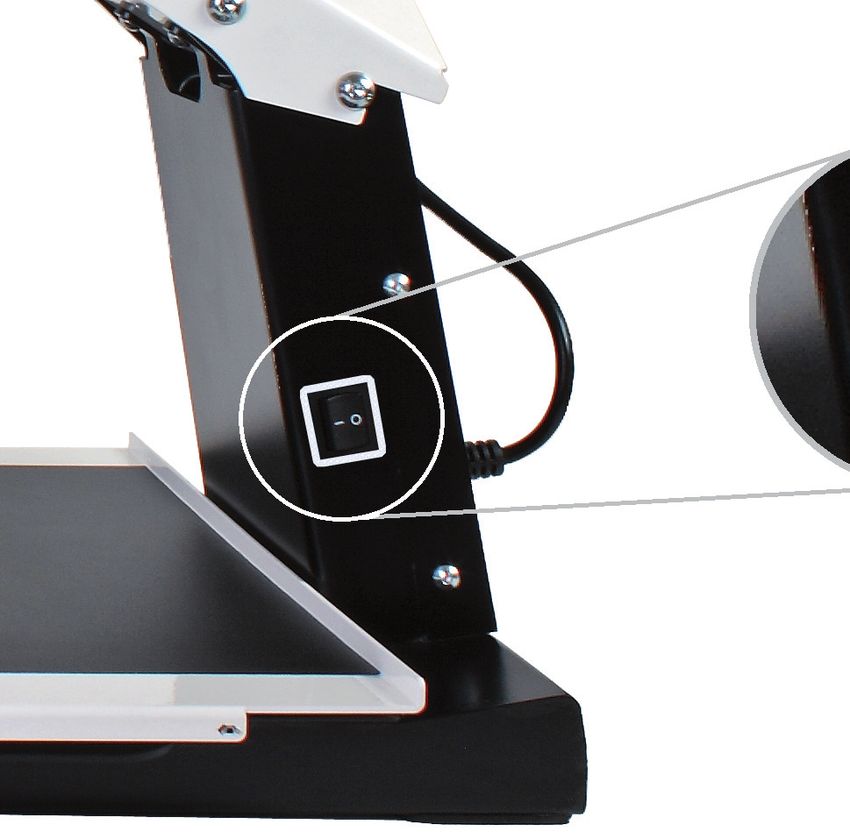
1 Introductie

NL   Gefeliciteerd met uw i-See HD; een beeldschermloep van
     hoogwaardige kwaliteit die ook bijzonder gebruiksvriendelijk is.

     Voordat u de i-See HD in gebruik neemt, lees deze handleiding
     aandachtig door. Deze handleiding bevat namelijk instructies over
     hoe het apparaat geïnstalleerd moet worden en beschrijft alle
     functies waarover de i-See HD beschikt.

     2 Inhoud verpakking
     In   de verpakking van de i-See HD treft u het volgende aan:
      •   i-See HD onderstel
      •   Monitor met bedieningspaneel
      •   Stroomkabel
      •   Handleiding

     3 Installatie
                 Maak het apparaat nooit zelf open; hiermee vervalt de
                 garantie. Vermoedt u dat onderhoud of reparatie nood-
                 zakelijk is, neem meteen contact op met de leverancier.

     De i-See HD wordt voorgemonteerd vanuit de fabriek geleverd. U
     hoeft alleen het beeldscherm op het onderstel te bevestigen, de
     kabels aan het beeldscherm aan te sluiten en de stroomkabel aan
     te sluiten aan het onderstel.

     3.1 TFT-scherm bevestigen
     Bevestig het TFT-scherm door het scherm in het onderstel te hangen
     en de draaiknoppen aan beide achterzijden van het scherm vast te
     draaien.

     6                                                              i-See HD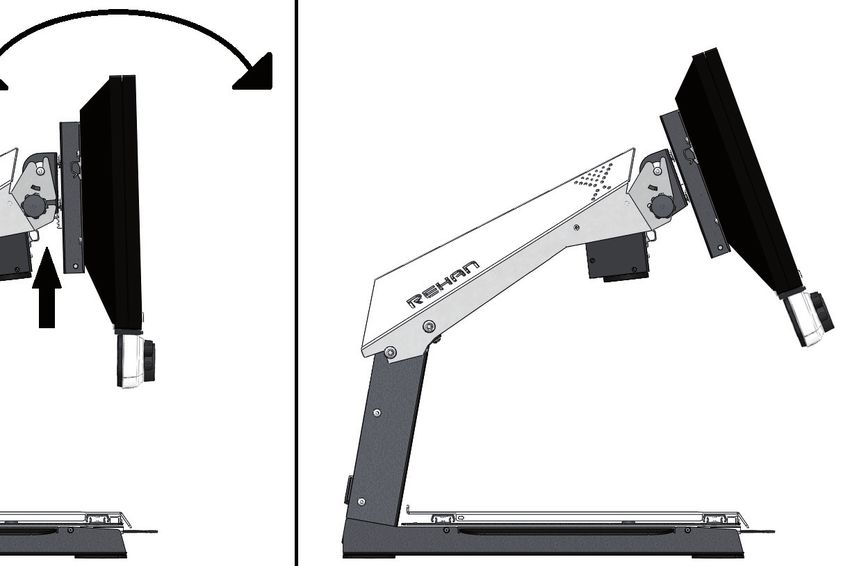
NL

3.2 Scherm kantelen
Draai de knoppen aan beide achterzijden van het scherm los zodat
het scherm te bewegen is. Kantel het scherm in de gewenste positie
en draai de schroeven vast.

3.3 Scherm in hoogte verstelbaar
Bij de i-See HD is het mogelijk om het scherm in hoogte te verstellen.
U kunt dit doen door de hendel aan de rechter zijkant van het beeld-
scherm naar u toe te trekken en het scherm vervolgens, met uw
linkerhand onder de linker benedenhoek van het scherm geplaatst,
omhoog of omlaag te schuiven. Laat de hendel los om het scherm in
die positie te vergrendelen.

                                                                    7
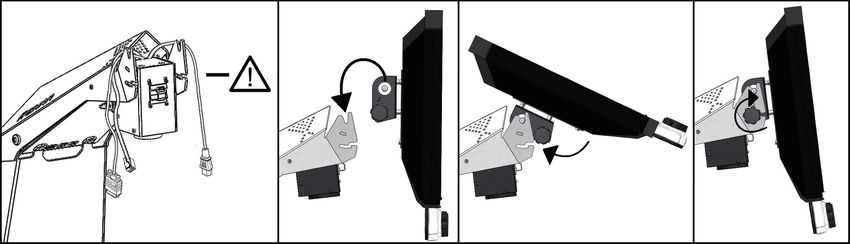
3.4 Kabels bevestigen
                                     Bedieningspaneel
NL

     Monitor

     4 Gebruik
     • Vermijd direct zonlicht op het scherm en het leestableau.
     • Wees voorzichtig met de bewegende onderdelen van het tableau.
     • De i-See HD vraagt weinig tot geen onderhoud. Als u het ap-
       paraat aan de buitenzijde wilt schoonmaken, gebruik dan al-
       leen een zachte droge doek. Gebruik in geen geval agressieve
       schoonmaakproducten zoals alcohol, aceton en andere chemi-
       sche middelen.
     • Gebruik de i-See HD niet als hulpmiddel om te lopen, zitten of op te
       staan.
     • Schakel het apparaat altijd uit als u er geen gebruik van maakt.
     • Sluit het netsnoer aan op een geaarde wandcontactdoos.
     • Zorg ervoor dat de i-See HD in een goed geventileerde ruimte staat.
     • Gebruik uw beeldschermloep alleen binnen. Stel het apparaat niet
       bloot aan extreme of snel veranderende temperaturen of vochtig-
       heid. Plaats uw i-See HD niet naast een warmtebron of in direct
       zonlicht.
     • Plaats het apparaat op een stabiele ondergrond zodat het apparaat
       niet kan vallen. Zorg ervoor dat de i-See HD minimaal 10 cm van
       de tafelrand is geplaatst.

     8                                                              i-See HD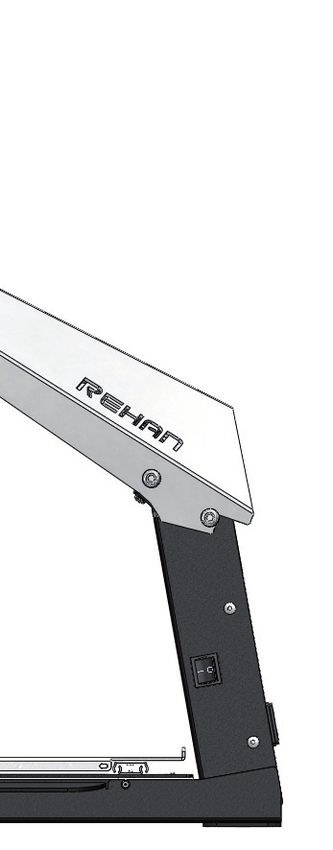
5 Bediening
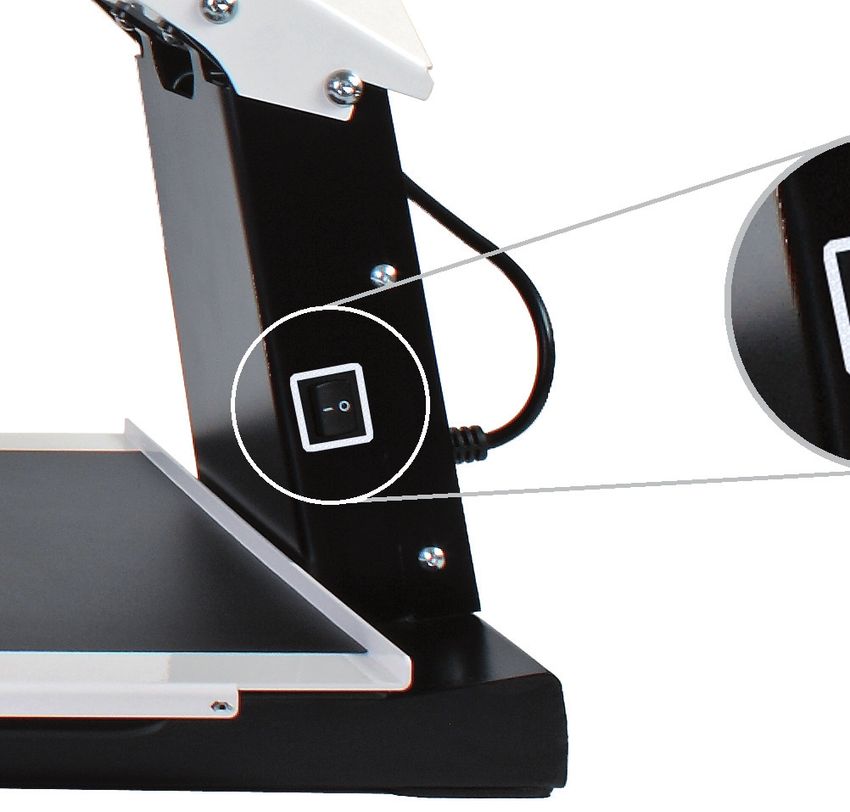
5.1 Aan-/uitschakelaar
De aan/uit schakelaar van de i-See HD bevindt zich aan de rechter
NL
zijkant van het apparaat.
U kunt de bedieningsknoppen van de i-See HD vinden op het witte
bedieningspaneel.
5.2 Beeldweergave
Druk op de knop om te kiezen tussen het gebruik van
de laatst gebruikte foto- of hoogcontraststanden.
Draai vervolgens aan de knop om de individuele
standen te selecteren.
U kunt een gedetailleerd overzicht van de beschik-
bare standen vinden in de technische specificaties
in deze handleiding.
9
5.3 Vergroten / verkleinen
     Draai de knop naar rechts om de weergave op het
NL   beeld te vergroten. Draai de knop naar links om
     de weergave op het beeld te verkleinen.

     5.4 Voorkeursvergroting
     Tijdens het lezen van teksten en het bekijken van afbeeldingen
     gebruikt u een vergrotingsinstelling die voor u het prettigst werkt.
     De i-See HD onthoudt automatisch deze gebruikte instelling als u
     tussen foto- of hoogcontraststanden wisselt. Dit houdt in dat als u
     overschakelt van een fotostand naar een hoogcontraststand en visa
     versa, het apparaat automatisch de laatst gebruikte vergroting van
     deze stand zal gebruiken.

     5.5 Autofocusblokkering
     De i-See HD zal altijd het beeld automatisch scherpstellen. In som-
     mige situaties (zoals tijdens het schrijven) kan het handig zijn om
     deze automatische focussering te blokkeren. Druk de vergrotings-
     knop in om de autofocus te blokkeren. Draai aan de knop om de
     blokkering op te heffen.

     5.6 Helderheid
     Draai deze knop linksom of rechtsom om de hel-
     derheid te verhogen of te verlagen.

     5.7 Leeshulp
     Door op de leeshulpknop te drukken kunt u 4 ver-
     schillende leeshulpen selecteren: een horizontale
     en een verticale leeslijn en een horizontaal en een
     verticaal afdekkader. Door vervolgens aan de knop
     te draaien stelt u uw gekozen leeshulp in.
     Door de leeshulpknop 2 seconden ingedrukt te
     houden zet u de laatst gekozen leeshulp direct aan of uit.

     10                                                           i-See HD
5.8 Tableau
De i-See HD is voorzien van een soepel bewegend X Y tableau. Hier-
op legt u uw lees- of beeldmateriaal dat u op het scherm wilt ver- NL
groten. Het tableau kan van links naar rechts (X-richting) en van
voor naar achter (Y-richting) bewogen worden.
5.9 Remhendel
Onder het tableau van de i-See HD bevindt zich een remhendel
waarmee u de beweging van het tableau kunt beperken. De hendel
heeft 3 posities:
links = alle beweging van het tableau is geblokkeerd
midden = de beweging van boven naar beneden is geblokkeerd
rechts = het tableau is vrij beweegbaar
6 Richtlijnen
De i-See HD is getest op veiligheid en elektromagnetische interfe-
rentie en voldoet aan de EMC Directive en de Low Voltage Directive
afgegeven zoals deze is afgegeven door het Europese Parlement en
de Commissie van de Europese Unie.
Dit apparaat voldoet ook aan de eisen die gesteld zijn onder FCC 47
CFR deel 15B klasse B.
7 De i-See HD recyclen
Dit symbool van de gekruiste afvalbak geeft aan dat het
product niet weggegooid mag worden met het huisvuil.
Vraag bij uw gemeente na voor de regels omtrent het
weggooien van elektronische producten.
118 Technische specificaties
NL Algemene Specificaties (voor 22”)
Vergroting 3× – 75×
Resolutie 720p
Afmetingen 51 × 48 × 64 cm (scherm in hoogste stand)
Gewicht 15,8kg/34,8lb
Stroomtoevoer 110 – 240V @ 50/60Hz
Gebruiksomstandigheden Temperatuur +5oC – +35oC
+41oF – +95oF
LuchtvochtigheidTable of contents
1 Introduction........................................................ 14
2 Package contents................................................. 14
3 Installation......................................................... 14
3.1 Attach the TFT screen.......................................... 14
3.2 Tilt the screen................................................... 15
3.3 Adjust the height of the screen............................... 15
3.4 Connecting the cables.......................................... 16
4 Use.................................................................. 16 EN
5 Controls............................................................. 17
5.1 On/off switch..................................................... 17
5.2 Display modes.................................................... 17
5.3 Zooming in and out.............................................. 18
5.4 Zoom presets..................................................... 18
5.5 Blocking the autofocus......................................... 18
5.6 Brightness......................................................... 18
5.7 Reading aid....................................................... 18
5.8 Tableau............................................................ 19
5.9 Brake handle..................................................... 19
6 Regulations......................................................... 20
7 Discarding the i-See HD.......................................... 20
8 Technical specifications.......................................... 21
131 Introduction
Congratulations with your i-See HD; a desktop video magnifier of
high quality that is especially user friendly.
Read this manual thoroughly before you start to use your i-See HD.
This manual contains instructions on how the device needs to be
installed, and describes all of the functions of the i-See HD.
EN 2 Package contents
The package of the i-See HD contains the following:
• i-See HD base
• TFT screen for with control interface
• Powercable
• Manual
3 Installation
Never open up the device yourself; this will void your
warranty. If you suspect the device is in need of service
or repairs, please contact your supplier.
The i-See HD will be delivered to you in a pre-assembled state. All
you have to do is connect the TFT monitor to the base, attach the
cables to the control interface and TFT monitor and connect the
power cable to the base.
3.1 Attach TFT screen
You can attach the TFT monitor by hanging it on the base and
tightening the bolts on both rear sides of the screen.
14 i-See HD3.2 Tilt the screen
Loosen the bolts at both rear sides of the screen; this loosens up the
EN
screen so you can move it in your preferred position. Tighten the
bolts to secure the screen at that position.
3.3 Adjust the height of the screen
With the i-See HD it is possible to adjust the height of the screen.
Simply grab the lever at the right side of the TFT screen, pull it
towards you and, while holding your left hand at the lower left cor-
ner of the screen, slide the screen up or down. Release the lever to
secure the screen at that position.
153.4 Connecting the cables
Control interface
Monitor
EN
4 Use
• Avoid direct sunlight on the screen and tableau.
• Be careful when handling the moving parts of the reading table.
• The i-See HD requires little or no maintenance. If you want to
clean the exterior of the device, only use a dry cloth. The use
of aggressive cleaning products like alcohol, acetone or other
chemical substances is prohibited.
• Do not use the i-See HD as a support for walking, sitting down or
getting up.
• Switch off the device if you do not intend to use it.
• Ensure that the i-See HD is placed in a well ventilated room.
• Place the i-See HD on a stable surface to prevent it from falling.
• Only use your i-See HD indoors. Do not expose the i-See HD to
extreme temperature fluctuations or humidity. Do not place your
i-See HD next to a heat source or in direct sunlight.
• Only use the supplied cables and connect the power cable to an
earthed socket.
• Ensure that the i-See HD is placed at a minimal distance of
10 cm / 4 inches from the edge of the table.
16 i-See HD5 Controls
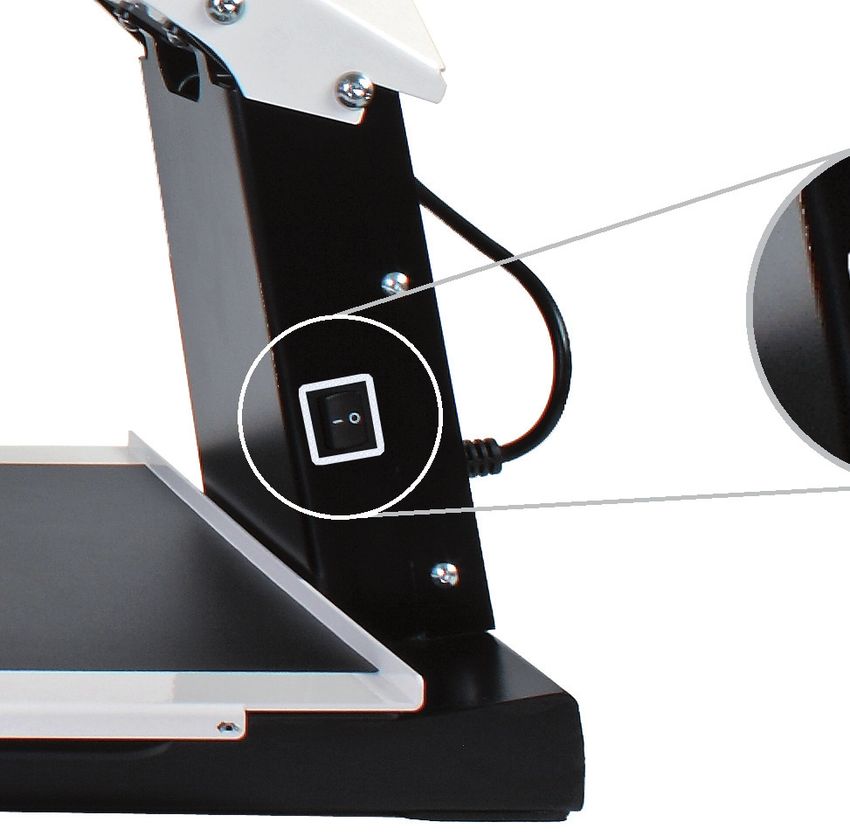
5.1 On/off switch
The on/off switch of the i-See HD is located on the right hand side
of the pillar.
EN
The control interface contains all the controls of the i-See HD.
5.2 Display modes
Push the knob to switch between
photograph modes or high contrast modes. The
last used mode will automatically be selected.
Turn the knob to select different display modes.
You can find a detailed overview of the available display modes in
the technical specifications section of this manual.
175.3 Zooming in and out
Turn the knob to the right to zoom in. Turn the
knob to the left to zoom out.
5.4 Zoom presets
While reading texts and looking at images, you
require a zoom setting that suits your needs. The i-See HD contains
a function that memorizes these preferred zoom settings for you.
This means that when you switch from the photograph mode to a
EN text mode, the i-See HD will automatically switch to the last zoom
setting you used in the text mode. The same goes when you switch
from a text mode to the photograph mode – the device will auto-
matically switch to the last zoom setting you used while viewing
photos.
5.5 Blocking the autofocus
The i-See HD will always automatically focus on the object on the
tableau. However, in certain situations (like during writing), it can
be useful to block the autofocus.
Push the zoom knob to block the autofocus. Turn the knob in either
direction to unblock the autofocus.
5.6 Brightness
Turn the knob to the left to decrease or or to the
right to increase the brightness of the image on
your screen.
5.7 Readings aid
By pushing the knob the user can choose between
4 different reading aids: a horizontal and verti-
cal reading line, a horizontal and a vertical block
blank. By subsequently turning the knob you can
fine tune your chosen reading aid.
By keeping the knob pressed for 2 seconds, you can immediately
switch your chosen reading aid on or off.
18 i-See HD5.8 Tableau
The i-See HD contains a tableau on which you can place your read-
ing material. The tableau can move from left to right (X-direction)
and from front to back (Y-direction).
5.9 Brake handle
Underneath the tableau of the i-See HD you will find a single brake
handle with which you can control the movability of the tableau.
The handle has 3 positions:
EN
Left = all movement of the tableau is blocked
Middle = the movement from front to back (Y-direction) is blocked
Right = the tableau can be moved freely
6 Regulations
The i-See HD is tested for safety and electromagnetic interference
and meets the requirements of both the Low Voltage Directive and
the EMC Directive as laid out by the European Parliament and the
Council of the European Union.
The device also meets the requirements of FCC 47 CFR Part15B
Class B.
7 Discarding the i-See HD
This symbol of the crossed out wheelie bin indicates
that the product must not be disposed of with your oth-
er household waste. Check local regulations for proper
disposal of electronic products.
198 Technical specifications
General specifications (for 22”)
Magnification 3× – 75×
Resolution 720p
Dimensions 51 × 48 × 64 cm (screen in highest position)
20 × 19 × 25.2 inch
Weight 15.8kg / 34.8lb
Power supply 110 – 240V @ 50/60Hz
Conditions of use Temperature +5oC – +35oC
EN +41oF – +95oF
humidityInhaltsverzeichnis
1 Einführung.......................................................... 22
2 Verpackungsinhalt................................................ 22
3 Installation......................................................... 22
3.1 Befestigen des TFT-Monitors................................... 22
3.2 Neigen des Monitors............................................. 23
3.3 In der Höhe verstellbarer Monitor............................ 23
3.4 Befestigen des Kabels........................................... 24
4 Verwendung........................................................ 24
5 Bedienung.......................................................... 25
5.1 Ein- / Aus-Schalter.............................................. 25
5.2 Anzeige............................................................ 25
5.3 Vergrößern - verkleinern....................................... 26
5.4 Bevorzugte Vergrößerung....................................... 26
5.5 Autofokus-Sperre................................................ 26 DE
5.6 Hellighkeit........................................................ 26
5.7 Lesehilfe.......................................................... 26
5.8 Tablett............................................................. 27
5.9 Bremshebel....................................................... 27
6 Richtlinien.......................................................... 27
7 Entsorgung......................................................... 27
8 Technische Daten................................................. 28
211 Einführung
Herzlichen Glückwunsch zu Ihrer i-See HD – eine Bildschirmlupe in
hochwertiger Qualität, die zudem besonders benutzerfreundlich ist.
Lesen Sie sich diese Anleitung bitte sorgfältig durch, bevor Sie
i-See HD in Betrieb nehmen. In dieser Anleitung finden Sie nämlich
eine Anleitung, wie das Gerät installiert werden muss, und eine
Beschreibung aller Funktionen, über die i-See HD verfügt.
2 Verpackungsinhalt
Die Verpackung des i-See HD enthält Folgendes:
• i-See HD Standfuß
DE • Monitor mit Bedienfeld
• Stromkabel
• Bedienungsanleitung
3 Installation
Für Wartungs- oder Reparaturarbeiten öffnen Sie das Gerät
niemals selbst, sonst verlieren Sie Ihren Gewährleistungs-
anspruch. Wenden Sie sich in diesem Falle an Ihren Händler.
i-See HD wird vom Werk vormontiert geliefert. Sie brauchen nur
den Bildschirm auf dem Gestell zu befestigen, die Kabel an den
Bildschirm anzuschließen und das Stromkabel an das Gestell anzu-
schließen.
3.1 Befestigen des TFT-Monitors
Zum Befestigen des TFT-Monitors hängen Sie den Monitor in den
Standfuß ein und drehen die Drehknöpfe an beiden Rückseiten des
Monitors fest an.
22 i-See HD3.2 Neigen des Monitors
Drehen Sie die Knöpfe an beiden Rückseiten des Monitors so weit
los, bis sich der Monitor bewegen lässt. Neigen Sie den Monitor in
die gewünschte Position, und drehen Sie die Knöpfe fest an.
DE
3.3 In der Höhe verstellbarer Monitor
Beim Modell i-See HD ist es möglich, den Bildschirm in der Höhe zu
verstellen. Dazu ziehen Sie den Hebel an der rechten Seite des Mo-
nitors zu sich hin und bewegen den Bildschirm dann mit der linken
Hand unter der linken unteren Ecke des Monitors nach oben oder
nach unten. Lassen Sie den Hebel los, um den Bildschirm in der ge-
wünschten Position zu verriegeln.
233.4 Befestigen des Kabels
Bedienfeld
Monitor
4 Verwendung
• Vermeiden Sie direktes Sonnenlicht am Bildschirm und dem Leseschirm.
• Gehen Sie mit den beweglichen Teilen des Tabletts vorsichtig um.
• Der i-See HD erfordert wenig oder keine Wartung. Zum Reinigen
der Oberfläche des Geräts verwenden Sie ausschließlich ein wei-
DE ches trockenes Tuch. Die Verwendung aggressiver Reinigungspro-
dukte, wie Alkohol, Aceton oder anderer chemischer Substanzen
ist verboten.
• Verwenden Sie den i-See HD nicht als Hilfsmittel beim Gehen,
Sitzen oder Aufstehen.
• Stellen Sie sicher dass das System in einem gut gelüfteten Raum
verwendet wird.
• Die Bildschirmlupe nur im Innenbereich verwenden. Das Gerät
darf weder extremen oder stark schwankenden Temperaturen,
noch der Feuchtigkeit ausgesetzt werden. Stellen Sie den i-See
HD niemals in die Nähe einer Wärmequelle oder direktes Sonnen-
licht.
• Verwenden Sie nur den mitgelieferten Adapter und schließen Sie
das Netzkabel nur an einer geerdeten Wandsteckdose an.
• Schalten Sie das Gerät immer aus wenn es nicht verwendet wird.
• Setzen Sie das System auf eine stabile Unterlage, damit das Gerät
nicht herunterfallen kann.Stellen Sie sicher, dass der i-See HD
mindestens 10 cm vom Tischrand entfernt steht.
24 i-See HD5 Bedienung
5.1 Ein- / Aus-Schalter
Der Ein- / Aus-Schalter des i-See HD befindet sich an der rechten
Seite des Geräts.
DE
Die Knöpfe für die Bedienung des i-See HD finden Sie auf der weißen
Bedienleiste.
5.2 Anzeige
Um zwischen den Foto- oder Hochkontrastmodi
zu wählen, drücken Sie auf die Anzeigetaste. Der
zuletzt verwendete Foto- oder Hochkontrastmo-
dus wird ausgewählt. Wählen Sie anschließend den
individuellen Modus durch Drehen am Drehknopf.
Eine detaillierte Übersicht der verfügbaren Modi
finden Sie in den technischen Daten in dieser Anleitung.
255.3 Vergrößern - Verkleinern
Um den Text im Bild zu vergrößern, drehen Sie
den Knopf nach rechts. Um den Text im Bild zu
verkleinern, drehen Sie den Knopf nach links.
5.4 Bevorzugte Vergrößerung
Beim Lesen von Texten und Betrachten von Abbildungen verwenden
Sie eine Vergrößerungseinstellung, die für Sie am angenehmsten ist.
i-See HD merkt sich automatisch die verwendete Einstellung, wenn
Sie zwischen den Foto- und Hochkontrastmodi umschalten. Das be-
deutet: Wenn Sie von einem Fotomodus in einen Hochkontrastmo-
dus umschalten, verwendet das Gerät automatisch die zuletzt ein-
gestellte Vergrößerung im Hochkontrastmodus. Gleiches gilt, wenn
Sie aus einem Hochkontrastmodus in den Fotomodus umschalten.
DE 5.5 Autofokus-Sperre
i-See HD stellt das Bild immer automatisch scharf ein. In bestimm-
ten Situationen – z. B. beim Schreiben – kann es zweckmäßig sein,
diese automatische Scharfeinstellung (Autofokus) zu sperren. Um
den Autofokus zu sperren, drücken Sie den Vergrößerungsknopf ein.
Um die Sperre aufzuheben, drehen Sie am Knopf.
5.6 Hellighkeit
Um der Bildhelligkeit zu verringern order erhöhen,
drehen Sie den Knopf nach links order rechts.
5.7 Lesehilfe
Durch Drücken auf den Lesehilfeknopf können Sie
4 verschiedene Lesehilfen auswählen: horizontalen
und vertikalen Leselinie sowie horizontalen und
vertikalen Abdeckrahmen. Durch Drehen am Knopf
stellen Sie dann die ausgewählte Lesehilfe ein.
Indem Sie den Lesehilfeknopf 2 Sekunden gedrückt halten, schalten
Sie die zuletzt gewählte Lesehilfe direkt ein bzw. aus.
26 i-See HD5.8 Tablett
i-See HD verfügt über ein flexibles Tablett. Darauf legen Sie ein
Buch, Foto oder einen anderen Gegenstand, der am Bildschirm ver-
größert dargestellt wird. Das Tablett kann von links nach rechts und
von vorne nach hinten bewegt werden.
5.9 Bremshebel
Unter dem Tablett von i-See HD befindet sich ein Bremshebel, mit
dem Sie die Bewegung des Tabletts einschränken können. Dieser
Hebel hat 3 Positionen:
Links = Tablett ist gesperrt
Mitte = die Bewegung der Tablett von vorne nach hinten ist
gesperrt
Rechts = Tablett ist vollständig bewegbar
DE
6 Richtlinien
i-See HD wurde auf Sicherheit und elektromagnetische Störungen
getestet und erfüllt die Anforderungen sowohl der Niederspannungs-
richtlinie als auch der EMV-Richtlinie des Europäischen Parlaments
und des Rates der Europäischen Union.
Das Gerät erfüllt außerdem die Anforderungen von Teil 15B der FCC-
Bestimmungen Titel 47 CFR Klasse B.
7 Entsorgung
Dieses Symbol des durchgestrichenen Abfalleimers
besagt, dass die Entsorgung des Produkts vom
Hausmüll getrennt zu erfolgen hat. Erkundigen Sie sich
nach den örtlichen Vorschriften über die ordnungsge-
mäße Entsorgung von Elektronikprodukten.
278 Technische Daten
Allgemeine Spezifikation (für 22”)
Vergrößerung 3× – 75×
Resolution 720p
Maße 51 × 48 × 64 cm / 20 × 19 × 25.2 inch
(Bildschirm in höchste Position)
Gewicht 15.8kg / 34.8lb
Stromversorgung 110 – 240V @ 50/60Hz
Einsatzbedingungen Temperatur +5oC – +35oC / +41oF – +95oF
LuftfeuchtigkeitSommario
1 Introduzione....................................................... 30
2 Contenuto della confezione..................................... 30
3 Installazione....................................................... 30
3.1 Fissaggio dello schermo TFT................................... 30
3.2 Inclinazione dello schermo..................................... 31
3.3 Schermo regolabile in altezza................................. 31
3.4 Fissaggio del cavi................................................ 32
4 Utilizzo............................................................. 32
5 Comandi............................................................ 33
5.1 Interruttore di accensione..................................... 33
5.2 Reproduzione..................................................... 33
5.3 Ingrandimento - riduzione...................................... 34
5.4 Preferenze d’ingrandimento................................... 34
5.5 Blocco autofocus................................................. 34
5.6 Luminosità........................................................ 34
5.7 Ausilio alla lettura............................................... 34
5.8 Tavola.............................................................. 35
5.9 Leva freno........................................................ 35
6 Direttive............................................................ 35
7 Smaltimento....................................................... 35
8 Specifiche tecniche............................................... 36 IT
291 Introduzione
Congratulazioni per l’acquisto del vostro i-See HD; un videoingran-
ditore che, oltre ad essere di eccellente qualità, è anche facile da
usare.
Prima di utilizzare l’i-See HD, leggete attentamente il presen-
te manuale. Esso, infatti, contiene istruzioni su come installare
l’apparecchio, oltre a descrivere tutte le funzioni dell’i-See HD.
2 Contenuto della confezione
Nella confezione dell’i-See HD troverete:
• Base dell’i-See HD
• Monitor con pannello di comando
• Cavo di alimentazione
• Manuale
3 Installazione
Qualora si rendano necessarie manutenzione o riparazioni,
IT non aprire mai l’apparecchio da soli, in quanto ciò com-
porterebbe la decadenza della garanzia. In questi casi,
rivolgersi al proprio fornitore.
L’i-See HD viene consegnato già montato. Si deve solo fissare lo
schermo sul supporto, collegare i cavi allo schermo e collegare il
cavo di alimentazione al supporto.
3.1 Fissaggio dello schermo TFT
Fissate lo schermo TFT inserendolo nella base e avvitando bene le
manopole su entrambi i lati posteriori dello schermo.
30 i-See HD3.2 Inclinazione dello schermo
Allentare le manopole su entrambi i lati posteriori dello schermo
di modo che si possa muovere. Inclinare lo schermo nella posizione
desiderata e riavvitare.
3.3 Schermo regolabile in altezza
IT
Con il modello i-See HD è possibile regolare lo schermo in altezza.
Per fare questo è sufficiente tirare verso di sé la leva sul lato destro
dello schermo e quindi alzare o abbassare lo schermo con la mano
sinistra posizionata sotto l’angolo in basso a sinistra dello schermo.
Lasciando la leva lo schermo si bloccherà in quella posizione.
313.4 Fissaggio del cavi
Pannello di
comando
Schermo
4 Utilizzo
• Evitare di esporre lo schermo e la tavoletta di lettura alla luce
solare diretta.
• Prestare attenzione ai componenti mobili della tavoletta.
• i-See HD richiede una manutenzione minima o nulla. Per pulire
l’apparecchio sul lato esterno, utilizzare semplicemente un pan-
no morbido asciutto. È vietato l’utilizzo di detergenti aggressivi
come alcool, acetone o altre sostanze chimiche.
• Non utilizzare i-See HD come sostegno per camminare, sedersi o
alzarsi.
• Utilizzare esclusivamente l’adattatore in dotazione, e collegare
il cavo di rete a una presa con contatto di terra.
IT • Accertarsi che l’impianto si trovi un ambiente sufficientemente
ventilato.
• Utilizzare il videoingranditore esclusivamente all’interno di un
edificio. Non esporre l’apparecchio a temperature o umidità
estreme o molto variabili. Non collocare i-See HD in prossimità di
una fonte di calore e non esporlo alla luce solare diretta.
• Spegnere l’apparecchio quando non viene utilizzato.
• Collocare l’impianto su una superficie stabile, in modo che
l’apparecchio non possa cadere. Accertarsi che i-See HD sia col-
locato a 10 cm dal bordo del tavolo.
32 i-See HD5 Comandi
5.1 Interruttore di accensione
L’interruttore di accensione di i-See HD si trova sul lato destro
dell’apparecchio.
Troverà i pulsanti di comando dell’i-See HD sul pannello di comando
bianco.
IT
5.2 Pulsante di accensione / spegnimento
Premere la manopola per scegliere fra l’uso delle
modalità foto o contrasto elevato. Viene selezi-
onata automaticamente la modalità foto o con-
trasto elevato utilizzata per ultima. Quindi ruotare
la manopola per selezionare le modalità individu-
ali.
Nelle specifiche tecniche del presente manuale potete tro-
vare una panoramica dettagliata delle modalità disponibili.
335.3 Ingrandimento / Riduzione
Ruotare la manopola verso destra per ingran-
dire il testo sull’immagine. Ruotare la manopola
verso sinistra per rimpicciolire il testo sull’im-
magine.
5.4 Preferenze d’ingrandimento
Durante la lettura di testi e la visualizzazione di immagini utilizze-
rete un’impostazione d’ingrandimento che più si adatta alla vostra
vista. L’i-See HD si ricorderà automaticamente l’impostazione da
voi utilizzata se passate dalla posizione foto a quella di contrasto
elevato. Questo significa che se passate dalla modalità foto a quel-
la di contrasto elevato, l’apparecchio utilizzerà automaticamente
l’ultimo ingrandimento di contrasto elevato utilizzato. Lo stesso vale
quando passate dalla modalità di contrasto elevato a quella di foto.
5.5 Blocco autofocus
L’i-See HD metterà sempre a fuoco l’immagine in automatico. In
alcune situazioni (come durante la scrittura) potrebbe essere co-
modo bloccare questa messa a fuoco automatica. Premere la ma-
nopola per bloccare la messa a fuoco automatica. Ruotare la mano-
pola per togliere il blocco.
IT
5.6 Luminosità
Ruotare la manopola a destra per aumentare il lu-
minosità. Ruotarla a sinistra per diminuire il lumi-
nosità.
5.7 Ausilio alla lettura
Premendo la manopola di ausilio alla lettura, po-
tete scegliere fra 4 tipi diversi di ausilio; una linea
di lettura orizzontale e verticale, una cornice di
copertura orizzontale e uno verticale. Ruotando
quindi la manopola regolate l’ausilio di lettura
prescelto.
Tenendo premuta per 2 secondi la manopola di ausilio alla lettura,
attiverete o disattiverete l’ultimo ausilio alla lettura selezionato.
34 i-See HD5.8 Tavola
i-See HD è provvisto di una tavoletta X-Y flessibile. Su di essa è pos-
sibile collocare un libro, una foto o un altro oggetto da ingrandire
sullo schermo. La tavoletta si può muovere sia a sinistra e a destra
(X) che avanti e indietro (Y).
5.9 Leva freno
Sotto il leggio dell’i-See HD c’è una leva freno con la quale potrete
limitare il movimento del leggio stesso. Questa leva ha 3 posizioni:
Sinistra = il leggio è bloccato
Centrale = il movimento dalla parte anteriore a quella posteri-
ore è bloccata
Destra = il leggio è totalmente movibile
6 Smaltimento
i-See HD è stato collaudato in termini di sicurezza e di interferenze
elettromagnetiche ed è conforme sia ai requisiti della Direttiva sul
basso voltaggio che alla Direttiva EMC, come disposto dal Parlamen-
to Europeo e dal Consiglio dell’Unione Europea.
Questo dispositivo è inoltre conforme ai limiti per i dispositivi di- IT
gitali di classe B ai sensi della Parte 15B della normativa FCC (47
CFR).
7 Smaltimento
Questo simbolo del cassone dei rifiuti con rotelle con
una croce sopra indica che il prodotto non può essere
smaltito insieme ai vostri rifiuti domestici. Consultare le
norme locali per sapere come smaltire correttamente i
prodotti elettronici.
358 Specifiche tecniche
Specifiche generali (schermo da 22”)
Ingrandimento 3× – 75×
Risoluzione 720p
Dimensioni 51 × 48 × 64 cm / 20 × 19 × 25.2 inch
(Schermo nella posizione più elevata)
Peso 15.8kg / 34.8lb
Alimentazione 110 – 240V @ 50/60Hz
Condizioni di utilizzo Temperatura +5oC – +35oC
+41oF – +95oF
Umidità dell’ariaÍndice
1 Introducción....................................................... 38
2 Contenido del embalaje......................................... 38
3 Instalación......................................................... 38
3.1 Fijación de la pantalla TFT.................................... 38
3.2 Ladear la pantalla............................................... 39
3.3 Pantalla regulable en altura................................... 39
3.4 Fijación del cables.............................................. 40
4 Uso.................................................................. 40
5 Manejo.............................................................. 41
5.1 Interruptor de encendido / apagado......................... 41
5.2 Selección de modo.............................................. 41
5.3 Ampliar - reducir................................................. 42
5.4 Preferencia de aumento........................................ 42
5.5 Bloqueo de enfoque automático.............................. 42
5.6 Brillo............................................................... 42
5.7 Ayuda de lectura................................................. 42
5.8 Bandeja........................................................... 43
5.9 Palanca de freno................................................. 43
6 Directivas........................................................... 43
7 Deshecho........................................................... 43
8 Especificaciones técnicas........................................ 44
ES
371 Introducción
Le felicitamos por la compra de i-See HD, una lupa para pantalla de
primerísima calidad que es especialmente fácil de usar.
Antes de empezar a usar i-See HD, lea atentamente este manual.
Contiene instrucciones sobre cómo se debe instalar el aparato y
describe todas las funciones de las que dispone i-See HD.
2 Contenido del embalaje
En el embalaje de i-See HD encontrará lo siguiente:
• Soporte i-See HD
• Monitor con panel de control
• Cable de corriente
• Manual
3 Instalación
En caso de mantenimiento o reparación, no abra nunca
el aparato, ya que la garantía quedaría anulada. Para
ello, póngase en contacto con su proveedor.
La i-See HD se entregará montada previamente de fábrica. Sólo tie-
ne que fijar la pantalla al soporte, conectar los cables a la pantalla
y el cable de alimentación al soporte.
ES
3.1 Fijación de la pantalla TFT
Fije la pantalla TFT colgando la pantalla en el soporte y enroscando
los botones giratorios a los dos lados posteriores de la pantalla.
38 i-See HD3.2 Ladear la pantalla
Desenrosque los botones de los dos lados posteriores de la pantalla
de modo que se pueda mover la pantalla. Ladee la pantalla a la
posición desea y vuelva a apretar los tornillos.
3.3 Pantalla regulable en altura
Con la i-See HD la pantalla se puede regular en altura. Lo podrá ha-
cer tirando hacia Ud. de la palanca que hay en el lado derecho de
la pantalla y desplazando a continuación la pantalla hacia arriba o
abajo con la mano izquierda colocada debajo de la esquina inferior
izquierda de la pantalla. Suelte la palanca para bloquear la pantalla
en esa posición.
ES
393.4 Fijación del cables
Panel de control
Pantalla
4 Uso
• Evite que la luz solar incida directamente sobre la pantalla y el
panel de lectura.
• Tenga cuidado con los componentes móviles del panel.
• El equipo i-See HD apenas necesita mantenimiento. Si desea lim-
piar el aparato por la parte exterior, utilice solamente un paño
suave y seco. Está prohibido el uso de productos de limpieza cor-
rosivos como alcohol, acetona y otras sustancias químicas.
• No utilice el i-See HD como apoyo para andar, sentarse o levan-
tarse.
• Apague siempre el aparato cuando no vaya a utilizarlo.
• Asegúrese de que el sistema se instale en un lugar con la suficiente
ventilación.
• Utilice el circuito cerrado de televisión únicamente en interiores.
No exponga el aparato a temperaturas extremas o rápidamente
cambiantes ni a la humedad. No coloque el i-See HD cerca de una
fuente de calor ni donde reciba directamente la luz solar.
ES • Utilice únicamente el adaptador suministrado y conecte el cable
de alimentación a un enchufe de pared conectado a tierra.
• Coloque el sistema sobre una superficie estable a fin de evitar que
se pueda caer. Compruebe que esté a 10 cm del borde de la mesa.
40 i-See HD5 Manejo
5.1 Interruptor de encendido / apagado
El interruptor de encendido / apagado del i-See HD está situado en
el lado derecho del aparato.
Los botones de manejo del i-See HD se encuentran en el panel de
control blanco.
5.2 Selección de modo
Pulse el botón para elegir ente el uso de estados de
foto o de alumbrado de alto contraste. Se seleccionará
automáticamente el último estado de foto o alumbra-
ES
do de alto contraste utilizado. A continuación, gire
el botón para seleccionar los estados individuales.
Podrá encontrar una panorámica detallada de los
estados disponibles en las especificaciones técnicas de este manual.
415.3 Ampliar / reducir
Gire el botón hacia la derecha para aumentar el
texto de la pantalla.
Gire el botón hacia la izquierda para reducir el
texto de la pantalla.
5.4 Preferencia de aumento
Al leer textos y ver imágenes Ud. hace uso de un ajuste de au-
mento que será el que le vaya mejor. La i-See HD memoriza au-
tomáticamente el ajuste utilizado cuando Ud. cambia entre el
estado de foto y el de alumbrado de alto contraste, lo que im-
plica que cuando Ud. cambia de un estado de foto a un estado
de alumbrado de alto contraste, el aparato utilizará automáti-
camente el último aumento empleado del estado de alumbrado
de alto contraste. Lo mismo es aplicable para los casos en que
Ud. cambie de un estado de alto contraste al estado de foto.
5.5 Bloqueo de enfoque automático
La i-See HD enfocará siempre la imagen automáticamente. En de-
terminadas circunstancias (como cuando se está escribiendo) pu-
ede resultar más práctico bloquear el enfoque automático. Pulse
el botón para bloquear el enfoque automático. Gire el botón para
eliminar el bloqueo.
5.6 Brillo
Gire el botón hacia la derecha para aumentar el
brillo. Gire el botón hacia la izquierda para reducir
el brillo.
ES 5.7 Ayuda de lectura
Al pulsar el botón de ayuda de lectura, podrá se-
leccionar 4 ayudas de lectura distintas: una lí-
nea de lectura horizontal y vertical, un encuadre
horizontal y uno vertical. Al girar a continuación
el botón, ajustará la ayuda de lectura elegida.
Manteniendo pulsado el botón de ayuda de lectura durante 2 se-
gundos conectará o desconectará directamente la última ayuda de
lectura elegida.
42 i-See HD5.8 Bandeja
El sistema i-See HD incorpora una bandeja X Y flexible. Puede colo-
car un libro, una foto u otro objeto para ampliarlo en la pantalla.
La bandeja se puede mover de izquierda a derecha (X) y adelante
y atrás (Y).
5.9 Palanca de freno
Debajo del panel de la i-See HD se encuentra una palanca de frena-
do con la que podrá restringir el movimiento del panel. Esta palan-
ca tiene 3 posiciones:
Izquierda = la bandeja está bloqueada
Centro = el movimiento de arriba hacia abajo ha sido bloqueada
Derecha = se puede mover la bandeja completamente libremente
6 Directivas
El dispositivo i-See HD se he sometido a pruebas de seguridad e
interferencias electromagnéticas y cumple los requisitos de la Di-
rectiva de baja tensión y la Directiva CEM establecidas por el Parla-
mento Europeo y el Consejo de la Unión Europea.
El dispositivo cumple también los requisitos de FCC 47 CFR Aparta-
do 15B Clase B.
7 Deshecho
Este símbolo con el contenedor tachado indica que el ES
producto no debe desecharse con el resto de residuos
domésticos. Compruebe las regulaciones locales para
desechar adecuadamente los productos electrónicos.
438 Especificaciones técnicas
Especificaciones generales (En una pantalla de 22”)
Aumento 3× – 75×
resolución 720p
Dimensiones 51 × 48 × 64 cm / 20 × 19 × 25.2 inch
(Pantalla en la posición más alta)
Peso 15.8kg / 34.8lb
Poder 110 – 240V @ 50/60Hz
Condiciones de uso Temperatura +5oC – +35oC
+41oF – +95oF
Humedad del aireSommaire
1 Introduction........................................................ 46
2 Le package contient.............................................. 46
3 Installation......................................................... 46
3.1 Montage de l’écran TFT........................................ 46
3.2 Inclinaison de l’écran........................................... 47
3.3 Réclage de l’écran en hauteur................................ 47
3.4 Raccordement des câbles...................................... 47
4 Utilisation.......................................................... 48
5 Commande......................................................... 49
5.1 Interrupteur marche / arrêt................................... 49
5.2 Affichage.......................................................... 49
5.3 Agrandissement / Réduction................................... 50
5.4 Réglages préférentiels d’agrandissement................... 50
5.5 Blocage de l’autofocus......................................... 50
5.6 Luminosité........................................................ 50
5.7 Aide à la lecture................................................. 50
5.8 Table............................................................... 51
5.9 Levier de frein................................................... 51
6 Directives........................................................... 51
7 Mise au rebut...................................................... 51
8 Spécifications techniques........................................ 52
FR
451 Introduction
Félicitations pour l’achat de votre i-See HD; un vidéo-agrandisseur
de haute qualité et particulièrement simple d’utilisation.
Veuillez lire attentivement ce manuel avant de commencer à
utiliser votre i-See HD. Vous y trouverez des instructions concernant
l’installation de l’appareil et une description de toutes ses fonctions.
2 Installation, sécurité et entretien
La boîte de l’i-See HD contient les éléments suivants:
• Support de l’i-See HD
• Monitor avec pupitre de commande
• Cordon d’alimentation
• Manuel
3 Installation
En cas d’entretien ou de réparation, n’ouvrez jamais
personnellement l’appareil, vous perdriez ce faisant
tout droit de recourir à la garantie. Dans pareil cas,
veuillez contacter votre fournisseur
L’i-See HD qui vous est livré a été monté au préalable en usine. Il
vous suffit de fixer l’écran sur le support, de raccorder les câbles à
l’écran et de brancher le cordon d’alimentation sur le support.
3.1 Montage de l’écran TFT
Pour installer l’écran TFT, positionnez-le dans le support et serrez
les boutons rotatifs situés à l’arrière, de part et d’autre de l’écran.
FR
46 i-See HD3.2 Inclinaison de l’écran
Pour ce faire, desserrez les boutons situés à l’arrière, de part et
d’autre de l’écran, jusqu’à pouvoir bouger l’écran. Inclinez l’écran
selon vos préférences, puis resserrez les vis.
3.3 Réglage de l’écran en hauteur
Le modèle i-See HD permet également d’ajuster la hauteur de
l’écran. Pour ce faire, tirez vers vous la manette située sur le côté
droit de l’écran et, en plaçant la main gauche sous le coin inférieur
gauche de l’écran, faites glisser l’écran vers le haut ou vers le bas.
Relâchez enfin la manette pour verrouiller la position de l’écran.
3.4 Raccordement des câbles
FR
Écran
474 Utilisation
• Évitez d’exposer l’écran et le tableau de lecture directement
aux rayons du soleil.
• Soyez délicat avec les éléments mobiles du tableau.
• L’i-See HD ne requiert pratiquement aucun entretien. Si vous sou-
haitez nettoyer l’extérieur de l’appareil, utilisez uniquement un
chiffon doux et sec. L’utilisation de produits de nettoyage agres-
sifs comme l’alcool, l’acétone et d’autres produits chimiques est
interdite.
• N’utilisez pas l’i-See HD comme outil pour marcher, vous asseoir
ou vous tenir debout.
• Débranchez toujours l’appareil si vous ne l’utilisez pas.
• Veillez à ce que le système se trouve en un endroit suffisamment aéré.
• Utilisez uniquement votre vidéo-agrandisseur à l’intérieur.
N’exposez pas l’appareil à des températures extrêmes ou rapide-
ment variables ni à de l’humidité. Ne placez pas votre i-See HD à
côté d’une source de chaleur ou directement exposé aux rayons
du soleil.
• Utilisez uniquement l’adaptateur également fourni et branchez
le cordon électrique sur une prise de courant reliée à la terre.
• Veillez à ce que les haut-parleurs d’un appareil audio ne soient
pas placés trop près du moniteur.
• Placez le système sur une base stable de manière à ce que
l’appareil ne puisse pas tomber. Veillez à ce que l’i-See HD soit
placé à 10 cm du bord de la table.
FR
48 i-See HD5 Commandes
5.1 Interrupteur marche / arrêt
L’interrupteur marche / arrêt du i-See HD se trouve sur le côté droit
de l’appareil.
Les boutons de commande de l’i-See HD se situent sur le panneau
de commande blanc.
5.2 Affichage
Appuyez sur le bouton pour choisir entre les modes
d’ affichage photo ou haut contraste. L’appareil
sélectionne automatiquement le dernier affichage
photo ou haut contraste utilisé. Tournez ensuite
le bouton rotatif pour choisir parmi les différents
modes disponibles. Une liste détaillée des modes
d’affichage disponibles figure dans ce manuel, dans
le chapitre relatif aux spécifications techniques. FR
495.3 Agrandissement / Réduction
Tournez le bouton vers la droite pour agrandir le
texte affiché à l’écran.
Tournez le bouton vers la gauche pour réduire la
taille du texte à l’écran.
5.4 Réglages préférentiels d’agrandissement
Pour lire un texte ou regarder des images, vous utilisez le réglage
d’agrandissement qui vous convient le mieux. Ce réglage est auto-
matiquement mémorisé par l’i-See HD pour l’affichage photo et l’af-
fichage haut contraste. De cette manière, lorsque vous passez d’un
mode photo vers un affichage à haut contraste, l’appareil s’ajuste au-
tomatiquement sur la base du dernier réglage d’agrandissement que
vous avez utilisé pour le mode d’affichage à haut contraste. Il en va de
même lorsque vous passez du mode haut contraste à l’affichage photo.
5.5 Blocage de l’autofocus
L’i-See HD mettra toujours automatiquement l’image au point. Dans
certaines circonstances (comme pour du courrier) il peut être utile
de bloquer cette mise au point automatique. Enfoncez le bouton
pour désactiver la mise au point automatique. Pour réactiver la
mise au point automatique, tournez le bouton rotatif.
5.6 Luminosité
Faites tourner le bouton pour ajuster la luminosité
de l’image.
5.7 Aide à la lecture
En appuyant sur le bouton d’aide à la lecture, vous
pouvez choisir parmi 4 fonctions d’aide à la lec-
ture : une ligne de lecture horizontal et vertical,
un contour horizontal et un contour vertical. Le
bouton rotatif permet ensuite d’ajuster la fonc-
tion d’aide à la lecture sélectionnée.
Il est aussi possible d’activer ou désactiver directement la der-
FR nière fonction d’aide à la lecture utilisée. Pour ce faire, main-
tenez le bouton d’aide à la lecture enfoncé pendant 2 secondes.
50 i-See HD5.8 Table
L’appareil est équipé d’une table X Y souple. Vous y posez un livre,
une photo ou un autre objet pour l’agrandir sur l’écran. Vous pou-
vez bouger la table de gauche à droite (X) et d’avant en arrière (Y).
5.9 Levier de frein
Vous trouverez ce levier sur la face avant sous le tableau. Il vous
permet de déterminer la liberté de mouvement du tableau. Ce le-
vier a 3 postions:
Gauche = la table est bloquée
Centre = le mouvement du tableau de haut en bas est bloquée
Droite = la table est entièrement mobile
6 Directives
Le produit i-See HD a été testé en ce qui concerne la sécurité et
les interférences électromagnétiques et répond aux exigences de la
directive basse tension et de la directive CEM publiées par le Parle-
ment européen et le Conseil de l’Union européenne.
Le dispositif répond également aux exigences de la FCC 47 CFR par-
tie 15B, classe B.
7 Mise au rebut
Ce symbole de poubelle barrée indique que le produit ne
doit pas être jeté avec les ordures ménagères. Voyez le
règlement local pour assurer le rejet appropriée des pro-
duits électroniques.
FR
518 Spécifications techniques
Spécifications générales (Avec un écran de 22”)
Agrandissement 3× – 75×
Résolution 720p
Dimensions 51 × 48 × 64 cm / 20 × 19 × 25.2 inch
(écran dans la position la plus haute)
Poids 15.8kg / 34.8lb
Alimentation électrique 110 – 240V @ 50/60Hz
Conditions d’utilisation Température +5oC – +35oC, +41oF – +95oF
Humidité de l’airRehan Electronics Ltd.
Aughrim Road, Carnew
County Wicklow
Republic of Ireland
+353 (0) 53 942 6742
sales@rehanelectronics.ie
www.rehanelectronics.ieVous pouvez aussi lire