BINEUSES DE PRÉCISION - PRECISION ROW-CROP CULTIVATORS
←
→
Transcription du contenu de la page
Si votre navigateur ne rend pas la page correctement, lisez s'il vous plaît le contenu de la page ci-dessous
BINEUSES - 2013
                                                                       Réf. : 10640107

                     COMPAGNIE RIBOULEAU

                  BINEUSES
                DE PRÉCISION
         PRECISION ROW-CROP
             CULTIVATORS

Notice de montage,    Assembly,        Bedienungsanleitung,   Notizia di Montaggio,
Réglage,              Adjustment and   Einstellung,           Regolazione,
                      Maintenance
Entretien             Instructions     Wartung                Manutenzione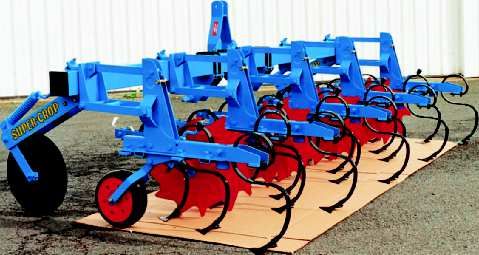
Cette notice est à lire attentivement avant
 montage et utilisation, elle est à conserver                                                     This manual should be read carefully
 soigneusement. Pour plus d’informations,                                                         before assembling and operation. It should
 ou en cas de réclamation, vous pouvez                                                            be kept in a safe place. For further
 appeler l’usine RIBOULEAU MONOSEM,                                                               information or in the event of claims, you
 numéro de téléphone en dernière page.                                                            may call the RIBOULEAU MONOSEM
 L’identification et l’année de fabrication de                                                    factory at the phone number given on the
 votre bineuse se trouvent sur le 3ème point                                                      last page of this manual.
 d’attelage.                                                                                      The identification and manufacturers plate
 L’identification et l’année de fabrication de                                                    on your cultivator is ti be found on the tree-
 votre bineuse se trouve sur le 3ème point                                                        point hitch of the machine.
 d’attelage.
                                                                                                  With the aim of continuously improving our
 Par souci d’amélioration continue de notre                                                       products, we reserve the right to modify
 production, nous nous réservons le droit de                                                      our equipment without notice. As a result,
 modifier sans préavis nos matériels qui de                                                       some elements may differ from those
 ce fait, pourront par certains détails être                                                      described in these instructions.
 différents de ceux décrits sur cette notice.

                 NOTICE ORIGINALE                                                                            ORIGINAL INSTRUCTIONS

 Diese Bedienungsanleitung ist vor jeder
 Montage und vor jedem Betrieb sorgfâltig                                                         Questo libretto é da leggere attentamente
 zu lesen und auf jeden Fall beizubehalten.                                                       prima del montaggio e dell'uso e deve
 Für jede zusätzliche Auskunft bzw. bei                                                           essere tenuto accuratamente. Per ogni
 Beanstandungen rufen Sie bitte das Werk                                                          informazione addizionale o in caso di
 RIBOULEAU MONOSEM unter der auf der                                                              reclamo , Lei può chiamare la fabbrica
 letzten Seite angegebenen Telefonnummer                                                          RIBOULEAU MONOSEM al numero di
 an!                                                                                              telefono indicato nell'ultima pagina.
 Die Identifikation und das Baujahr Ihrer                                                         L'identificazione e l'anno di fabbricazione
 Maschine finden Sie auf dem dritten Punkt                                                        della Sua sarchiatrice si trovano sul terzo
 der Kupplung.                                                                                    punto dell'attaco.

 Da wir um eine ständige Verbesserung                                                             Al fine di migliorare continuamente la
 unserer Produkte bemüht sind, behalten                                                           nostra produzione, ci riserviamo il diritto di
 wir uns das Recht vor, unsere Maschinen                                                          modificare senza preavviso i nostri
 ohne Vorankündigung zu verändern.                                                                materiali; per questo motivo alcuni
 Manche Details können daher von den in                                                           particolari potranno differire da quanto
 dieser     Anleitung      beschriebenen                                                          descritto in questa specifica.
 abweichen.
    ORIGINALBETRIEBSANLEITUNG                                                                                    ISTRUZIONI ORIGINALI

                                                                         Photographies non contractuelles

             Les instructions de cette notice sont destinées à nos BINEUSES ; elles ne concernent pas les sous ensembles utilisés seuls ou sur dʼautres appareils
                  The instructions in this manual are for our CULTIVATORS ; they do not concern any parts or accessories used alone or on other machines.
Die Anweisungen dieses Hanbuches werden unseren HACKMASCHINEN bestimmt. Sie beziehen sich nicht auf die separat oder auf anderen Geräten benutzten Unterbaugruppen.
               Le istruzioni di questo libretto sono applicabili alle nostre SARCHIATRICI e non riguardono i sottoinsiemi utilizzati separatamente o su altri attrezzi.
Pages
                                                PRESCRIPTION DE SECURITE                          ➔   2-3
                                                SAFETY REGULATIONS                                ➔   4-5
                                                SICHERHEITSVORSCHIFTEM                            ➔   6-7
                                                PRESCRIZIONI DI SICUREZZA                         ➔   8-9

                                                BINEUSE AUTOGUIDÉE SCD
                                                SCD ROW-CROP CULTIVATOR
                                                SCD HACKMASCHINE MIT SELBSTSTEUERUNG
                                                SARCHIATRICE AUTOGUIDATA SCD
                                                CHÂSSIS RIGIDES - RIGID FRAME                     ➔   11 - 17
                                                STEIFRAHMEN - TELAIO RIGIDO
                                                CHÂSSIS REPLIABLES - FOLDING FRAME                ➔   30 - 33
                                                EINKLAPPBARE RAHMEN - TELAIO RIPIEGHEVOLE
                                                CHÂSSIS AUTODIRIGÉS - SELF-STEERING FRAME         ➔   42 - 43
                                                RAHMEN MIT SELBSTSTEUERUNG - TELAIO AUTODIRETTO

MONTAGES                                        CHÂSSIS FRONTAUX - FRONT MOUNTED
                                                FRONTMONTIERTE RAHMEN - TELAIO FRONTALE
                                                                                                  ➔   26 - 29

et RÉGLAGES                                     OUTILS - TOOLS
                                                WERKZEUGE – UTENSILI
                                                                                                  ➔   24 - 25

                                                FERTILISEURS - FERTILIZER ATTACHMENT              ➔   34 - 37
                                                DÜNGERSTREUER – FERTILIZZATORE
ASSEMBLY                                        GRANDES TRÉMIES - HIGH CAPACITY HOPPERS           ➔   38 - 39
                                                GROSSRAUMBEHÄLTER - TRAMOGGE GRANDI
INSTALLATION
                                                EXTRA FORT F - LEGER V DIRIGEABLES
                                                EXTRA STRONG F - LIGHT V STEERING
                                                EXTRA STARK F – LEICHTE V HACKMASCHINE
MONTAGE                                         EXTRA FORTE F – LEGGERO V DIRIGIBILE

EINSTELLUNG                                     CHÂSSIS RIGIDES - RIGID FRAME
                                                STEIFRAHMEN - TELAIO RIGIDO
                                                                                                  ➔   18 - 21

                                                CHÂSSIS REPLIABLES - FOLDING FRAME                ➔   30 - 33
                                                EINKLAPPBARE RAHMEN - TELAIO RIPIEGHEVOLE
MONTAGGIO                                       CHÂSSIS FRONTAUX - FRONT MOUNTED                  ➔   26 - 29
                                                FRONTMONTIERTE RAHMEN - TELAIO FRONTALE
REGOLAZIONE                                     OUTILS - TOOLS                                        24 - 25
                                                WERKZEUGE – UTENSILI
                                                                                                  ➔
                                                FERTILISEURS - FERTILIZER ATTACHMENT              ➔   34 - 37
                                                DÜNGERSTREUER – FERTILIZZATORE

                                                HOUE DIRIGEABLE
                                                STEERING HOE
                                                LENKBARE HACKE
                                                ZAPPATRICE DIRIGIBILE
                                                CHÂSSIS - FRAME                                   ➔   22 - 23
                                                RAHMEN – TELAIO
                                                OUTILS - TOOLS                                    ➔   24 - 25
                                                WERKZEUGE – UTENSILI

ENTRETIEN ET DÉPANNAGE - ADVICE FOR MAINTENANCE AND TROUBLE SHOOTING                              ➔       46
RATSCHLÄGE FÜR WARTUNG UND STÖRUNGSBESEITIGUNG - MANUTENZIONE E RIPARAZIONE

PIÈCES DE RECHANGE - SPARE PARTS                                                                  ➔   47 - 68
ERSATZTEILE - PEZZI DI RICAMBIO
                                                  1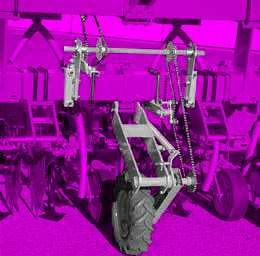
PRESCRIPTIONS DE SECURITE

La machine ne doit être utilisée, entretenue et réparée que par du personnel formé à cet effet et averti des risques inhérents.
Il est impératif de respecter les consignes de sécurité mentionnées sur les autocollants de la machine, de ses accessoires et sur cette notice.
Avant tout déplacement sur la voie publique, il est impératif de s’assurer du respect des dispositions du Code de la route en vigueur et de
la conformité avec la réglementation en matière de sécurité du travail.

Attention aux consignes de sécurité :
● Attelage : Contrôler de temps en temps le blocage des boulons.
● Ne pas travailler sous la bineuse.

● Châssis repliables : ne pas stationner sous la charge.
ATTENTION : A cause de son poids important, ne pas laisser la bineuse en appui uniquement sur ces 2 béquilles centrales. Il est interdit
d’atteler ou de dételer appareil replié, celui-ci doit être remisé ouvert.
● Manipulation de produits dangereux : voir emballage.
● Suivre les instructions d’entretien page 46.

CONSIGNES GENERALES DE SECURITE
1- En complément des instructions contenues dans cette notice, respectez la législation relative aux prescriptions de sécurité et de
prévention des accidents.
2- Les autocollants apposés sur la machine et ses accessoires fournissent des indications importantes pour une utilisation sans risque. En
les respectant, vous assurez votre sécurité.
3- Respectez les prescriptions du Code de la route lors de la circulation sur la voie publique.
4- Familiarisez-vous avec l’utilisation de la machine avant le travail. En cours de travail, il sera trop tard.
5- L’utilisateur doit éviter de porter des vêtements flottants qui risqueraient d’être happés par des éléments en mouvement.
6- Il est recommandé d’utiliser un tracteur équipé d’une cabine ou d’un arceau de sécurité, conformes aux normes en vigueur.
7- Vérifiez que les alentours proches soient dégagés (pas d’enfant).
8- Le transport de personnes et d’animaux en cours de travail et de transport est interdit.
9- Attelez la machine sur les points d’attelage prévus à cet effet, conformément aux normes en vigueur.
10- Les opérations d’attelage et de dételage doivent se faire avec précaution.
11- Lors du dételage, assurez-vous du bon positionnement des béquilles pour une bonne stabilité de la machine.
12- Avant l’attelage de la machine, assurez-vous du bon lestage de l’essieu avant du tracteur.
13- La mise en place des masses doit se faire sur les supports prévus à cet effet, conformément aux prescriptions du constructeur du tracteur
et dans le respect des charges maximum par essieu et du poids total autorisé en charge.
14- Mettez en place et contrôlez les équipements réglementaires lors du transport : éclairage, signalisation…
15- Les commandes à distance (cordes, flexible…) doivent être positionnées de façon à éviter le déclenchement accidentel d’une manœuvre
génératrice de risque d’accident ou de dégâts.
16- Mettez la machine en position de transport conformément aux indications avant de vous engager sur la voie publique.
17- Ne quittez jamais le poste de conduite lorsque le tracteur est en marche.
18- Adaptez la vitesse et le mode de conduite au terrain. Évitez les brusques changements de direction.
19- La tenue de route, la direction et le freinage sont influencés par les outils portés et tractés. Pour ces raisons, soyez vigilant et veillez à
avoir suffisamment de réponse avec la direction et les organes de freinage.
20- Dans les virages, tenez compte des objets en saillie, des porte-à-faux et de la masse d’inertie.
21- Assurez-vous de la mise en place et du bon état des dispositifs de protection avant chaque utilisation.
22- Avant chaque utilisation, contrôlez le serrage des vis et des écrous.
23- Ne stationnez pas dans la zone de travail de la machine.
24- Des zones d’écrasement et de cisaillement peuvent exister sur les organes commandés à distance, notamment ceux asservis
hydrauliquement.
25- Veillez à couper le moteur, retirez la clé de contact et à attendez l’arrêt complet de toutes les pièces en fonctionnement avant de
descendre du tracteur ou d’effectuer toute opération sur la machine.
26- Ne stationnez pas entre le tracteur et la machine sans avoir préalablement serré le frein de parcage et / ou placé des cales sous les roues.
27- Avant toute intervention sur la machine, assurez-vous que celle-ci ne Puisse être mise en route accidentellement.
28- Ne pas utiliser l’anneau de levage pour soulever la machine lorsque celle-ci est chargée.

                                                                        2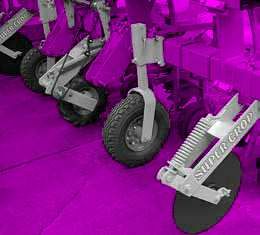
UTILISATION CONFORME DE LA MACHINE
La machine ne doit être utilisée que pour les travaux pour lesquels elle a été conçue.
Tout dommage lié à l’utilisation de la machine en dehors du domaine indiqué par le contructeur n’engagera en aucun cas la responsabilité
de celui-ci.
Toute modification de la machine se fera aux risques et périls de l’utilisateur.
La bonne utilisation de la machine nécessite :
- le respect des notices d’utilisation, d’entretien et maintenance constructeur
- utilisation impérative des pièces détachées, accessoires d’origine ou recommandées par le constructeur.
L’utilisation, entretien ou réparation ne se fera que par des personnes compétentes et informées des dangers auxquelles elles sont exposées.
L’utilisateur devra respecter les réglementations :
- prévention contre les accidents
- sécurité du travail (Code du travail)
- circulation (Code de la route)
Veillez au respect des indications précisées sur les machines.
Toute modification du matériel, sans accord écrit du constructeur, engage l’entière responsabilité du propriétaire.

ATTELAGE
1- Lors de l’attelage de la machine au tracteur ou de sa dépose, le levier de commande du relevage hydraulique doit être placé de manière à
ce que le relevage ne puisse s’effectuer.
2- Lors de l’attelage de la machine au relevage 3 points du tracteur, les diamètres des broches ou tourillons devront bien correspondrent au
diamètre des rotules du tracteur.
3- Risques d’écrasement et de cisaillement dans la zone de relevage 3 points.
4- Lors de la manoeuvre du levier de commande extérieur du relevage, veuillez à vous tenir éloigné de la zone située entre le tracteur et la
machine.
5- Lors du transport de la machine, veuillez à bien la stabiliser par des tirants de rigidification du relevage afin d’éviter d’éventuels frottements
ou débatements latéraux.
6- En cas de transport de la machine en mode relevé, veillez à ce que le levier de commande du relevage soit bien verrouillé.

CIRCUIT HYDRAULIQUE
1- Le circuit hydraulique est sous pression.
2- Veillez au bon branchement des circuits lors du montage de vérins ou moteurs hydrauliques, selon les directives constructeur.
3- Vérifier que les circuits côté tracteur et côté machine ne sont pas sous pression avant tout branchement de flexible au circuit hydraulique
du tracteur.
4- Afin d’éviter tout risque d’inversion des fonctions ou erreur de branchement, nous recommandons de suivre les répères d’identification
sur les raccord hydrauliques entre le tracteur et la machine.
5- Verifier une fois par an les flexibles hydrauliques :
- blessure et porosité de la couche extérieure
- déformation avec et sans pression
- état des raccords et joints
Le remplacement des flexibles doit se faire avant 6 ans d’utilisation, et selon les recommandations du constructeur.
6- Si une fuite apparait, veillez à prendre les dispositions pour éviter tout accident.
7- Tout liquide sous pression, comme l’huile du circuit hydraulique, peut provoquer de graves blessures, perforer la peau..., il convient en cas
de blessure de contacter immédiatement un médecin et ainsi éviter un risque d’infection.
8- La machine devra être abaissée, le circuit hors pression, le moteur coupé et la clé de contact retirée avant toute intervention sur le circuit
hydraulique.

CONSIGNES D’ ENTRETIEN
1- La prise de force devra impérativement être débrayée, le moteur coupé et la clé de contact retirée avant tous travaux de maintenance,
entretien ou réparation de la machine.
2- Le serrage des vis et écrous devra être effectué régulièrement. Après les premières heures d’utilisation (4 heures), toutes les vis doivent
être resserrées puis refaire l’opération toutes les 80 heures.
3- Avant tous travaux d’entretien sur une machine relevé, étayer celle-ci.
4- Portez des gants et n’utilisez que l’outillage adéquat pour tout remplacement d’une pièce travaillante.
5- Il est interdit de jeter de l’huile, graisse, ou filtres afin de respecter l’environnement.
6- La déconnection de la source d’énergie devra être effectuée avant toute intervention sur le circuit électrique.
7- Il convient de vérifier régulièrement les pièces exposées à une usure, et les remplacer si usées ou endommagées.
8- L’utilisation de pièce de rechange MONOSEM est impérative, celles- ci correspondant aux caractéristiques définies par le constructeur.
9- Les câbles de l’alternateur et de la batterie doivent être débranché avant tous travaux de soudure électrique sur le tracteur ou la machine
attelée.
10- Seul un personnel qualifié peut intervenir pour effectuer des réparations impliquant des organes sous tension ou pression.

                                                                         3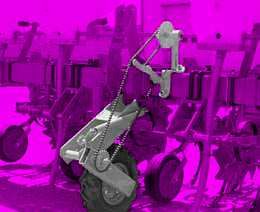
SAFETY REGULATIONS

The machine should only be used, maintained and repaired by trained employees who are aware of the eventual risks. It is essential to
respect the safety regulations mentioned on the machine and accessory stickers and those given in this manual.
Before transport on public highways, it is essential to ensure that the current Highway Code is respected and that the machine is in
accordance with safety working regulations.

Follow all recommended precautions :
● Hitch : Check from time that the bolts are correctly tightened.
● Do not work under the row-crop cultivator.
● Folding frames : keep clear of the load.
ATTENTION : Because of its weight, do not leave the cultivator resting on its 2 control stands. Attaching or detaching the cultivator when
the it is forbidden : the cultivator must be unstacked for these operations.
● Handling dangerous products : see instructions of manufacturer.
● Carefuly follow the maintenance instruction page 46.

GENERAL
1- In addition to the instructions contained in this manual, legislation relating to safety instructions and accident prevention should be
complied with.
2- Warnings affixed to the machine give indications regarding safety measures to be observed and help to avoid accidents.
3- When travelling on public roads, abide by the provisions of the Highway Code.
4- Before starting work, it is essential that the user familiarizes himself with the control and operating elements of the machine and their
respective functions. When the machine is running, it may be too late.
5- The user should avoid wearing loose clothing which may be caught up in the moving parts.
6- We recommend using a tractor with a safety cab or roll bar conforming to standards in force.
7- Before starting up the machine and beginning work, check the immediate surroundings, particularly for children. Make sure that visibility
is adequate. Clear any persons or animals out of the danger zone.
8- It is strictly forbidden to transport any persons or animals on board the machine whether it is in operation or not.
9- The machine should only be coupled up to the tractor at the specially provided towing points and in accordance with applicable safety
standards.
10- Extreme care must be taken when coupling or uncoupling the machine from the tractor.
11- Before hitching up the machine, ensure that the front axle of the tractor is sufficiently weighted. Ballast weights should be fitted to the
special supports in accordance with the instructions of the tractor manufacturer.
12- Do not exceed the maximum axle weight or the gross vehicle weight rating.
13- Do not exceed the maximum authorized dimensions for using public roads.
14- Before entering a public road, ensure that the protective and signalling devices (lights, reflectors, etc.) required by law are fitted and
working properly.
15- All remote controls (cords, cables, rods, hoses, etc.) must be positioned so that they cannot accidentally set off any manoeuvre which
may cause an accident or damage.
16- Before entering a public road, place the machine in the transport position, in accordance with the manufacturer’s instructions.
17- Never leave the driver’s position whilst the tractor is running.
18- The speed and the method of operation must always be adapted to the land, roads and paths. Avoid sudden changes of direction under
all circumstances.
19- Precision of the steering, tractor adhesion, road holding and effectiveness of the braking mechanism are influenced by factors such as
the weight and nature of the machine being towed, the front axle stage and the state of the land or path. It is essential, therefore, that the
appropriate care is taken for each situation.
20- Take extra care when cornering, taking account of the overhang, length, height and weight of the machine or trailer being towed.
21- Before using the machine, ensure that all protective devices are fitted and in good condition. Damaged protectors should be replaced
immediately.
22- Before using the machine, check that nuts and screws are tight, particularly those for attaching tools (discs, flickers, deflectors, etc.).
Tighten if necessary.
23- Do not stand in the operation area of the machine
24- Caution! Be aware of any crushing and shearing zones on remote-controlled parts
25- Before climbing down from the tractor, or before any operation on the machine, turn off the engine, remove the key from the ignition
and wait until all moving parts have come to a standstill.
26- Do not stand between the tractor and the machine until the handbrake has been applied and/or the wheels have been wedged.
27- Before any operation on the machine, ensure that it cannot be started up accidentally.
28- Do not use the lifting ring to lift the machine when it is loaded.

                                                                      4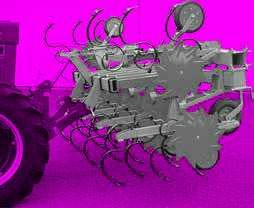
PROPER USE OF THE MACHINE
The machine must only be used for tasks for which it has been designed.
The manufacturer will not be liable or any damage caused by using the machine for applications other than those specified by the
manufacturer. Using the machine for purposes other than those originally intended will be done so entirely at the user’s risk.
Proper use of the machine also implies:
-complying with instructions on use, care and maintenance provided by the manufacturer;
-using only original or manufacturer recommended spare parts, equipment and accessories.
The machine must only be operated, maintained and repaired by competent persons, familiar with the specifications and methods of operation
of the machine. These persons must also be informed of the dangers to which they may be exposed.
The user must strictly abide by current legislation regarding :
-accident prevention
-safety at work (health and safety regulations)
-transport on public roads (road traffic regulations)
Strict compliance with warnings affixed to the machine is obligatory.
The owner of the equipment shall become liable for any damage resulting from alterations made to the machine by the user or any other
person, without the prior written consent of the manufacturer.

HITCHING
1- When hitching or unhitching the machine from the tractor, place the control lever of the hydraulic lift in such a position that the lifting
mechanism cannot be activated accidentally.
2- When hitching the machine to the three-point lifting mechanism of the tractor, ensure that the diameters of the pins or gudgeons correspond
to the diameter of the tractor ball joints.
3- Caution! In the three points lifting zone, there may be a danger of crushing and shearing.
4- Do not stand between the tractor and the machine whilst operating the external lift control lever.
5- When in transport, lifting mechanism stabilizer bars must be fitted to the machine to avoid floating and side movement.
6- When transporting the machine in the raised position, lock the lift control lever.

HYDRAULIC CIRCUIT
1- Caution! The hydraulic circuit is pressurized.
2- When fitting hydraulic motors or cylinders, ensure that the circuits are connected correctly in accordance with the manufacturer’s guidelines.
3- Before fitting a hose to the tractor’s hydraulic circuit, ensure that the tractor side and the machine side circuits are not pressurized.
4- The user of the machine is strongly recommended to identify the hydraulic couplings between the tractor and the machine in order to avoid
wrong connection. Caution! There is a danger of reversing the functions (for example : raise/lower).
5- Check hydraulic hoses once a year :
-damage to the outer surface
-porosity of the outer surface
-deformation with and without pressure
-stat of the fittings and seals
6- When a leak is found, all necessary precautions should be taken to avoid accidents.
7- Pressurized liquid, particularly hydraulic circuit oil, may cause serious injury if it comes into contact with the skin. In the case of injury, consult
a doctor immediately. There is a risk of infection.
8- Before any operation on the hydraulic circuit, lower the machine, release the pressure from the circuit, turn off the engine and remove the
key from ignition.

MAINTENANCE
1- Before commencing any maintenance, servicing or repair work, or before attempting to locate the source of a breakdown or fault, it is
essential that the power take-off is disengaged, the engine turned off and the key removed from the ignition.
2- Check regularly that nuts and screws are not loose. Tighten if necessary. After the first few hours of use (4 hours), all screws must be
tightened. Then repeat the operation every 80 hours.
3- Before carrying out maintenance work on a raised machine, prop it up using appropriate means of support.
4- When replacing a working part (fertilizer spreader blade or planter coulter), wear protective gloves and only use appropriate tools.
5- To protect the environment, it is forbidden to throw away oil, grease or filters of any kind. Give them to specialist recycling firms.
6- Before operating on the electric circuit, disconnect the power source.
7- Protective devices likely to be exposed to wear and tear should be checked regularly. Replace them immediately if they are damaged.
8- Spare parts should comply the standards and specifications laid down by the manufacturer. Only use MONOSEM spare parts.
9- Before commencing any electric welding work on the tractor or the towed machine, disconnect the alternator and battery cables.
10- Repairs affecting parts under stress or pressure (springs, pressure accumulators, etc…) should be carried out by suitably qualified
engineers with special tools.

                                                                            5
SICHERHEITSVORSCHIFTEN

Nur ausgebildet Personal dürfen die Maschine benützen, pflegen, und reparieren.
Jeder Benutzer dieser Maschine muss die Sicherheitsvorschriften, die auf Aufkleber (Maschine, Zubehör, und diese Anweisung) gezeichnet
sind, genau kennen und unbedingt respektieren.
Vor jeder Reise auf der Strasse kontrollieren, ob sie den Sicherheitsvorschiften und den Vorschriften der Straßenverkehrsordnung entsprechen.

Befolgen Sie die empfohlenen Vorsichtsmaßnahmen :
● Dreipunkt : Prüfen Sie von Zeit zu zeit die Schrauben auf festen Sitz.
● Arbeiten Sie nicht unter der Hackmaschine.
● Klapprahmen : Beim Klappen nicht unter der Maschine aufhalten!
ACHTUNG : Wegen des hohen Gewichts darf die hackmaschine nie auf beide Zentralstütze abgestellt werden. Das An-und Abhängen der
hackmaschine ist strikt verboten, wenn die hackmaschine eingeklappt ist. Sie muß ausgeklappt sein für diese Arbeiten.
● Handhabung gefährlicher Produkte : Bitte beachten Sie die Anweisungen des Herstellers.
● Beachten Sie die wartungshinweise auf seite 46.

ALLGEMEINES
1-        Zusätzlich zu den in diesem Handbuch enthaltenen Anweisungen die Gesetzgebung bezüglich der Sicherheits-und
Unfallverhütungvorschriften einhalten.
2- Die auf der Maschine angebrachten Warnungen informieren über die einzuhaltenden Sicherheitsmassnahmen und tragen zur
Unfallverhütung bei.
3- Im Straßenverkehr die Straßenverkehrsordnung einhalten
4- Vor Arbeitsbeginn muss sich der Benutzer unbedingt mit den Antriebs- und Bedienungsorganen der Maschine und ihren jeweiligen
Funktionen vertraut machen. Während der Arbeit ist es dafür zu Spät.
5- Weite Kleidungsstücke, die in sich bewegende Teile geraten könnten, vermeiden.
6- es empfiehlt sich, gemäß den gültigen normen einen Schlepper mit Kabine oder Sicherheitsverstärkung zu verwenden.
7- Vor Inbetriebsetzung und Arbeitsbeginn die direkte Umgebung kontrollieren (Kind!). Für ausreichende Sicht sorgen! Personen oder Tiere
aus dem Maschinengefahrenbereich entfernen (Schutzvorrichtungen!).
8- Der Transport von Personen oder Tieren auf der Maschine ist während der Arbeit oder beim Fahren streng verboten.
9- Die Maschine darf gemäß den geltenden Sicherheitsnormen nur an den dafür vorgesehenen Kupplungspunkten angehängt werden.
10- Besondere Vorsicht ist beim An- und Abbau der Maschine am Schlepper geboten.
11- Vor Anhängen der Maschine kontrollieren, ob der Ballast des Schleppers genügt. Die Ballastelemente müssen gemäß den Vorschriften des
Schlepperherstellers auf den dafür vorgesehenen Haltern angebracht werden.
12- Die Maximale Achslast und das zulässige Gesamtgewicht einhalten.
13- Das für den Straßenverkehr maximal zulässige Aussenmass einhalten.
14- Vor Strassenbenutzung die Schutzvorrichtungen (Licht und Rückstrahlelemente) anbringen und ihre Funktion prüfen.
15- Alle Fernsteuerungen (Seil, Kabel, Stange, schlauch) müssen so positioniert sein, dass sie nicht ungewollt betätigt werden und dadurch
Unfälle oder Schäden hervorrufen können.
16- Vor Benutzung der Strasse die Maschine gemäß Herstelleranweisungen in Transportstellung bringen.
17- Fahrersitz nie bei laufender Maschine verlassen.
18- Fahrgeschwindigkeit und –weise müssen immer dem Gelände, den Strassen und Wegen angepasst sein. Auf alle Fälle plötzliche
Richtungsänderungen vermeiden.
19- Die Präzision der Lenkung, die Bodenhaftung des Schleppers, die Straßenlage und die Wirksamkeit der Bremsvorrichtungen werden
beeinflusst von Faktoren wie: Gewicht und Art der angebauten Maschine, Belastung der Vorderachse, Zustand des Geländes oder der Fahrbahn.
Die den Bedingungen entsprechen Vorsichtsmassnahmen einhalten.
20- Besondere Vorsicht ist in Kurven geboten. Schwerpunktlage, Länge, Höhe und Gewicht der Maschine oder des Anhängers berücksichtigen.
21- Vor jeder Benutzung der Maschine kontrollieren, ob alle Schutzvorrichtungen angebracht und in gutem Zustand sind. Bei Beschädigung
sofort austauschen.
22- Vor jeder Benutzung kontrollieren, ob alle Schrauben und Muttern fest angezogen sind, insbesondere die, mit denen die Geräte befestigt
sind (Schreiben, Paletten, Schirme…). Notfalls anziehen
23- Sich nicht im Manövrierbereich der Maschine aufhalten.
24- Vorsicht! Auf den Fernsteuerungsorganen, insbesondere auf denen mit hydraulischem Regelkreis, kann es Stauch- und abscherzonen
geben.
25- Vor verlassen des Schleppers oder vor jedem eingriff auf der Maschine Motor abschalten, Zündschlüssel abziehen und völligen stillstand
aller bewegten Teile abwarten.
26- Sich nicht zwischen Schlepper und Maschine aufhalten, ohne zuvor die Parkbremse angezogen und/oder Keile unter die Räder gelegt zu
haben.
27- Vor jedem Eingriff an der Maschine kontrollieren, ob diese nicht ungewollt in Betrieb gesetzt werden kann.
28- Die Aufhängöse nicht zum Heben der gefüllten Maschine benutzen.

                                                                     6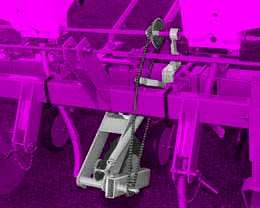
BESTIMMUNGSGEMÄSSE VERWENDUNG DER MASCHINE
Die Maschine darf nur für die Arbeiten eingesetzt werden, für die sie geplant ist.
Bei Beschädigung der Maschine infolge einer nicht vom Hersteller spezifizierten Benutzung ist dieser nicht haftbar.
Jede nicht der ursprünglichen Bestimmung der Maschine entsprechende Benutzung erfolgt auf Rechnung und Gefahr des Benutzers.
Die Bestimmungsgemäße Verwendung der Maschine setzt ebenfalls voraus:
-die Einhaltung der vom Hersteller verordneten Benutzungs-, Wartungs- und Instandsetzungsvorschriften,
-die ausschließliche Verwendung von Originalersatzteilen, Originalausrüstungen und Originalzubehör oder von Teilen, die vom Hersteller
empfohlen sind.
Die Drillmaschine darf nur von kompetenten, mit den technischen Daten und Benutzungsanweisungen der Maschine vertrauten Personen benutzt,
gewartet und repariert werden, die über die Risiken informiert sind, denen sie ausgesetzt sein könnten.
Streng die gültige Reglementierung einhalten bezüglich:
-der Unfallverhütung,
-der Arbeitssicherheit (Arbeitsgesetzbuch)
-des Strassenverkehrs (Strassenverkehrsordnung)
Die auf der Maschine angebrachten Warnungen berücksichtigen.
Der Hersteller haftet nicht für Schäden, die durch Abänderungen entstehen, die vom Benutzer selbst oder von Dritten ohne schriftliche
Genehmigung an der Maschine vorgenommen wurden.

ANHÄNGUNG
1- Beim An- und Abkuppeln der Maschine am Schlepper, den Steuerhebel des Hydraulikkrafthebers so stellen, dass der Hubvorgang nicht
unerwartet ausgelöst werden kann.
2- Beim Anhängen der Maschine am Dreipunktkraftheber des Schleppers darauf achten, dass die spindel- oder Zapfendurchmesser dem
Durchmesser der Schlepperkugelgelenke entsprechen.
3- Vorsicht ! Im dreipunkt-Hubbereich bestehen Stauch- und Abscherrisiken!
4- Sich bei Betätigung des äußeren Krafthebersteuerhebels nicht zwischen Schlepper und Maschine aufhalten.
5- Beim Transport muss die Maschine durch die Versteifungsstreben des Krafthebers zur Vermeidung von Unwucht und seitlicher Pendelung
stabilisiert werden.
6- Beim Transport der Maschine in angehobener Stellung den Kraftheber-Steuerhebel blockieren.

HYDRAULIKLEITUNG
1- Vorsicht! Die Hydraulikleitung steht unter druck.
2- Bei Montage von Zylindern oder Hydraulikmotoren auf den korrekten Anschluss gemäß Anweisungen des Herstellers achten.
3- Vor Anschluss eines Schlauches an der Hydraulikleitung des Schleppers dafür sorgen, dass die Schlepper- und maschinenseitigen Leitungen
nicht unter Druck stehen.
4- Dem Benutzer der Maschine wird zur Vermeidung falscher Anschlüsse dringend geraten, die Kennzeichnungen auf den Hydraulikanschlüssen
zwischen Schlepper und Maschine zu beachten, da sonst die Gefahr einer Funktionsumkehrung besteht (z.B. : Heben/Senken).
5- Einmal im Jahr dir Hydraulikschläuche kontrollieren auf :
-Beschädigung der Aussenschicht
-Porosität der Aussenschicht
-Verformung ohne Druck und unter Druck
-Zustand der Verbindungen und Dichtungen
Die maximale Benutzungsdauer der Schläuche ist 6 Jahre. Beim Auswechseln darauf achten, dass nur Schläuche verwendet werden, deren
Eigenschaften und Qualität den Vorschriften des Maschinenkonstrukteurs entsprechen.
6- Bei Feststellung einer undichten Stelle alle Vorsichtsmassnahmen zur Unfallverhütung treffen.
7- Eine unter Druck stehende Flüssigkeit, insbesondere das öl der Hydraulikleitung, kann die Haut durchbringen und schwere Verletzungen
verursachen! Bei Verletzungen sofort Arzt konsultieren; Infektionsgefahr!
8- Vor jedem Eingriff in die Hydraulikanlage Maschine ablassen, Anlage drucklos schalten, Motor abstellen und Zündschlüssel abziehen.

WARTUNG
1- Vor Instandsetzungs-, wartungs- oder Reparaturarbeiten sowie bei Ermitteln einer Pannen- oder Betriebsstörungsquelle muss die Zapfwelle
ausgekuppelt, der Motor abgeschaltet und der Zündschlüssel abgezogen sein.
2- Die Schrauben und Muttern müssen regelmäßig nachgezogen werden. Nach den ersten Betriebsstunden (4 Stunden) müssen alle Schrauben
nachgezogen werden. Danach diesen Eingriff alle 80 Stunden wiederholen.
3- Vor Wartung einer Maschine in angehobener Stellung diese mit einem geeigneten Mittel abstützen.
4- Beim Austausch eines Funktionsteiles (Schaufel bei Streuern oder schare bei Drillmaschinen) Schutzhandschuhe tragen und nur geeignete
Werkzeuge benutzen.
5- Zum Schutz der Umwelt ist es verboten, Öl, Fett und Filter jeder Artwegzuwerfen oder auszugießen. Sie sind von darauf spezialisierten
Unternehmen zu entsorgen.
6- Vor Eingriff an de elektrischen Leitung die Stromzufuhr unterbrechen
7- Verschleiß ausgesetzte Schutzvorrichtungen müssen regelmäßig kontrolliert werden. Sie sofort austauschen, wenn Schadhaft.
8- Ersatzteile müssen den vom Konstrukteur festgelegten Normen und Kennkennwerten entsprechen. Nur Ribouleau – Monosem Ersatzteile
verwenden!
9- Vor Elektroschweissarbeiten am Schlepper oder der angehängten Maschine die Kabel des Wechselstromgenerators und der Batterie abziehen.
10- Reparaturen an Organen, die unter Spannung oder Druck stehen (Federn, Druckspeicher, usw…)setzen eine ausreichende Qualifikation voraus
und erfordern Werkzeuge; sie dürfen daher nur von qualifiziertem Personal durchgeführt werden.

                                                                    7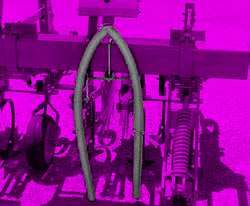
PRESCRIZIONI DI SICUREZZA

La macchina deve essere utilizzata e riparata da personale esperto e avvertito dei rischi inerenti.
Rispettare le norme di sicurezza poste sugli adesivi della macchina e degli accessori di manuale.
Prima di ogni spostamento su strade pubbuche, e necessario assicurarsi del rispetto delle disposizioni del codice della strada in vigore e della
conformità con la regolamentazione in materia di sicurezza del lavoro.

ATTENZIONE ai consigli di sicurezza :
● Attaco : Controllare periódicamente il bloccaggio dei bulloni.
● Non lavorare sotto la sarchiatrice.
● Telaio ripieghevole : non sostare sotto il carico.
ATTENZIONE : A causa del suo peso importante, non lasciare la sarchiatrice in appoggio unicamente sui 2 sostegni centrali. E vietato attaccare
o staccare la macchina piegata. Questa deve essere Lasciata spiegata per tali lavori.
● Manipolazione di prodotti chimici pericolosi : vedere notizie sui contenitori.
● Seguire le istruzioni di manutenzione della pagina 46.

GENERALITA
1- Rispettare, oltre alle istruzioni contenute in questo foglietto, la legislazione relativa alle prescrizioni di sicurezza e di prevenzione d’ incidenti.
2- Gli avvisi apposti sulla macchina sono delle indicazioni sulle misure di sicurezza da osservare e contribuiscono a evitare incidenti.
3- Durante la circolazione su strada pubblica, rispettare le norme del Codice della Strada
4- Prima di iniziare a lavorare, l’operatore dovrà obbligatoriamente prendere mano con gli organi di controllo e manovra della macchina e le loro
rispettive funzioni. In fase di lavoro sarà troppo tardi per farlo.
5- L’operatore deve evitare di indossare indumenti svolazzanti che potrebbero rischiare di essere aggrappati dagli elementi in movimento
6- Si consiglia di utilizzare un trattore fornito di cabina o di archetto di sicurezza, conformemente alle norme in vigore.
7- Prima di avviare la macchina e di iniziare i lavori, controllare i pericoli imminenti (bambini!).
Cercare di avere una visibilità sufficiente ! Allontanare qualsiasi persona o animale dalla zona di pericolo della macchina (prevedere!).
8- Il trasporto di persone o animali sulla macchina durante il lavoro o durante gli spostamenti è severamente vietato.
9- L’accoppiamento della macchina al trattore deve essere effettuato esclusivamente sui punti di attacco previsti per questa operazione
conformemente alle norme vigenti di sicurezza.
10- La prudenza è di rigore durante l’attacco della macchina al trattore e durante lo sganciamento!
11- Prima di attaccare la macchina, converrà assicurarsi che lo zavorramento dell’assale davanti al trattore sia sufficiente. La messa in atto di masse
di zavorramento deve essere effettuata sui supporti previsti per questa operazione conformemente alle indicazioni del costruttore del trattore.
12- Rispettare il carico massimo dell’assale e il peso totale in movimento autorizzato in carico.
13- Rispettare la sagoma massima su strada pubblica.
14- Prima di immettersi su strada, controllare la presenza e il buono stato delle protezioni e dei dispositivi di segnalazione (luminosi,
catarifrangenti…) previsti dalla legge.
15- Tutti i comandi a distanza (corda, cavo, asta, flessibile…) devono essere posizionati in modo tale che non possano causare accidentalmente
una manovra causa di rischio d’incidente o danni.
16- Prima di immettersi su strada, posizionare la macchina in posizione di trasporto, conformemente alle disposizioni del costruttore
17- Non abbandonare mai il posto di guida quando il trattore è in funzione.
18- La velocità e la modalità di guida devono essere sempre idonei al terreno, strade e percorsi. In ogni circostanza, evitare cambi di direzione
bruschi.
19- La precisione nella direzione, l’aderenza del trattore, la tenuta di strada e l’efficacia dei dispositivi di frenaggio sono influenzati da fattori quali:
peso e natura della macchina agganciata, zavorramento dell’assale anteriore, stato del terreno o della carreggiata. È dunque obbligatorio il rispetto
delle regole di prudenza dettate da ogni situazione.
20- Prestate ulteriore attenzione nelle sterzate tenendo conto delle sporgenze, della lunghezza, dell’altezza e del peso della macchina o del
rimorchio agganciato.
21- Prima di ogni utilizzo della macchina, accertarsi che tutti i dispositivi di protezione siano presenti e in buono stato. Le protezioni danneggiate
devono essere obbligatoriamente sostituite.
22- Prima di ogni utilizzo della macchina, controllare il serraggio delle viti e dei dadi, in particolare di quelli che fissano gli strumenti (dischi, palette,
deflettori…). Avvitare se necessario.
23- Non sostare nella zona di manovra della macchina.
24- Attenzione! Possono esistere sugli organi di controllo a distanza delle aree di schiacciamento e taglio, soprattutto su quelli motorizzati
idraulicamente.
25- Prima di scendere dal trattore, o preliminarmente a qualsiasi intervento sulla macchina, spegnere il motore, togliere la chiave di accensione e
attendere l’arresto totale di tutte le parti in movimento.
26- Non sostare tra il trattore e la macchina senza avere prima tirano il freno a mano e/o avere sistemato dei cunei sotto le ruote.
27- Prima di ogni intervento sulla macchina, assicurarsi che questa non possa avviarsi accidentalmente.
28- Non utilizzare l’anello di sollevamento per sollevare la macchina quando è piena.

                                                                              8
UTILIZZO CONFORME DELLA MACCHINA
La sarchiatrice deve essere utilizzata unicamente per gli scopi per cui è stata concepita.
In caso di danno legato all’utilizzo della macchina al di fuori del quadro delle sue applicazioni indicate, il costruttore non è soggetto ad alcuna
responsabilità.
Ogni estrapolazione dalla destinazione di origine della macchina sarà fatta a rischio e pericolo dell’operatore.
L’utilizzo conforme della macchina implica allo stesso modo:
-il rispetto delle norme d’uso, di manutenzione e mantenimento formulate dal costruttore,
-l’utilizzo esclusivo dei pezzi di ricambio, attrezzatura e accessori originali o raccomandati dal costruttore.
La seminatrice deve essere utilizzata, conservata e riparata unicamente da persone competenti, a conoscenza delle caratteristiche e delle
modalità di utilizzo della macchina. Queste persone devono inoltre essere informate dei pericoli a cui potranno essere esposte.
L’operatore è tenuto a rispettare scrupolosamente la regolamentazione in vigore in materia di:
-prevenzione degli incidenti,
-sicurezza del lavoro (Codice del Lavoro)
-circolazione su strada pubblica (Codice della Strada)
Gli è inoltre fatto obbligo di osservare severamente gli avvisi posti sulla macchina,
Ogni modifica della macchina effettuata dall’operatore stesso o da qualsiasi altra persona, senza l’accordo scritto preliminare del costruttore
implicherà la responsabilità del proprietario del materiale modificato.
AGGANCIO
1- In fase di aggancio della macchina al trattore o della sua rimozione, mettere la leva di comando di sollevamento idraulico in una posizione
in cui qualsiasi avviamento del sollevamento non possa intervenire in maniera improvvisa.
2- In fase di aggancio della macchina al sollevamento su 3 punti del trattore, controllate che i diametri dei mandrini o dei perni corrispondano
bene ai diametri delle rotule del trattore.
3- Attenzione ! Nella zona di sollevamento su 3 punti, possono presentarsi dei rischi di schiacciamento e di taglio!
4- Non mettersi tra il trattore e la macchina durante la manovra della leva di comando esterna del sollevamento.
CIRCUITO IDRAULICO
1- Attenzione ! il circuito idraulico è a pressione.
2- In fase di montaggio dei martinetti o dei motori idraulici, controllare attentamente il corretto collegamento dei circuiti, conformemente alle
disposizioni del costruttore.
3- Prima di collegare un flessibile al circuito idraulico del trattore, assicurarsi che i circuiti del trattore e della macchina non siano pressurizzati.
4- Si raccomanda vivamente l’operatore della macchina di seguire i punti di riferimento d’identificazione sui raccordi idraulici tra il trattore e
la macchina al fine di evitare errori di collegamento. Attenzione ! Può presentarsi il rischio di invertire alcune funzioni (ad esempio:
sollevare/abbassare)
5- Controllare una volta all’anno i flessibili idraulici:
-escoriazione dello strato esterno
-porosità dello strato esterno
-deformazione senza pressione e sotto pressione
-stato dei raccordi e dei giunti
La durata di utilizzo massima dei flessibili è di sei anni. Al momento della sostituzione, accertarsi di utilizzare flessibili con specifiche e qualità
raccomandate dal costruttore della macchina.
6- Nella localizzazione di una fuga, sarà consigliabile prendere ogni precauzione per evitare incidenti.
7- Qualsiasi liquido pressurizzato, soprattutto l’olio del circuito idraulico, può perforare la pelle e causare gravi ferite! In caso di ferita,
consultare un medico! Possono esistere pericoli di infezione!
9- Prima di qualsiasi intervento sul circuito idraulico, abbassare la macchina, depressurizzare il circuito, spegnere il motore e togliere la chiave
di accensione.
MANUTENZIONE
1- Prima di ogni lavoro di manutenzione, conservazione o riparazione e di ricerca dell’origine di un guasto o di un incidente di funzionamento,
occorre obbligatoriamente scollegare la presa di forza, spegnere il motore e che rimuovere la chiave di accensione.
2- Controllare regolarmente il serraggio delle viti e dei dadi. Avvitare se necessario! Dopo le prime ore di utilizzo (4 ore), occorre ristringere
tutte le viti, ripetere quindi questa operazione ogni 80 ore.
3- Prima di procedere con lavori di manutenzione su una macchina in posizione rialzata, riporre a terra quest’ultima con un mezzo appropriato.
4- Nella sostituzione di un pezzo di lavoro, (pala per i distributori o vomere per i seminatori), indossare dei guanti di protezione e utilizzare solo
attrezzatura appropriata.
5- Per il rispetto dell’ambiente, è vietato gettare o versare oli, grassi e filtri di alcun genere. Si consiglia di consegnarli a imprese specializzate
nel loro smaltimento.
6- Prima di qualsiasi intervento sul circuito elettrico, togliere l’alimentazione.
7- I dispositivi di protezione suscettibili all’usura devono essere regolarmente controllati. Sostituirli immediatamente se risultano danneggiati.
8- I pezzi di ricambio devono rispondere alle norme e alle specifiche indicate dal costruttore. Utilizzare solo pezzi di ricambio Monosem !
9- Prima di intraprendere lavori di saldatura elettrica sul trattore o la macchina agganciata, scollegare i cavi dell’alternatore e della batteria.
10- Le riparazioni che coinvolgono gli organi in tensione o a pressione (molle, accumulatori di pressione,ecc…) richiedono una sufficiente
qualifica e un’attrezzatura specifica; così come personale qualificato.
9BINEUSES DE PRÉCISION
PRECISION ROW-CROP CULTIVATORS
PRÄZISIONSHACKMASCHINEN
SARCHIATRICI DI PRECIZIONE
SCD C1L C1L
45 - 65 cm 40 - 60 cm 55 - 80 cm
65 - 80 cm
C3D
C3 65 - 80 cm DF5 DF5
65 - 80 cm 60 - 90 cm 60 - 90 cm
V + AM V1 - V1D V1L HOUE
30 - 40 cm 40 - 60 cm HOE
10Bineuse SCD 4 rangs maïs : 65/80 cm - Châssis 3,50 m - 2 disques de
guidage.
4-row SCD maize cultivator : 65/80 cm - 3,50 m frame - 2 guiding discs.
4-reihige SCD Hackmaschine Mais : 65/80 cm - Rahmen 3,50 m -
2 Führungsscheiben.
Sarchiatrice SCD 4 file mais : 65/80cm - telaio 3,50 m – 2 dischi di guida.
Bineuse SCD 8 rangs maïs : 65/80 cm - Châssis 6,60 m - 2 disques de
guidage.
8-row SCD maize cultivator : 65/80 cm – 6m60 frame – 2 guiding discs.
8-reihige SCD Hackmaschine Mais : 65/80 cm - Rahmen 6,60 m -
2 Führungsscheiben.
Sarchiatrice SCD 8 file mais : 65/80cm - telaio 6,60 m - 2 dischi di guida.
Bineuse SCD 12 rangs betterave : 45/50 cm - Châssis 6,60 m - 12-row SCD sugarbeet cultivator : 45/50 cm - 6,60 m frame -
2 disques de guidage. 2 guiding discs.
12-reihige SCD Hackmaschine Rüben : 45/50 cm - Rahmen 6,60 m Sarchiatrice SCD 12 file barbabiètola : 45/50cm - telaio 6,60 m -
- 2 Führungsscheiben. 2 dischi di guida.
Bineuse SCD 12 rangs maïs : 65/80 cm - Châssis 7” x 7” - 12-row SCD maize cultivator : 65/80 cm - 7” x 7” frame - length :
Longueur 9,80 m - 4 disques de guidage - 2 roues porteuses. 9,80 m - 4 guiding discs - 2 land wheels.
12-reihige SCD Hackmaschine Mais : 65/80 cm - Rahmen 7” x 7” - Sarchiatrice SCD 12 file mais : 65/80cm - telaio 7” x 7” -
Länge 9,80 m - 4 Führungsscheiben – 2 Tragräder. Lunghezza 9,80 m - 4 dischi di guida - 2 ruote portanti.
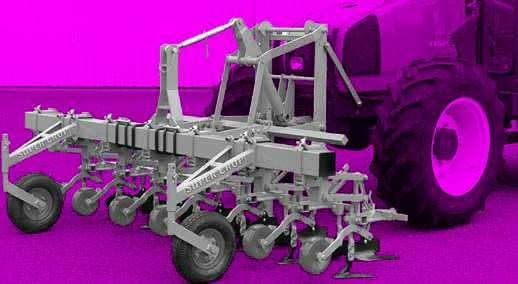
11AUTOGUIDÉE SCD
Fig. 1
B
C
C
D
Fig. 2 Fig. 3
E
F
Fig. 4 Fig. 5
12AUTOGUIDÉE SCD
MONTAGE GÉNÉRAL GENERAL ASSEMBLY
Une bineuse SUPER-CROP SCD se compose normalement : The SCD “SUPER-CROP” interrow cultivator is normally composed of :
• d'une barre porte-outils (A) • a toolbar (A)
• de 3 pièces d'attelage, c'est-à-dire d'une pièce centrale (B) et de 2 brides • 3 point hitch, consisting of a central mast (B) and 2 lower mounting
latérales (C) brackets (C)
• d'un certain nombre de corps d'éléments bineurs (D) : 5 pour bineuse • a certain number of cultivator units (D) : 5 for the 4 row cultivator - 7 for
4 rangs - 7 pour 6 rangs... the 6 row model, etc.
• de 2 stabilisateurs (E) (coutres à disques) • 2 stabilizers (E) (disc coulters)
• d'une béquille (F) • a toolbar stand (F)
• de l'équipement : dents flexibles avec socs et traverses, disques protège • the accessories : spring tines with foot pieces and cross-bars, rotating
plants... cultivator shields...
OPÉRER DE LA MANIÈRE SUIVANTE POUR LE MONTAGE PROCEED AS FOLLOWS FOR ASSEMBLY
1. Repérer exactement sur la barre les emplacements d'éléments (D) en
1. Mark the toolbar the exact locations for placement of the cultivating
fonction des inter-rangs.
units (D) according to the row spacing to be cultivated.
2. Fixer le 3e point (B) puis de part et d'autre et à EGALE DISTANCE de ce
2. Fasten the central mast (B) then on either side and at an EQUAL
3e point les 2 brides latérales (C) à un écartement tel, qu'après attelage
DISTANCE from this central mast, the 2 lower mounting brackets (C),
au tracteur, les rotules des bras de relevage soient distantes de 85 à 88 cm.
L'axe d'attelage des brides (C) est déporté ce qui permet de toujours with such spacing that after hitching to the tractor, the balls of the lift
trouver un emplacement libre sur la poutre. arms are 85 to 88 cm (34-35") apart. The hitch pin of the lower
mounting brackets (C) is offset which always allows for proper
Attention : Ces 2 brides (C) se plaquent sous la barre (fig. 2) et non sur
l'avant de la barre. placement on the bracket.
3. Atteler à un tracteur la barre porte-outils ainsi munie de son attelage. Attention : These 2 brackets (C) are positioned underneath the toolbar
4. Fixer, aux emplacements précédemment repérés, les corps d'éléments and not in front of the toolbar.
(D). 3. Hitch the toolbar to the tractor at the 3 point hitch.
5. Fixer les 2 ensembles coutres stabilisateurs (E) sur l'avant des éléments 4. Attach units (D) to the locations previously marked.
extérieurs. 5. Mount the 2 stabilizing coulter units (E) in front of the outside units.
6. Placer la béquille (F) à un endroit libre et accessible vers le centre de la 6. Place the toolbar stand (F) in a clear and accessible location near the
machine. center of the machine.
7. Monter les équipements (traverses-dents-disques...) en respectant les 7. Mount the accessories (cross-bars, tines, discs ... ) following the
conseils de la page suivante. instructions of the next page.
SE REPORTER AUX PAGES 16-17 POUR LA MISE EN ROUTE FOR OPERATING INSTRUCTIONS, PLEASE REFER TO PAGES 16-17
MONTAGEANLEITUNG MONTAGGIO GENERALE
Die Hackmaschine SUPER-CROP SCD besteht aus : Una sarchiatrice SUPER-CROP SCD consta normalmente di :
• einem Werkzeugrahmen (A) • Una barra porta attrezzi (A)
• drei Kupplungsteilen - 1 Oberlenkeranbaubock (B) und 2 Unterlenkeran- • 3 pezzi di attacco, cioè un pezzo centrale (B) e 2 flange laterali (C)
baulaschen (C) • Certo numero di corpi di elementi sarchiatori (D) : 5 per sarchiatrice 4 file -
7 per 6 file…
• Hackelemente (D) : 5 Stück bei 4-reihiger und 7 Stück bei 6-reihiger
• Stabilizzatori (E) (coltri a dischi)
Hackmaschine
• Un sostegno (F)
• zwei Scheibenseche (E) für Selbstlenkung • L'attrezzatura : denti flessibili con vomeri e traverse, dischi proteggi-
• einer Abstellstütze (F) piante…
• Federzinken mit Scharen und Querstreben und Pflanzenschutzscheiben
PROCEDERE NEL MODO SEGUENTE PERE IL MONTAGGIO
DIE MONTAGE FÜHREN SIE WIEFOLGT DURCH : 1. Identificare essatamente sulla barrale posizioni degli elementi (D) in
1. Markieren Sie auf dem Rahmen die Punkte, wo die Elemente (D) funzione dell'interfila.
angebaut werden müssen - je nach Reihenweite. 2. Fissare il terzo punto (B) e dopodiché da una parte e dall'altra e a
UGUALE DISTANZA di questo terzo punto le 2 flange laterali (C) a un
2. Den Oberlenkeranbaubock (B) befestigen Sie genau in der Mitte der intervallo tale che dopo l'accoppiamento al trattore, i giunti a sfera dei
Anbauschiene. Die zwei Unterlen-keranbaulaschen (C) werden im bracci di sollevamento siano distanti di 85 a 88cm. L'asse di attacco
gleichen Abstand vom Oberlenkeranbaubock montiert. Achten Sie delle flange (C) é diportato ciò che permette di trovare sempre un posto
darauf, daß die Unterlenkeranbaulaschen nach außen stehen und ein libero sulla trave.
Spreizmaß von 85-88 cm haben. Attenzione : queste 2 flange si fissano sotto la barra (fig. 2) ma non sulla
3. Bauen Sie jetzt den Werkzeugrahmen an Ihren Schlepper an. parte anteriore della barra.
4. Die Hackelemente werden an den vorher markierten Punkten auf dem 3. Accoppiare a un trattore la barra porta-attrezzi così provista del suo
Rahmen befestigt. attacco.
4. Fissare i corpi di elementi (D) alle posizioni previamente identificati.
5. Die beiden Scheibenseche (E) montieren Sie an die beiden äußeren
5. Fissare le 2 insiemi coltri stabilizzatori (E) sulla parte anteriore degli
Enden des Rahmens, so daß diese nach vorne stehen.
elementi esterni.
6. Die Abstellstütze (F) an eine freie Stelle im mittleren Bereich der 6. Fissare il sostegno (F) a un luogo libero ed accessibile verso il centro
Maschine montieren. della macchina.
7. Die Ausrüstungen (Querträger - Federzinken - Schutzscheiben) je nach 7. Montare gli attrezzi (traverse-denti-dischi…) osservando le
Anweisung der nächsten Seiten anbringen. racommandazioni della pagina seguente.
BEACHTEN SIE DIE SEITEN 16-17 FÜR DIE INBETRIEBNAHME ! VEDERE LE PAGINE 16-17 PER L'AVVIAMENTO
13AUTOGUIDÉE SCD
Fig. 6
8
1
9
2
5
4
Fig. 8 Fig. 9
3 6
7
7
Fig. 10 Fig. 11 Fig. 12
14AUTOGUIDÉE SCD
UTILISATION DES EQUIPEMENTS ASSEMBLING THE ACCESSORIES
Réglage des éléments Adjusting the units
Une bineuse se compose d'éléments centraux pour binage d'inter-rangs The “Row Crop” cultivator is usually composed of central units for complete
complets et de 2 éléments latéraux pour binage de 1/2 inter-rangs. Une interrow cultivating and 2 outside units for 1/2 interrow cultivating. For
bineuse 4 rangs, par exemple, comporte 3 éléments centraux et 2 éléments instance, a 4-row cultivator is equipped with 3 central units and 2 outside
latéraux. units.
Pour inter-rangs supérieurs à 65 cm, les éléments centraux sont équipés For interrows over 65 cm (26"), the central units are equipped with 5 tines
de 5 dents et les éléments latéraux de 3 dents. Pour inter-rangs inférieurs and the outside units with 3 tines. For interrows under 65 cm (26"), they
à 65 cm ils sont respectivement équipés de 3 et 2 dents. Les traverses are respectively equipped with 3 and 2 tines. The support cross-bars 1 2
support 1 2 sont de 36 et 25 cm en 5-3 dents et de 25 cm en 3-2 dents. are 36 and 25 cm (14" and 10") with 5 or 3 tines and 25 cm (10") with 3 or
2 tines.
Disques protège-plants crénelés
Rotating Cultivator Shields
Ils sont destinés à protéger les jeunes plants des projections de terre. 3
They are intented to protect the young plants against thrown and loose
positions sont possibles par les trous 3 . Ils doivent être disposés à 2-3
soil. Three positions are possible with holes 3 . These must be placed a
cm minimum des socs 4 . L'espace 5 entre 2 disques est à choisir entre
minimum of 2-3 cm (3/4"-1 1/4") from the foot piece 4 .
10 et 20 cm suivant la culture (betterave - maïs...) et le développement du
Spacing 5 between the 2 shields should be between 10 and 20 cm (4-8”)
feuillage. Dès que ce développement ne nécessite plus une protection il
according to the crop (sugar-beets - corn...) and the development of foliage.
sera préférable d'ailleurs d'escamoter les ensembles disques par les
As soon as this development does not require any protection, it will be
taquets 6 .
advisable to lift the shield assemblies using lever 6 .
Disques de déchaussage pour tournesol Sunflower Unbedding Discs
Lors du 1er passage ils dégagent le pied des plants facilitant ainsi le During the first cultivation, they clear the foot of the plants, making the
réchauffement du sol au niveau des racines. Ils travaillent en combinaison soil warmer at the root level. They work in combination with the rotating
avec les disques protecteurs et se règlent en écartement et orientation 7 . cultivator shields and their spacing and placement can be ajusted 7 .
Réglages divers Miscellaneous Adjustments
8 Réglage du terrage par manivelle avec secteur cranté de repérage. 8 Working depth adjustment with crank, with notched marking area.
9 Taquet d'accrochage en position haute pour transport ou escamotage. 9 Coupling lever in up position for road transport or backing up.
N.B. - La dent flexible avec soc de 15 cm est l'équipement de base NOTE : The spring tines with foot piece 15 cm (6") are the basic SCD
SUPER-CROP SCD, cependant de nombreux autres outils peuvent SUPER-CROP accessories. However it may be replaced by many
la remplacer (cœurs-lames-butteurs...). Voir page 24-25 et fig. 9 other tools (mould-board - shanks - ridgers). See page 24-25 and
ci-contre. fig. 9 opposite.
UTILIZZAZIONE DEGLI ATTREZZI
MONTAGE DER AUSRÜSTUNGSTEILE Regolazione degli elementi
Einstellung der Elemente
Una sarchiatrice consta di elementi centrali per la sarchiatura di interfile
Eine Hackmaschine besteht aus ganzen Elementen und zwei halben completi e di 2 elementi laterali per sarchiatura de 1/2 interfile. Una
Elementen. Eine 4 reihige Maschine besteht z.B. aus drei ganzen sarchiatrice 4 file per esempio consta di 3 elementi centrali e di 2 elementi
Hackelementen und zwei Halbelementen. Bei Reihenabständen von mehr laterali.
als 65 cm werden die ganzen Elemente mit je 5 Zinken und die seitlichen Per interfile superiori a 65 cm, gli elementi centrali vengono equipaggiati
Elemente mit je 3 Zinken ausgerüstet. Die Querträger 1 und 2 sind di 5 denti e gli elementi laterali di 3 denti. Per interfile inferiori a 65cm,
36 und 25 cm lang - fur 5 und 3 Zinken. l'attrezzatura é respettivamente di 3 e 2 denti. Le traverse supporti 1 2
sono di 36 e 25 cm in 5-3 denti e di 25 cm in 3-2 denti.
Gezackte Pflanzenschutzscheiben
Dischi proteggi-piante dentati
Diese schützen die jungen Pflanzen, damit die Federzinken nicht den Mais
mit Erde zuschütten. Die Pflanzen-schutzscheiben lassen sich in drei La loro funzione é di proteggere le piccole piante dalle proiezioni di terra.
Positionen durch die Löcher 3 einstellen. Sie sind mindestens 2-3 cm von 3 posizioni sono possibili a seconda dei fori 3 . Devono essere disposti a
2-3 cm minimo dai vomeri 4 . Lo spazio 5 fra 2 dischi é da scegliere fra
den Scharen 4 anzubringen. Der Abstand 5 zwischen den beiden
10 e 20 cm in funzione della coltivazione (barbabiètola - mais…) e lo
Scheiben soll zwischen 10 und 20 cm betragen. Sobald die Pflanzen höher
sviluppo del fogliame. Appena questo sviluppo non bisogna più una
sind, ist darauf zu achten, daß die Pflanzenschutzscheiben hoch gestellt
protezione, sará preferibile bloccare gli insiemi dischi a mezzo degli
werden 6 .
arresti 6 .
Abräumscheiben für Sonnenblumen Dischi di pulitura per girasole
Bei der ersten Durchfahrt befreien Sie den Fuß der Pflanze und erleichtern Nel primo passo, liberano il piede delle piante agevolandi così il
dadurch das Erwärmen des Bodens, in der Höhe der Wurzeln. Sie arbeiten riscaldamento del suolo al livello delle radici. Lavorano in combinazione
in Verbindung mit den Schutzscheiben und lassen sich in Richtung, con i
Neigung und Abstand 7 einstellen. dischi protettori e lo scartamento e orientazione sono regolabili 7 .
Verschiedene Einstellungen Aggiustamenti diversi
8 Einstellung der Arbeitstiefe durch Kurbel mit gezahntem Markierung- 8 Aggiustamento del interramento tramite manovella con settore
sanzeiger. dentato di identificazione.
9 Verriegelungszapfen in Hochstellung für Transport. 9 Arresto di collegamento in posizione alta per trasporto o ritorno indietro.
NB. - Der Federzahn mit Schar 15 cm ist Grundausrüstung beim SUPER- Nota - Il denti flessibile con vomere da 15 cm é l'attrezzatura basica SUPER-
CROP SCD. Viele anderen Werk-zeuge können aber auch verwendet CROP SCD. Tuttavia altri numerosi attrezzi possono sustituirlo (lame
werden (Gänsefußschare, Winkelmesser, Häufelkörper). triangolari-lame-rincalzatrici…). Vedere pagine 24-25 e fig. 9 qui
accanto.
15Vous pouvez aussi lire