POLARIS ADJUSTMENT KIT-2 (PAK2) - Sophysa
←
→
Transcription du contenu de la page
Si votre navigateur ne rend pas la page correctement, lisez s'il vous plaît le contenu de la page ci-dessous

EN   POLARIS® ADJUSTMENT KIT-2 (PAK2)
     Instructions for Use

FR   KIT DE RÉGLAGE-2 POLARIS® (PAK2)
     Notice d’utilisation

DE   POLARIS® EINSTELL-SET 2 (PAK2)
     Gebrauchsanweisung

IT   KIT DI REGOLAZIONE-2 (PAK2) POLARIS®
     Istruzioni per l’uso

NL   POLARIS®-AFSTELKIT-2 (PAK2)
     Gebruiksaanwijzing

PT   KIT DE AJUSTE-2 POLARIS® (PAK2)
     Instruções de Utilização

                                          NT140_ML_S1
                                        Rev000_2021-02
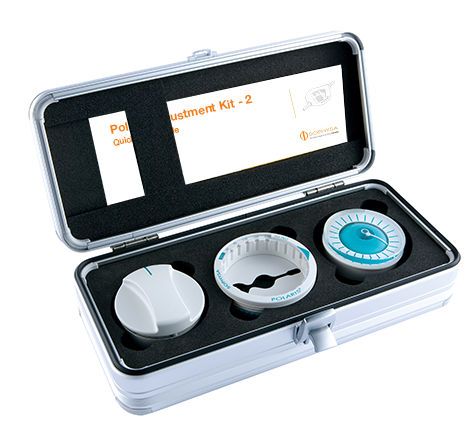
Table of Contents
EN   Polaris® Adjustment Kit-2 (PAK2) . . . . . . . . . . . . . . . . . . . . . . . . . . . . . . . . . . . . . . . . . . . . . . . . . . . . . . . . . . . . . . . . . . . . . . . . . . . . . . . . . . . 9
          1. Intended use . . . . . . . . . . . . . . . . . . . . . . . . . . . . . . . . . . . . . . . . . . . . . . . . . . . . . . . . . . . . . . . . . . . . . . . . . . . . . . . . . . . . . . . . . . . . . . . . 9
          2. Indications . . . . . . . . . . . . . . . . . . . . . . . . . . . . . . . . . . . . . . . . . . . . . . . . . . . . . . . . . . . . . . . . . . . . . . . . . . . . . . . . . . . . . . . . . . . . . . . . . . 9
          3. Patient populations . . . . . . . . . . . . . . . . . . . . . . . . . . . . . . . . . . . . . . . . . . . . . . . . . . . . . . . . . . . . . . . . . . . . . . . . . . . . . . . . . . . . . . . . . . 9
          4. Environment of use . . . . . . . . . . . . . . . . . . . . . . . . . . . . . . . . . . . . . . . . . . . . . . . . . . . . . . . . . . . . . . . . . . . . . . . . . . . . . . . . . . . . . . . . . . 9
          5. Contraindications . . . . . . . . . . . . . . . . . . . . . . . . . . . . . . . . . . . . . . . . . . . . . . . . . . . . . . . . . . . . . . . . . . . . . . . . . . . . . . . . . . . . . . . . . . . . 9
          6. Description . . . . . . . . . . . . . . . . . . . . . . . . . . . . . . . . . . . . . . . . . . . . . . . . . . . . . . . . . . . . . . . . . . . . . . . . . . . . . . . . . . . . . . . . . . . . . . . . . . 9
              6.1. Locator . . . . . . . . . . . . . . . . . . . . . . . . . . . . . . . . . . . . . . . . . . . . . . . . . . . . . . . . . . . . . . . . . . . . . . . . . . . . . . . . . . . . . . . . . . . . . . . . 9
              6.2. Compass . . . . . . . . . . . . . . . . . . . . . . . . . . . . . . . . . . . . . . . . . . . . . . . . . . . . . . . . . . . . . . . . . . . . . . . . . . . . . . . . . . . . . . . . . . . . . 10
              6.3. Magnet . . . . . . . . . . . . . . . . . . . . . . . . . . . . . . . . . . . . . . . . . . . . . . . . . . . . . . . . . . . . . . . . . . . . . . . . . . . . . . . . . . . . . . . . . . . . . . . 10
              6.4. Demonstration valve . . . . . . . . . . . . . . . . . . . . . . . . . . . . . . . . . . . . . . . . . . . . . . . . . . . . . . . . . . . . . . . . . . . . . . . . . . . . . . . . . . . 11
          7. Cleaning and disinfection procedure . . . . . . . . . . . . . . . . . . . . . . . . . . . . . . . . . . . . . . . . . . . . . . . . . . . . . . . . . . . . . . . . . . . . . . . . .                        11
              7.1. Introduction . . . . . . . . . . . . . . . . . . . . . . . . . . . . . . . . . . . . . . . . . . . . . . . . . . . . . . . . . . . . . . . . . . . . . . . . . . . . . . . . . . . . . . . . . . .     11
              7.2. Prerequisites . . . . . . . . . . . . . . . . . . . . . . . . . . . . . . . . . . . . . . . . . . . . . . . . . . . . . . . . . . . . . . . . . . . . . . . . . . . . . . . . . . . . . . . . . .      11
              7.3. Cleaning procedure . . . . . . . . . . . . . . . . . . . . . . . . . . . . . . . . . . . . . . . . . . . . . . . . . . . . . . . . . . . . . . . . . . . . . . . . . . . . . . . . . . . .             11
              7.4. Disinfection procedure . . . . . . . . . . . . . . . . . . . . . . . . . . . . . . . . . . . . . . . . . . . . . . . . . . . . . . . . . . . . . . . . . . . . . . . . . . . . . . . . .               11
              7.5. Inspection . . . . . . . . . . . . . . . . . . . . . . . . . . . . . . . . . . . . . . . . . . . . . . . . . . . . . . . . . . . . . . . . . . . . . . . . . . . . . . . . . . . . . . . . . . . . .   11
          8. Reading and adjusting the valve . . . . . . . . . . . . . . . . . . . . . . . . . . . . . . . . . . . . . . . . . . . . . . . . . . . . . . . . . . . . . . . . . . . . . . . . . . . . .                    11
              8.1. Adjusting the pressure prior to implantation . . . . . . . . . . . . . . . . . . . . . . . . . . . . . . . . . . . . . . . . . . . . . . . . . . . . . . . . . . . . .                                 12
                  8.1.1. Checking the compatibility between the valve and adjustment kit . . . . . . . . . . . . . . . . . . . . . . . . . . . . . . . . . . .                                                            12
                  8.1.2. Displaying the correct pressure range on the Locator . . . . . . . . . . . . . . . . . . . . . . . . . . . . . . . . . . . . . . . . . . . . . . .                                               12
                  8.1.3. Positioning the Locator . . . . . . . . . . . . . . . . . . . . . . . . . . . . . . . . . . . . . . . . . . . . . . . . . . . . . . . . . . . . . . . . . . . . . . . . . . .                    12
                  8.1.4. Reading the pressure . . . . . . . . . . . . . . . . . . . . . . . . . . . . . . . . . . . . . . . . . . . . . . . . . . . . . . . . . . . . . . . . . . . . . . . . . . . . .                   12
                  8.1.5. Adjusting the pressure . . . . . . . . . . . . . . . . . . . . . . . . . . . . . . . . . . . . . . . . . . . . . . . . . . . . . . . . . . . . . . . . . . . . . . . . . . . .                   12
                  8.1.6. Checking the pressure setting . . . . . . . . . . . . . . . . . . . . . . . . . . . . . . . . . . . . . . . . . . . . . . . . . . . . . . . . . . . . . . . . . . . . .                          13
                  8.1.7. Recording the pressure selected for the implantation . . . . . . . . . . . . . . . . . . . . . . . . . . . . . . . . . . . . . . . . . . . . . . .                                               13
              8.2. Reading and/or changing the valve pressure after implantation . . . . . . . . . . . . . . . . . . . . . . . . . . . . . . . . . . . . . . . . . . .                                                    13
                  8.2.1. Identifying the valve model . . . . . . . . . . . . . . . . . . . . . . . . . . . . . . . . . . . . . . . . . . . . . . . . . . . . . . . . . . . . . . . . . . . . . . . .                      13
                  8.2.2. Displaying the correct pressure range on the Locator . . . . . . . . . . . . . . . . . . . . . . . . . . . . . . . . . . . . . . . . . . . . . . .                                               13
                  8.2.3. Positioning the patient . . . . . . . . . . . . . . . . . . . . . . . . . . . . . . . . . . . . . . . . . . . . . . . . . . . . . . . . . . . . . . . . . . . . . . . . . . . .                  13
                  8.2.4. Positioning the Locator . . . . . . . . . . . . . . . . . . . . . . . . . . . . . . . . . . . . . . . . . . . . . . . . . . . . . . . . . . . . . . . . . . . . . . . . . . .                    13
                  8.2.5. Reading the pressure . . . . . . . . . . . . . . . . . . . . . . . . . . . . . . . . . . . . . . . . . . . . . . . . . . . . . . . . . . . . . . . . . . . . . . . . . . . . .                   14
                  8.2.6. Setting a new pressure . . . . . . . . . . . . . . . . . . . . . . . . . . . . . . . . . . . . . . . . . . . . . . . . . . . . . . . . . . . . . . . . . . . . . . . . . . .                     14
                  8.2.7. Checking the pressure setting . . . . . . . . . . . . . . . . . . . . . . . . . . . . . . . . . . . . . . . . . . . . . . . . . . . . . . . . . . . . . . . . . . . . .                          15
                  8.2.8. Recording the new pressure . . . . . . . . . . . . . . . . . . . . . . . . . . . . . . . . . . . . . . . . . . . . . . . . . . . . . . . . . . . . . . . . . . . . . .                           15
                  8.2.9. Post-adjustment monitoring . . . . . . . . . . . . . . . . . . . . . . . . . . . . . . . . . . . . . . . . . . . . . . . . . . . . . . . . . . . . . . . . . . . . . . .                         15
          9. Checking the performances of the adjustment kit . . . . . . . . . . . . . . . . . . . . . . . . . . . . . . . . . . . . . . . . . . . . . . . . . . . . . . . . . . . . . 15
              9.1. Visual checks . . . . . . . . . . . . . . . . . . . . . . . . . . . . . . . . . . . . . . . . . . . . . . . . . . . . . . . . . . . . . . . . . . . . . . . . . . . . . . . . . . . . . . . . . 15
              9.2. Functional check . . . . . . . . . . . . . . . . . . . . . . . . . . . . . . . . . . . . . . . . . . . . . . . . . . . . . . . . . . . . . . . . . . . . . . . . . . . . . . . . . . . . . . 16
          10. Solutions in case of difficult adjustment . . . . . . . . . . . . . . . . . . . . . . . . . . . . . . . . . . . . . . . . . . . . . . . . . . . . . . . . . . . . . . . . . . . . .                         16
              10.1. Backwards and forwards movement of the Magnet . . . . . . . . . . . . . . . . . . . . . . . . . . . . . . . . . . . . . . . . . . . . . . . . . . . .                                                 16
              10.2. Stop method . . . . . . . . . . . . . . . . . . . . . . . . . . . . . . . . . . . . . . . . . . . . . . . . . . . . . . . . . . . . . . . . . . . . . . . . . . . . . . . . . . . . . . . . .         16
              10.3. Adjusting without the Locator . . . . . . . . . . . . . . . . . . . . . . . . . . . . . . . . . . . . . . . . . . . . . . . . . . . . . . . . . . . . . . . . . . . . . . . . .                       17
              10.4. Specific case of valves implanted upside down . . . . . . . . . . . . . . . . . . . . . . . . . . . . . . . . . . . . . . . . . . . . . . . . . . . . . . . .                                         17
              10.5. Reading of valves implanted in conditions other than those recommended . . . . . . . . . . . . . . . . . . . . . . . . . . . . . .                                                                    17
          11. Storage . . . . . . . . . . . . . . . . . . . . . . . . . . . . . . . . . . . . . . . . . . . . . . . . . . . . . . . . . . . . . . . . . . . . . . . . . . . . . . . . . . . . . . . . . . . . . . . . . . . 18
          12. Processing of the products after use . . . . . . . . . . . . . . . . . . . . . . . . . . . . . . . . . . . . . . . . . . . . . . . . . . . . . . . . . . . . . . . . . . . . . . . 18
              12.1. Products return . . . . . . . . . . . . . . . . . . . . . . . . . . . . . . . . . . . . . . . . . . . . . . . . . . . . . . . . . . . . . . . . . . . . . . . . . . . . . . . . . . . . . . 18
              12.2. Products elimination . . . . . . . . . . . . . . . . . . . . . . . . . . . . . . . . . . . . . . . . . . . . . . . . . . . . . . . . . . . . . . . . . . . . . . . . . . . . . . . . . . 18
          13. Monitoring of the product safety . . . . . . . . . . . . . . . . . . . . . . . . . . . . . . . . . . . . . . . . . . . . . . . . . . . . . . . . . . . . . . . . . . . . . . . . . . . . 18
          14. Warranty . . . . . . . . . . . . . . . . . . . . . . . . . . . . . . . . . . . . . . . . . . . . . . . . . . . . . . . . . . . . . . . . . . . . . . . . . . . . . . . . . . . . . . . . . . . . . . . . . . 18
          15. Symbols . . . . . . . . . . . . . . . . . . . . . . . . . . . . . . . . . . . . . . . . . . . . . . . . . . . . . . . . . . . . . . . . . . . . . . . . . . . . . . . . . . . . . . . . . . . . . . . . . . 18
          16. References . . . . . . . . . . . . . . . . . . . . . . . . . . . . . . . . . . . . . . . . . . . . . . . . . . . . . . . . . . . . . . . . . . . . . . . . . . . . . . . . . . . . . . . . . . . . . . . . 19

                                                                                                                                                                                                       Page 3 of 82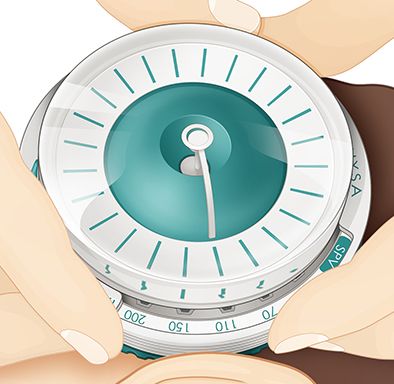
FR     Kit de Réglage-2 Polaris® (PAK2) . . . . . . . . . . . . . . . . . . . . . . . . . . . . . . . . . . . . . . . . . . . . . . . . . . . . . . . . . . . . . . . . . . . . . . . . . . . . . . . . . . 21
            1. Usage prévu . . . . . . . . . . . . . . . . . . . . . . . . . . . . . . . . . . . . . . . . . . . . . . . . . . . . . . . . . . . . . . . . . . . . . . . . . . . . . . . . . . . . . . . . . . . . . . . . 21
            2. Indications . . . . . . . . . . . . . . . . . . . . . . . . . . . . . . . . . . . . . . . . . . . . . . . . . . . . . . . . . . . . . . . . . . . . . . . . . . . . . . . . . . . . . . . . . . . . . . . . . 21
            3. Populations de patients . . . . . . . . . . . . . . . . . . . . . . . . . . . . . . . . . . . . . . . . . . . . . . . . . . . . . . . . . . . . . . . . . . . . . . . . . . . . . . . . . . . . . 21
            4. Environnement d’utilisation . . . . . . . . . . . . . . . . . . . . . . . . . . . . . . . . . . . . . . . . . . . . . . . . . . . . . . . . . . . . . . . . . . . . . . . . . . . . . . . . . . 21
            5. Contre-indications . . . . . . . . . . . . . . . . . . . . . . . . . . . . . . . . . . . . . . . . . . . . . . . . . . . . . . . . . . . . . . . . . . . . . . . . . . . . . . . . . . . . . . . . . . 21
            6. Description . . . . . . . . . . . . . . . . . . . . . . . . . . . . . . . . . . . . . . . . . . . . . . . . . . . . . . . . . . . . . . . . . . . . . . . . . . . . . . . . . . . . . . . . . . . . . . . . .   21
                6.1. Sélecteur . . . . . . . . . . . . . . . . . . . . . . . . . . . . . . . . . . . . . . . . . . . . . . . . . . . . . . . . . . . . . . . . . . . . . . . . . . . . . . . . . . . . . . . . . . . . . .     21
                6.2. Boussole . . . . . . . . . . . . . . . . . . . . . . . . . . . . . . . . . . . . . . . . . . . . . . . . . . . . . . . . . . . . . . . . . . . . . . . . . . . . . . . . . . . . . . . . . . . . . .      22
                6.3. Aimant . . . . . . . . . . . . . . . . . . . . . . . . . . . . . . . . . . . . . . . . . . . . . . . . . . . . . . . . . . . . . . . . . . . . . . . . . . . . . . . . . . . . . . . . . . . . . . . .    22
                6.4. Valve de démonstration . . . . . . . . . . . . . . . . . . . . . . . . . . . . . . . . . . . . . . . . . . . . . . . . . . . . . . . . . . . . . . . . . . . . . . . . . . . . . . . .                    23
            7. Procédure de nettoyage et de désinfection . . . . . . . . . . . . . . . . . . . . . . . . . . . . . . . . . . . . . . . . . . . . . . . . . . . . . . . . . . . . . . . . . . .                                 23
                7.1. Introduction . . . . . . . . . . . . . . . . . . . . . . . . . . . . . . . . . . . . . . . . . . . . . . . . . . . . . . . . . . . . . . . . . . . . . . . . . . . . . . . . . . . . . . . . . . .        23
                7.2. Prérequis . . . . . . . . . . . . . . . . . . . . . . . . . . . . . . . . . . . . . . . . . . . . . . . . . . . . . . . . . . . . . . . . . . . . . . . . . . . . . . . . . . . . . . . . . . . . . .     23
                7.3. Procédure de Nettoyage . . . . . . . . . . . . . . . . . . . . . . . . . . . . . . . . . . . . . . . . . . . . . . . . . . . . . . . . . . . . . . . . . . . . . . . . . . . . . . .                      23
                7.4. Procédure de désinfection . . . . . . . . . . . . . . . . . . . . . . . . . . . . . . . . . . . . . . . . . . . . . . . . . . . . . . . . . . . . . . . . . . . . . . . . . . . . .                       23
                7.5. Inspection . . . . . . . . . . . . . . . . . . . . . . . . . . . . . . . . . . . . . . . . . . . . . . . . . . . . . . . . . . . . . . . . . . . . . . . . . . . . . . . . . . . . . . . . . . . . .      24
            8. Lecture et réglage de la valve . . . . . . . . . . . . . . . . . . . . . . . . . . . . . . . . . . . . . . . . . . . . . . . . . . . . . . . . . . . . . . . . . . . . . . . . . . . . . . .                    24
                8.1. Réglage de la pression avant l’implantation . . . . . . . . . . . . . . . . . . . . . . . . . . . . . . . . . . . . . . . . . . . . . . . . . . . . . . . . . . . . .                                     24
                    8.1.1. Vérification de la compatibilité entre la valve et le kit de réglage . . . . . . . . . . . . . . . . . . . . . . . . . . . . . . . . . . . . .                                                      24
                    8.1.2. Affichage de la gamme de pressions correcte sur le Sélecteur . . . . . . . . . . . . . . . . . . . . . . . . . . . . . . . . . . . . . .                                                            24
                    8.1.3. Positionnement du Sélecteur . . . . . . . . . . . . . . . . . . . . . . . . . . . . . . . . . . . . . . . . . . . . . . . . . . . . . . . . . . . . . . . . . . . . . .                             25
                    8.1.4. Lecture de la pression . . . . . . . . . . . . . . . . . . . . . . . . . . . . . . . . . . . . . . . . . . . . . . . . . . . . . . . . . . . . . . . . . . . . . . . . . . . .                      25
                    8.1.5. Réglage de la pression . . . . . . . . . . . . . . . . . . . . . . . . . . . . . . . . . . . . . . . . . . . . . . . . . . . . . . . . . . . . . . . . . . . . . . . . . . .                        25
                    8.1.6. Contrôle du réglage de la pression . . . . . . . . . . . . . . . . . . . . . . . . . . . . . . . . . . . . . . . . . . . . . . . . . . . . . . . . . . . . . . . .                                  25
                    8.1.7. Enregistrement de la pression sélectionnée pour l’implantation . . . . . . . . . . . . . . . . . . . . . . . . . . . . . . . . . . . . .                                                            25
                8.2. Lecture et/ou modification de la pression de la valve après implantation . . . . . . . . . . . . . . . . . . . . . . . . . . . . . . . . . .                                                              25
                    8.2.1. Identification du modèle de la valve . . . . . . . . . . . . . . . . . . . . . . . . . . . . . . . . . . . . . . . . . . . . . . . . . . . . . . . . . . . . . . .                                  25
                    8.2.2. Affichage de la gamme de pressions correcte sur le Sélecteur . . . . . . . . . . . . . . . . . . . . . . . . . . . . . . . . . . . . . .                                                            25
                    8.2.3. Positionnement du patient . . . . . . . . . . . . . . . . . . . . . . . . . . . . . . . . . . . . . . . . . . . . . . . . . . . . . . . . . . . . . . . . . . . . . . . .                           26
                    8.2.4. Positionnement du Sélecteur . . . . . . . . . . . . . . . . . . . . . . . . . . . . . . . . . . . . . . . . . . . . . . . . . . . . . . . . . . . . . . . . . . . . . .                             26
                    8.2.5. Lecture de la pression . . . . . . . . . . . . . . . . . . . . . . . . . . . . . . . . . . . . . . . . . . . . . . . . . . . . . . . . . . . . . . . . . . . . . . . . . . . .                      26
                    8.2.6. Réglage d’une nouvelle pression . . . . . . . . . . . . . . . . . . . . . . . . . . . . . . . . . . . . . . . . . . . . . . . . . . . . . . . . . . . . . . . . . .                                 27
                    8.2.7. Contrôle du réglage de la pression . . . . . . . . . . . . . . . . . . . . . . . . . . . . . . . . . . . . . . . . . . . . . . . . . . . . . . . . . . . . . . . .                                  27
                    8.2.8. Enregistrement d’une nouvelle pression . . . . . . . . . . . . . . . . . . . . . . . . . . . . . . . . . . . . . . . . . . . . . . . . . . . . . . . . . . .                                        28
                    8.2.9. Surveillance post-réglage . . . . . . . . . . . . . . . . . . . . . . . . . . . . . . . . . . . . . . . . . . . . . . . . . . . . . . . . . . . . . . . . . . . . . . . . .                         28
            9. Contrôle des performances du kit de réglage . . . . . . . . . . . . . . . . . . . . . . . . . . . . . . . . . . . . . . . . . . . . . . . . . . . . . . . . . . . . . . . . . 28
                9.1. Contrôles visuels . . . . . . . . . . . . . . . . . . . . . . . . . . . . . . . . . . . . . . . . . . . . . . . . . . . . . . . . . . . . . . . . . . . . . . . . . . . . . . . . . . . . . . 28
                9.2. Contrôle fonctionnel . . . . . . . . . . . . . . . . . . . . . . . . . . . . . . . . . . . . . . . . . . . . . . . . . . . . . . . . . . . . . . . . . . . . . . . . . . . . . . . . . . . 28
            10. Solutions en cas de réglage difficile . . . . . . . . . . . . . . . . . . . . . . . . . . . . . . . . . . . . . . . . . . . . . . . . . . . . . . . . . . . . . . . . . . . . . . . .                          28
                10.1. Mouvements de va-et-vient de l’Aimant . . . . . . . . . . . . . . . . . . . . . . . . . . . . . . . . . . . . . . . . . . . . . . . . . . . . . . . . . . . . . . .                                      28
                10.2. Méthode de la butée . . . . . . . . . . . . . . . . . . . . . . . . . . . . . . . . . . . . . . . . . . . . . . . . . . . . . . . . . . . . . . . . . . . . . . . . . . . . . . . . .                    29
                10.3. Réglage sans le Sélecteur . . . . . . . . . . . . . . . . . . . . . . . . . . . . . . . . . . . . . . . . . . . . . . . . . . . . . . . . . . . . . . . . . . . . . . . . . . . .                        29
                10.4. Cas particulier des valves implantées à l’envers (dessus – dessous) . . . . . . . . . . . . . . . . . . . . . . . . . . . . . . . . . . . . .                                                            30
                10.5. Lecture des valves implantées dans des conditions autres que celles recommandées . . . . . . . . . . . . . . . . . . . .                                                                                 30
            11. Stockage . . . . . . . . . . . . . . . . . . . . . . . . . . . . . . . . . . . . . . . . . . . . . . . . . . . . . . . . . . . . . . . . . . . . . . . . . . . . . . . . . . . . . . . . . . . . . . . . . 30
            12. Traitement des produits après usage . . . . . . . . . . . . . . . . . . . . . . . . . . . . . . . . . . . . . . . . . . . . . . . . . . . . . . . . . . . . . . . . . . . . . . . 30
                12.1. Retour des produits . . . . . . . . . . . . . . . . . . . . . . . . . . . . . . . . . . . . . . . . . . . . . . . . . . . . . . . . . . . . . . . . . . . . . . . . . . . . . . . . . . 30
                12.2. Mise au rebut des produits . . . . . . . . . . . . . . . . . . . . . . . . . . . . . . . . . . . . . . . . . . . . . . . . . . . . . . . . . . . . . . . . . . . . . . . . . . . . 30
            13. Surveillance de la sécurité du produit . . . . . . . . . . . . . . . . . . . . . . . . . . . . . . . . . . . . . . . . . . . . . . . . . . . . . . . . . . . . . . . . . . . . . . . 31
            14. Garantie . . . . . . . . . . . . . . . . . . . . . . . . . . . . . . . . . . . . . . . . . . . . . . . . . . . . . . . . . . . . . . . . . . . . . . . . . . . . . . . . . . . . . . . . . . . . . . . . . . 31
            15. Symboles . . . . . . . . . . . . . . . . . . . . . . . . . . . . . . . . . . . . . . . . . . . . . . . . . . . . . . . . . . . . . . . . . . . . . . . . . . . . . . . . . . . . . . . . . . . . . . . . . 31
            16. Références . . . . . . . . . . . . . . . . . . . . . . . . . . . . . . . . . . . . . . . . . . . . . . . . . . . . . . . . . . . . . . . . . . . . . . . . . . . . . . . . . . . . . . . . . . . . . . . . 31

 Page 4 of 82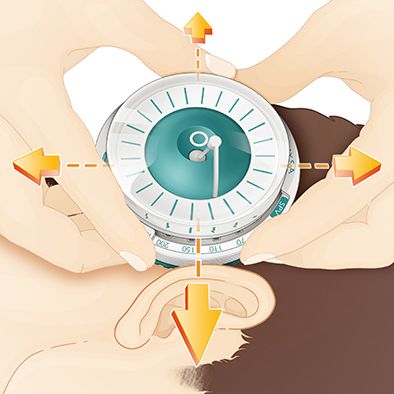
DE   Polaris® Einstell-Set 2 (PAK2) . . . . . . . . . . . . . . . . . . . . . . . . . . . . . . . . . . . . . . . . . . . . . . . . . . . . . . . . . . . . . . . . . . . . . . . . . . . . . . . . . . . . . 33
          1. Vorgesehene Verwendung . . . . . . . . . . . . . . . . . . . . . . . . . . . . . . . . . . . . . . . . . . . . . . . . . . . . . . . . . . . . . . . . . . . . . . . . . . . . . . . . . . . 33
          2. Indikationen . . . . . . . . . . . . . . . . . . . . . . . . . . . . . . . . . . . . . . . . . . . . . . . . . . . . . . . . . . . . . . . . . . . . . . . . . . . . . . . . . . . . . . . . . . . . . . . . 33
          3. Patientenpopulationen . . . . . . . . . . . . . . . . . . . . . . . . . . . . . . . . . . . . . . . . . . . . . . . . . . . . . . . . . . . . . . . . . . . . . . . . . . . . . . . . . . . . . . 33
          4. Einsatzumgebung . . . . . . . . . . . . . . . . . . . . . . . . . . . . . . . . . . . . . . . . . . . . . . . . . . . . . . . . . . . . . . . . . . . . . . . . . . . . . . . . . . . . . . . . . . 33
          5. Kontraindikationen . . . . . . . . . . . . . . . . . . . . . . . . . . . . . . . . . . . . . . . . . . . . . . . . . . . . . . . . . . . . . . . . . . . . . . . . . . . . . . . . . . . . . . . . . . 33
          6. Beschreibung . . . . . . . . . . . . . . . . . . . . . . . . . . . . . . . . . . . . . . . . . . . . . . . . . . . . . . . . . . . . . . . . . . . . . . . . . . . . . . . . . . . . . . . . . . . . . .      33
              6.1. Lokator . . . . . . . . . . . . . . . . . . . . . . . . . . . . . . . . . . . . . . . . . . . . . . . . . . . . . . . . . . . . . . . . . . . . . . . . . . . . . . . . . . . . . . . . . . . . . . .   33
              6.2. Kompass . . . . . . . . . . . . . . . . . . . . . . . . . . . . . . . . . . . . . . . . . . . . . . . . . . . . . . . . . . . . . . . . . . . . . . . . . . . . . . . . . . . . . . . . . . . . . .     34
              6.3. Magnet . . . . . . . . . . . . . . . . . . . . . . . . . . . . . . . . . . . . . . . . . . . . . . . . . . . . . . . . . . . . . . . . . . . . . . . . . . . . . . . . . . . . . . . . . . . . . . .    34
              6.4. Demonstrationsventil . . . . . . . . . . . . . . . . . . . . . . . . . . . . . . . . . . . . . . . . . . . . . . . . . . . . . . . . . . . . . . . . . . . . . . . . . . . . . . . . . .                35
          7. Reinigungs- und Desinfektionsverfahren . . . . . . . . . . . . . . . . . . . . . . . . . . . . . . . . . . . . . . . . . . . . . . . . . . . . . . . . . . . . . . . . . . . . .                              35
              7.1. Einleitung . . . . . . . . . . . . . . . . . . . . . . . . . . . . . . . . . . . . . . . . . . . . . . . . . . . . . . . . . . . . . . . . . . . . . . . . . . . . . . . . . . . . . . . . . . . . .    35
              7.2. Voraussetzungen . . . . . . . . . . . . . . . . . . . . . . . . . . . . . . . . . . . . . . . . . . . . . . . . . . . . . . . . . . . . . . . . . . . . . . . . . . . . . . . . . . . . . .             35
              7.3. Reinigungsverfahren . . . . . . . . . . . . . . . . . . . . . . . . . . . . . . . . . . . . . . . . . . . . . . . . . . . . . . . . . . . . . . . . . . . . . . . . . . . . . . . . . . .               35
              7.4. Desinfektionsverfahren . . . . . . . . . . . . . . . . . . . . . . . . . . . . . . . . . . . . . . . . . . . . . . . . . . . . . . . . . . . . . . . . . . . . . . . . . . . . . . . . .                35
              7.5. Überprüfung . . . . . . . . . . . . . . . . . . . . . . . . . . . . . . . . . . . . . . . . . . . . . . . . . . . . . . . . . . . . . . . . . . . . . . . . . . . . . . . . . . . . . . . . . .         36
          8. Ablesen und Einstellen des Ventils . . . . . . . . . . . . . . . . . . . . . . . . . . . . . . . . . . . . . . . . . . . . . . . . . . . . . . . . . . . . . . . . . . . . . . . . . . .                      36
              8.1. Einstellen des Drucks vor der Implantation . . . . . . . . . . . . . . . . . . . . . . . . . . . . . . . . . . . . . . . . . . . . . . . . . . . . . . . . . . . . . .                                  36
                  8.1.1. Prüfung der Kompatibilität von Ventil und Einstellset . . . . . . . . . . . . . . . . . . . . . . . . . . . . . . . . . . . . . . . . . . . . . . .                                               36
                  8.1.2. Anzeige der korrekten Druckstufe auf dem Lokator . . . . . . . . . . . . . . . . . . . . . . . . . . . . . . . . . . . . . . . . . . . . . . . . .                                                36
                  8.1.3. Positionierung des Lokators . . . . . . . . . . . . . . . . . . . . . . . . . . . . . . . . . . . . . . . . . . . . . . . . . . . . . . . . . . . . . . . . . . . . . .                           37
                  8.1.4. Ablesen des Drucks . . . . . . . . . . . . . . . . . . . . . . . . . . . . . . . . . . . . . . . . . . . . . . . . . . . . . . . . . . . . . . . . . . . . . . . . . . . . . .                    37
                  8.1.5. Einstellen des Drucks . . . . . . . . . . . . . . . . . . . . . . . . . . . . . . . . . . . . . . . . . . . . . . . . . . . . . . . . . . . . . . . . . . . . . . . . . . . . .                   37
                  8.1.6. Überprüfen der Druckeinstellung . . . . . . . . . . . . . . . . . . . . . . . . . . . . . . . . . . . . . . . . . . . . . . . . . . . . . . . . . . . . . . . . . .                               37
                  8.1.7. Protokollieren des für das zu implantierende Ventil eingestellten Drucks . . . . . . . . . . . . . . . . . . . . . . . . . . . . .                                                                37
              8.2. Ablesen und/oder Ändern des Ventildrucks nach der Implantation . . . . . . . . . . . . . . . . . . . . . . . . . . . . . . . . . . . . . . . .                                                          37
                  8.2.1. Identifizierung des Ventilmodells . . . . . . . . . . . . . . . . . . . . . . . . . . . . . . . . . . . . . . . . . . . . . . . . . . . . . . . . . . . . . . . . . .                             37
                  8.2.2. Anzeige der korrekten Druckstufe auf dem Lokator . . . . . . . . . . . . . . . . . . . . . . . . . . . . . . . . . . . . . . . . . . . . . . . . .                                                37
                  8.2.3. Positionierung des Patienten . . . . . . . . . . . . . . . . . . . . . . . . . . . . . . . . . . . . . . . . . . . . . . . . . . . . . . . . . . . . . . . . . . . . . .                          38
                  8.2.4. Positionierung des Lokators . . . . . . . . . . . . . . . . . . . . . . . . . . . . . . . . . . . . . . . . . . . . . . . . . . . . . . . . . . . . . . . . . . . . . .                           38
                  8.2.5. Ablesen des Drucks . . . . . . . . . . . . . . . . . . . . . . . . . . . . . . . . . . . . . . . . . . . . . . . . . . . . . . . . . . . . . . . . . . . . . . . . . . . . . .                    38
                  8.2.6. Druck neu einstellen . . . . . . . . . . . . . . . . . . . . . . . . . . . . . . . . . . . . . . . . . . . . . . . . . . . . . . . . . . . . . . . . . . . . . . . . . . . . . .                  39
                  8.2.7. Überprüfen der Druckeinstellung . . . . . . . . . . . . . . . . . . . . . . . . . . . . . . . . . . . . . . . . . . . . . . . . . . . . . . . . . . . . . . . . . .                               39
                  8.2.8. Protokollieren des neuen Drucks . . . . . . . . . . . . . . . . . . . . . . . . . . . . . . . . . . . . . . . . . . . . . . . . . . . . . . . . . . . . . . . . . .                               40
                  8.2.9. Postoperative Überwachung . . . . . . . . . . . . . . . . . . . . . . . . . . . . . . . . . . . . . . . . . . . . . . . . . . . . . . . . . . . . . . . . . . . . . .                             40
          9. Prüfung der Leistung des Einstell-Sets . . . . . . . . . . . . . . . . . . . . . . . . . . . . . . . . . . . . . . . . . . . . . . . . . . . . . . . . . . . . . . . . . . . . . . . 40
              9.1. Sichtprüfungen . . . . . . . . . . . . . . . . . . . . . . . . . . . . . . . . . . . . . . . . . . . . . . . . . . . . . . . . . . . . . . . . . . . . . . . . . . . . . . . . . . . . . . . . 40
              9.2. Funktionskontrolle . . . . . . . . . . . . . . . . . . . . . . . . . . . . . . . . . . . . . . . . . . . . . . . . . . . . . . . . . . . . . . . . . . . . . . . . . . . . . . . . . . . . . 40
          10. Lösungen im Falle von Einstellungsproblemen . . . . . . . . . . . . . . . . . . . . . . . . . . . . . . . . . . . . . . . . . . . . . . . . . . . . . . . . . . . . . .                                      40
              10.1. Vor- und Rückwärtsbewegung des Magnets . . . . . . . . . . . . . . . . . . . . . . . . . . . . . . . . . . . . . . . . . . . . . . . . . . . . . . . . . . .                                           40
              10.2. Endlagen-Methode . . . . . . . . . . . . . . . . . . . . . . . . . . . . . . . . . . . . . . . . . . . . . . . . . . . . . . . . . . . . . . . . . . . . . . . . . . . . . . . . . . .                 41
              10.3. Einstellen ohne Lokator . . . . . . . . . . . . . . . . . . . . . . . . . . . . . . . . . . . . . . . . . . . . . . . . . . . . . . . . . . . . . . . . . . . . . . . . . . . . . . .                  42
              10.4. Sonderfall: Verkehrt herum (mit der Oberseite nach unten) implantierte Ventile. . . . . . . . . . . . . . . . . . . . . . . . . . .                                                                    42
              10.5. Messung bei Ventilen, die nicht gemäß der empfohlenen Technik implantiert wurden . . . . . . . . . . . . . . . . . . . . .                                                                             42
          11. Lagerung . . . . . . . . . . . . . . . . . . . . . . . . . . . . . . . . . . . . . . . . . . . . . . . . . . . . . . . . . . . . . . . . . . . . . . . . . . . . . . . . . . . . . . . . . . . . . . . . . 42
          12. Handhabung nach Gebrauch . . . . . . . . . . . . . . . . . . . . . . . . . . . . . . . . . . . . . . . . . . . . . . . . . . . . . . . . . . . . . . . . . . . . . . . . . . . . . . . 43
              12.1. Rücksendung . . . . . . . . . . . . . . . . . . . . . . . . . . . . . . . . . . . . . . . . . . . . . . . . . . . . . . . . . . . . . . . . . . . . . . . . . . . . . . . . . . . . . . . . 43
              12.2. Produktbeseitigung . . . . . . . . . . . . . . . . . . . . . . . . . . . . . . . . . . . . . . . . . . . . . . . . . . . . . . . . . . . . . . . . . . . . . . . . . . . . . . . . . . . 43
          13. Überwachung der Produktsicherheit . . . . . . . . . . . . . . . . . . . . . . . . . . . . . . . . . . . . . . . . . . . . . . . . . . . . . . . . . . . . . . . . . . . . . . . . 43
          14. Garantie . . . . . . . . . . . . . . . . . . . . . . . . . . . . . . . . . . . . . . . . . . . . . . . . . . . . . . . . . . . . . . . . . . . . . . . . . . . . . . . . . . . . . . . . . . . . . . . . . . 43
          15. Symbol . . . . . . . . . . . . . . . . . . . . . . . . . . . . . . . . . . . . . . . . . . . . . . . . . . . . . . . . . . . . . . . . . . . . . . . . . . . . . . . . . . . . . . . . . . . . . . . . . . . 43
          16. Referenznummern . . . . . . . . . . . . . . . . . . . . . . . . . . . . . . . . . . . . . . . . . . . . . . . . . . . . . . . . . . . . . . . . . . . . . . . . . . . . . . . . . . . . . . . . . 44

                                                                                                                                                                                                        Page 5 of 82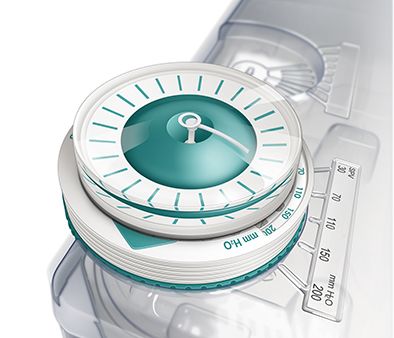
IT         Kit di regolazione-2 (PAK2) Polaris® . . . . . . . . . . . . . . . . . . . . . . . . . . . . . . . . . . . . . . . . . . . . . . . . . . . . . . . . . . . . . . . . . . . . . . . . . . . . . . . 45
                1. Uso previsto . . . . . . . . . . . . . . . . . . . . . . . . . . . . . . . . . . . . . . . . . . . . . . . . . . . . . . . . . . . . . . . . . . . . . . . . . . . . . . . . . . . . . . . . . . . . . . . . 45
                2. Indicazioni . . . . . . . . . . . . . . . . . . . . . . . . . . . . . . . . . . . . . . . . . . . . . . . . . . . . . . . . . . . . . . . . . . . . . . . . . . . . . . . . . . . . . . . . . . . . . . . . . . 45
                3. Popolazioni di pazienti . . . . . . . . . . . . . . . . . . . . . . . . . . . . . . . . . . . . . . . . . . . . . . . . . . . . . . . . . . . . . . . . . . . . . . . . . . . . . . . . . . . . . . 45
                4. Ambiente di utilizzo . . . . . . . . . . . . . . . . . . . . . . . . . . . . . . . . . . . . . . . . . . . . . . . . . . . . . . . . . . . . . . . . . . . . . . . . . . . . . . . . . . . . . . . . . 45
                5. Controindicazioni . . . . . . . . . . . . . . . . . . . . . . . . . . . . . . . . . . . . . . . . . . . . . . . . . . . . . . . . . . . . . . . . . . . . . . . . . . . . . . . . . . . . . . . . . . . 45
                6. Descrizione . . . . . . . . . . . . . . . . . . . . . . . . . . . . . . . . . . . . . . . . . . . . . . . . . . . . . . . . . . . . . . . . . . . . . . . . . . . . . . . . . . . . . . . . . . . . . . . . .   45
                    6.1. Selettore . . . . . . . . . . . . . . . . . . . . . . . . . . . . . . . . . . . . . . . . . . . . . . . . . . . . . . . . . . . . . . . . . . . . . . . . . . . . . . . . . . . . . . . . . . . . . .     45
                    6.2. Bussola . . . . . . . . . . . . . . . . . . . . . . . . . . . . . . . . . . . . . . . . . . . . . . . . . . . . . . . . . . . . . . . . . . . . . . . . . . . . . . . . . . . . . . . . . . . . . . .     46
                    6.3. Magnete . . . . . . . . . . . . . . . . . . . . . . . . . . . . . . . . . . . . . . . . . . . . . . . . . . . . . . . . . . . . . . . . . . . . . . . . . . . . . . . . . . . . . . . . . . . . . .       46
                    6.4. Valvola di prova . . . . . . . . . . . . . . . . . . . . . . . . . . . . . . . . . . . . . . . . . . . . . . . . . . . . . . . . . . . . . . . . . . . . . . . . . . . . . . . . . . . . . . .            47
                7. Procedura di pulizia e disinfezione . . . . . . . . . . . . . . . . . . . . . . . . . . . . . . . . . . . . . . . . . . . . . . . . . . . . . . . . . . . . . . . . . . . . . . . . . . .                       47
                    7.1. Introduzione . . . . . . . . . . . . . . . . . . . . . . . . . . . . . . . . . . . . . . . . . . . . . . . . . . . . . . . . . . . . . . . . . . . . . . . . . . . . . . . . . . . . . . . . . . .        47
                    7.2. Prerequisiti . . . . . . . . . . . . . . . . . . . . . . . . . . . . . . . . . . . . . . . . . . . . . . . . . . . . . . . . . . . . . . . . . . . . . . . . . . . . . . . . . . . . . . . . . . . .      47
                    7.3. Procedura di pulizia . . . . . . . . . . . . . . . . . . . . . . . . . . . . . . . . . . . . . . . . . . . . . . . . . . . . . . . . . . . . . . . . . . . . . . . . . . . . . . . . . . . .              47
                    7.4. Procedura di disinfezione . . . . . . . . . . . . . . . . . . . . . . . . . . . . . . . . . . . . . . . . . . . . . . . . . . . . . . . . . . . . . . . . . . . . . . . . . . . . . .                     47
                    7.5. Ispezione . . . . . . . . . . . . . . . . . . . . . . . . . . . . . . . . . . . . . . . . . . . . . . . . . . . . . . . . . . . . . . . . . . . . . . . . . . . . . . . . . . . . . . . . . . . . .       48
                8. Rilevazione e regolazione della valvola . . . . . . . . . . . . . . . . . . . . . . . . . . . . . . . . . . . . . . . . . . . . . . . . . . . . . . . . . . . . . . . . . . . . . . .                           48
                    8.1. Regolazione della pressione prima dell’impianto . . . . . . . . . . . . . . . . . . . . . . . . . . . . . . . . . . . . . . . . . . . . . . . . . . . . . . . .                                           48
                        8.1.1. Controllo della compatibilità tra la valvola e il kit di regolazione . . . . . . . . . . . . . . . . . . . . . . . . . . . . . . . . . . . . .                                                      48
                        8.1.2. Visualizzazione della corretta gamma di pressione sul Selettore . . . . . . . . . . . . . . . . . . . . . . . . . . . . . . . . . . . . .                                                           48
                        8.1.3. Posizionamento del Selettore . . . . . . . . . . . . . . . . . . . . . . . . . . . . . . . . . . . . . . . . . . . . . . . . . . . . . . . . . . . . . . . . . . . . .                              48
                        8.1.4. Rilevazione della pressione . . . . . . . . . . . . . . . . . . . . . . . . . . . . . . . . . . . . . . . . . . . . . . . . . . . . . . . . . . . . . . . . . . . . . . .                           49
                        8.1.5. Regolazione della pressione . . . . . . . . . . . . . . . . . . . . . . . . . . . . . . . . . . . . . . . . . . . . . . . . . . . . . . . . . . . . . . . . . . . . . .                             49
                        8.1.6. Controllo dell’impostazione della pressione . . . . . . . . . . . . . . . . . . . . . . . . . . . . . . . . . . . . . . . . . . . . . . . . . . . . . . . .                                         49
                        8.1.7. Registrazione della pressione scelta per l'impianto . . . . . . . . . . . . . . . . . . . . . . . . . . . . . . . . . . . . . . . . . . . . . . . . .                                               49
                    8.2. Rilevazione e/o modifica della pressione dopo l’impianto . . . . . . . . . . . . . . . . . . . . . . . . . . . . . . . . . . . . . . . . . . . . . . . .                                                  49
                        8.2.1. Identificazione del modello di valvola . . . . . . . . . . . . . . . . . . . . . . . . . . . . . . . . . . . . . . . . . . . . . . . . . . . . . . . . . . . . . .                                  49
                        8.2.2. Visualizzazione della corretta gamma di pressione sul Selettore . . . . . . . . . . . . . . . . . . . . . . . . . . . . . . . . . . . . .                                                           49
                        8.2.3. Posizionamento del paziente . . . . . . . . . . . . . . . . . . . . . . . . . . . . . . . . . . . . . . . . . . . . . . . . . . . . . . . . . . . . . . . . . . . . . .                             50
                        8.2.4. Posizionamento del Selettore . . . . . . . . . . . . . . . . . . . . . . . . . . . . . . . . . . . . . . . . . . . . . . . . . . . . . . . . . . . . . . . . . . . . .                              50
                        8.2.5. Rilevazione della pressione . . . . . . . . . . . . . . . . . . . . . . . . . . . . . . . . . . . . . . . . . . . . . . . . . . . . . . . . . . . . . . . . . . . . . . .                           50
                        8.2.6. Impostazione di una nuova pressione . . . . . . . . . . . . . . . . . . . . . . . . . . . . . . . . . . . . . . . . . . . . . . . . . . . . . . . . . . . . . .                                     51
                        8.2.7. Controllo dell’impostazione della pressione . . . . . . . . . . . . . . . . . . . . . . . . . . . . . . . . . . . . . . . . . . . . . . . . . . . . . . . .                                         51
                        8.2.8. Registrazione della nuova pressione . . . . . . . . . . . . . . . . . . . . . . . . . . . . . . . . . . . . . . . . . . . . . . . . . . . . . . . . . . . . . . .                                   52
                        8.2.9. Monitoraggio postoperatorio . . . . . . . . . . . . . . . . . . . . . . . . . . . . . . . . . . . . . . . . . . . . . . . . . . . . . . . . . . . . . . . . . . . . . .                             52
                9. Controllo delle prestazioni del kit di regolazione . . . . . . . . . . . . . . . . . . . . . . . . . . . . . . . . . . . . . . . . . . . . . . . . . . . . . . . . . . . . . . 52
                    9.1. Controlli visivi . . . . . . . . . . . . . . . . . . . . . . . . . . . . . . . . . . . . . . . . . . . . . . . . . . . . . . . . . . . . . . . . . . . . . . . . . . . . . . . . . . . . . . . . . 52
                    9.2. Controllo funzionale . . . . . . . . . . . . . . . . . . . . . . . . . . . . . . . . . . . . . . . . . . . . . . . . . . . . . . . . . . . . . . . . . . . . . . . . . . . . . . . . . . . 52
                10. Soluzioni in caso di difficoltà di regolazione . . . . . . . . . . . . . . . . . . . . . . . . . . . . . . . . . . . . . . . . . . . . . . . . . . . . . . . . . . . . . . . . .                               52
                    10.1. Movimento avanti e indietro del Magnete . . . . . . . . . . . . . . . . . . . . . . . . . . . . . . . . . . . . . . . . . . . . . . . . . . . . . . . . . . . . . .                                      52
                    10.2. Metodo dell’arresto . . . . . . . . . . . . . . . . . . . . . . . . . . . . . . . . . . . . . . . . . . . . . . . . . . . . . . . . . . . . . . . . . . . . . . . . . . . . . . . . . . .                52
                    10.3. Regolazione senza il Selettore . . . . . . . . . . . . . . . . . . . . . . . . . . . . . . . . . . . . . . . . . . . . . . . . . . . . . . . . . . . . . . . . . . . . . . . .                           53
                    10.4. Caso particolare: impianto di valvole capovolte . . . . . . . . . . . . . . . . . . . . . . . . . . . . . . . . . . . . . . . . . . . . . . . . . . . . . . . .                                          54
                    10.5. Regolazione delle valvole impiantate in condizioni diverse da quelle consigliate . . . . . . . . . . . . . . . . . . . . . . . . . .                                                                     54
                11. Conservazione . . . . . . . . . . . . . . . . . . . . . . . . . . . . . . . . . . . . . . . . . . . . . . . . . . . . . . . . . . . . . . . . . . . . . . . . . . . . . . . . . . . . . . . . . . . . 54
                12. Gestione dei prodotti dopo l'uso . . . . . . . . . . . . . . . . . . . . . . . . . . . . . . . . . . . . . . . . . . . . . . . . . . . . . . . . . . . . . . . . . . . . . . . . . . . 54
                    12.1. Reso di prodotti . . . . . . . . . . . . . . . . . . . . . . . . . . . . . . . . . . . . . . . . . . . . . . . . . . . . . . . . . . . . . . . . . . . . . . . . . . . . . . . . . . . . . . 54
                    12.2. Smaltimento dei prodotti . . . . . . . . . . . . . . . . . . . . . . . . . . . . . . . . . . . . . . . . . . . . . . . . . . . . . . . . . . . . . . . . . . . . . . . . . . . . . . 54
                13. Monitoraggio della sicurezza del prodotto . . . . . . . . . . . . . . . . . . . . . . . . . . . . . . . . . . . . . . . . . . . . . . . . . . . . . . . . . . . . . . . . . . 54
                14. Garanzia . . . . . . . . . . . . . . . . . . . . . . . . . . . . . . . . . . . . . . . . . . . . . . . . . . . . . . . . . . . . . . . . . . . . . . . . . . . . . . . . . . . . . . . . . . . . . . . . . . 55
                15. Simboli . . . . . . . . . . . . . . . . . . . . . . . . . . . . . . . . . . . . . . . . . . . . . . . . . . . . . . . . . . . . . . . . . . . . . . . . . . . . . . . . . . . . . . . . . . . . . . . . . . . 55
                16. Codici di riferimento . . . . . . . . . . . . . . . . . . . . . . . . . . . . . . . . . . . . . . . . . . . . . . . . . . . . . . . . . . . . . . . . . . . . . . . . . . . . . . . . . . . . . . . 55

     Page 6 of 82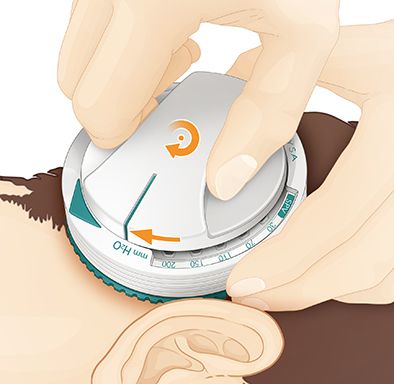
NL   Polaris®-afstelkit-2 (PAK2) . . . . . . . . . . . . . . . . . . . . . . . . . . . . . . . . . . . . . . . . . . . . . . . . . . . . . . . . . . . . . . . . . . . . . . . . . . . . . . . . . . . . . . . . 57
          1. Beoogd gebruik . . . . . . . . . . . . . . . . . . . . . . . . . . . . . . . . . . . . . . . . . . . . . . . . . . . . . . . . . . . . . . . . . . . . . . . . . . . . . . . . . . . . . . . . . . . . 57
          2. Indicaties . . . . . . . . . . . . . . . . . . . . . . . . . . . . . . . . . . . . . . . . . . . . . . . . . . . . . . . . . . . . . . . . . . . . . . . . . . . . . . . . . . . . . . . . . . . . . . . . . . . 57
          3. Patiëntenpopulaties . . . . . . . . . . . . . . . . . . . . . . . . . . . . . . . . . . . . . . . . . . . . . . . . . . . . . . . . . . . . . . . . . . . . . . . . . . . . . . . . . . . . . . . . . 57
          4. Gebruiksomgeving . . . . . . . . . . . . . . . . . . . . . . . . . . . . . . . . . . . . . . . . . . . . . . . . . . . . . . . . . . . . . . . . . . . . . . . . . . . . . . . . . . . . . . . . . . 57
          5. Contra-indicaties . . . . . . . . . . . . . . . . . . . . . . . . . . . . . . . . . . . . . . . . . . . . . . . . . . . . . . . . . . . . . . . . . . . . . . . . . . . . . . . . . . . . . . . . . . . 57
          6. Beschrijving van het . . . . . . . . . . . . . . . . . . . . . . . . . . . . . . . . . . . . . . . . . . . . . . . . . . . . . . . . . . . . . . . . . . . . . . . . . . . . . . . . . . . . . . . .            57
              6.1. Lokalisator . . . . . . . . . . . . . . . . . . . . . . . . . . . . . . . . . . . . . . . . . . . . . . . . . . . . . . . . . . . . . . . . . . . . . . . . . . . . . . . . . . . . . . . . . . . .       57
              6.2. Kompas . . . . . . . . . . . . . . . . . . . . . . . . . . . . . . . . . . . . . . . . . . . . . . . . . . . . . . . . . . . . . . . . . . . . . . . . . . . . . . . . . . . . . . . . . . . . . . .      58
              6.3. Magneet . . . . . . . . . . . . . . . . . . . . . . . . . . . . . . . . . . . . . . . . . . . . . . . . . . . . . . . . . . . . . . . . . . . . . . . . . . . . . . . . . . . . . . . . . . . . . .       58
              6.4. Demonstratieklep . . . . . . . . . . . . . . . . . . . . . . . . . . . . . . . . . . . . . . . . . . . . . . . . . . . . . . . . . . . . . . . . . . . . . . . . . . . . . . . . . . . . . .              59
          7. Reinigings- en desinfectieprocedure . . . . . . . . . . . . . . . . . . . . . . . . . . . . . . . . . . . . . . . . . . . . . . . . . . . . . . . . . . . . . . . . . . . . . . . . .                           59
              7.1. Inleiding . . . . . . . . . . . . . . . . . . . . . . . . . . . . . . . . . . . . . . . . . . . . . . . . . . . . . . . . . . . . . . . . . . . . . . . . . . . . . . . . . . . . . . . . . . . . . . .   59
              7.2. Voorzorgsmaatregelen . . . . . . . . . . . . . . . . . . . . . . . . . . . . . . . . . . . . . . . . . . . . . . . . . . . . . . . . . . . . . . . . . . . . . . . . . . . . . . . . .                    59
              7.3. Reinigingsprocedure . . . . . . . . . . . . . . . . . . . . . . . . . . . . . . . . . . . . . . . . . . . . . . . . . . . . . . . . . . . . . . . . . . . . . . . . . . . . . . . . . . .                 59
              7.4. Desinfectieprocedure . . . . . . . . . . . . . . . . . . . . . . . . . . . . . . . . . . . . . . . . . . . . . . . . . . . . . . . . . . . . . . . . . . . . . . . . . . . . . . . . . .                  59
              7.5. Inspectie . . . . . . . . . . . . . . . . . . . . . . . . . . . . . . . . . . . . . . . . . . . . . . . . . . . . . . . . . . . . . . . . . . . . . . . . . . . . . . . . . . . . . . . . . . . . . .     60
          8. De klep meten en afstellen . . . . . . . . . . . . . . . . . . . . . . . . . . . . . . . . . . . . . . . . . . . . . . . . . . . . . . . . . . . . . . . . . . . . . . . . . . . . . . . . . .                  60
              8.1. De druk afstellen vóór implantatie . . . . . . . . . . . . . . . . . . . . . . . . . . . . . . . . . . . . . . . . . . . . . . . . . . . . . . . . . . . . . . . . . . . . . .                            60
                  8.1.1. De compatibiliteit tussen de klep en de afstelkit controleren . . . . . . . . . . . . . . . . . . . . . . . . . . . . . . . . . . . . . . . .                                                       60
                  8.1.2. Het juiste drukbereik op de Lokalisator weergeven . . . . . . . . . . . . . . . . . . . . . . . . . . . . . . . . . . . . . . . . . . . . . . . . .                                                 60
                  8.1.3. De Lokalisator positioneren . . . . . . . . . . . . . . . . . . . . . . . . . . . . . . . . . . . . . . . . . . . . . . . . . . . . . . . . . . . . . . . . . . . . . . .                           61
                  8.1.4. De druk meten . . . . . . . . . . . . . . . . . . . . . . . . . . . . . . . . . . . . . . . . . . . . . . . . . . . . . . . . . . . . . . . . . . . . . . . . . . . . . . . . . . .                 61
                  8.1.5. De druk afstellen . . . . . . . . . . . . . . . . . . . . . . . . . . . . . . . . . . . . . . . . . . . . . . . . . . . . . . . . . . . . . . . . . . . . . . . . . . . . . . . . .                 61
                  8.1.6. De drukinstelling controleren . . . . . . . . . . . . . . . . . . . . . . . . . . . . . . . . . . . . . . . . . . . . . . . . . . . . . . . . . . . . . . . . . . . . . .                           61
                  8.1.7. De geselecteerde druk voor de implantatie registreren . . . . . . . . . . . . . . . . . . . . . . . . . . . . . . . . . . . . . . . . . . . . . .                                                   61
              8.2. De klepdruk na implantatie meten en/of wijzigen . . . . . . . . . . . . . . . . . . . . . . . . . . . . . . . . . . . . . . . . . . . . . . . . . . . . . . . .                                           61
                  8.2.1. Het klepmodel vaststellen . . . . . . . . . . . . . . . . . . . . . . . . . . . . . . . . . . . . . . . . . . . . . . . . . . . . . . . . . . . . . . . . . . . . . . . . .                         61
                  8.2.2. Het juiste drukbereik op de Lokalisator weergeven . . . . . . . . . . . . . . . . . . . . . . . . . . . . . . . . . . . . . . . . . . . . . . . . .                                                 61
                  8.2.3. De patiënt positioneren . . . . . . . . . . . . . . . . . . . . . . . . . . . . . . . . . . . . . . . . . . . . . . . . . . . . . . . . . . . . . . . . . . . . . . . . . . .                       62
                  8.2.4. De Lokalisator positioneren . . . . . . . . . . . . . . . . . . . . . . . . . . . . . . . . . . . . . . . . . . . . . . . . . . . . . . . . . . . . . . . . . . . . . . .                           62
                  8.2.5. De druk meten . . . . . . . . . . . . . . . . . . . . . . . . . . . . . . . . . . . . . . . . . . . . . . . . . . . . . . . . . . . . . . . . . . . . . . . . . . . . . . . . . . .                 62
                  8.2.6. Een nieuwe druk instellen . . . . . . . . . . . . . . . . . . . . . . . . . . . . . . . . . . . . . . . . . . . . . . . . . . . . . . . . . . . . . . . . . . . . . . . . .                         63
                  8.2.7. De drukinstelling controleren . . . . . . . . . . . . . . . . . . . . . . . . . . . . . . . . . . . . . . . . . . . . . . . . . . . . . . . . . . . . . . . . . . . . . .                           63
                  8.2.8. De nieuwe druk registreren . . . . . . . . . . . . . . . . . . . . . . . . . . . . . . . . . . . . . . . . . . . . . . . . . . . . . . . . . . . . . . . . . . . . . . . .                          64
                  8.2.9. Controle na afstellen . . . . . . . . . . . . . . . . . . . . . . . . . . . . . . . . . . . . . . . . . . . . . . . . . . . . . . . . . . . . . . . . . . . . . . . . . . . . . .                   64
          9. De presentaties van de afstelkit controleren . . . . . . . . . . . . . . . . . . . . . . . . . . . . . . . . . . . . . . . . . . . . . . . . . . . . . . . . . . . . . . . . . . 64
              9.1. Visuele controles . . . . . . . . . . . . . . . . . . . . . . . . . . . . . . . . . . . . . . . . . . . . . . . . . . . . . . . . . . . . . . . . . . . . . . . . . . . . . . . . . . . . . . 64
              9.2. Functionele controle . . . . . . . . . . . . . . . . . . . . . . . . . . . . . . . . . . . . . . . . . . . . . . . . . . . . . . . . . . . . . . . . . . . . . . . . . . . . . . . . . . . 64
          10. Oplossingen in geval van een problematische afstelling . . . . . . . . . . . . . . . . . . . . . . . . . . . . . . . . . . . . . . . . . . . . . . . . . . . . . .                                             64
              10.1. Heen en weer bewegen van de Magneet . . . . . . . . . . . . . . . . . . . . . . . . . . . . . . . . . . . . . . . . . . . . . . . . . . . . . . . . . . . . . .                                          64
              10.2. Stopmethode . . . . . . . . . . . . . . . . . . . . . . . . . . . . . . . . . . . . . . . . . . . . . . . . . . . . . . . . . . . . . . . . . . . . . . . . . . . . . . . . . . . . . . . .              65
              10.3. Afstellen zonder de Lokalisator . . . . . . . . . . . . . . . . . . . . . . . . . . . . . . . . . . . . . . . . . . . . . . . . . . . . . . . . . . . . . . . . . . . . . . . .                          66
              10.4. Specifieke gevallen van kleppen die ondersteboven zijn geïmplanteerd . . . . . . . . . . . . . . . . . . . . . . . . . . . . . . . . . .                                                                 66
              10.5. Het meten van kleppen die zijn geïmplanteerd in andere omstandigheden dan aanbevolen . . . . . . . . . . . . . . .                                                                                       66
          11. Opslag . . . . . . . . . . . . . . . . . . . . . . . . . . . . . . . . . . . . . . . . . . . . . . . . . . . . . . . . . . . . . . . . . . . . . . . . . . . . . . . . . . . . . . . . . . . . . . . . . . . . 66
          12. Verwerking van de producten na gebruik . . . . . . . . . . . . . . . . . . . . . . . . . . . . . . . . . . . . . . . . . . . . . . . . . . . . . . . . . . . . . . . . . . . . 67
              12.1. Retour zenden van producten . . . . . . . . . . . . . . . . . . . . . . . . . . . . . . . . . . . . . . . . . . . . . . . . . . . . . . . . . . . . . . . . . . . . . . . . . 67
              12.2. Verwijdering van producten . . . . . . . . . . . . . . . . . . . . . . . . . . . . . . . . . . . . . . . . . . . . . . . . . . . . . . . . . . . . . . . . . . . . . . . . . . . 67
          13. Bewaking van de productveiligheid . . . . . . . . . . . . . . . . . . . . . . . . . . . . . . . . . . . . . . . . . . . . . . . . . . . . . . . . . . . . . . . . . . . . . . . . . 67
          14. Garantie . . . . . . . . . . . . . . . . . . . . . . . . . . . . . . . . . . . . . . . . . . . . . . . . . . . . . . . . . . . . . . . . . . . . . . . . . . . . . . . . . . . . . . . . . . . . . . . . . . 67
          15. Symbolen . . . . . . . . . . . . . . . . . . . . . . . . . . . . . . . . . . . . . . . . . . . . . . . . . . . . . . . . . . . . . . . . . . . . . . . . . . . . . . . . . . . . . . . . . . . . . . . . . 67
          16. Referenties . . . . . . . . . . . . . . . . . . . . . . . . . . . . . . . . . . . . . . . . . . . . . . . . . . . . . . . . . . . . . . . . . . . . . . . . . . . . . . . . . . . . . . . . . . . . . . . . 68

                                                                                                                                                                                                          Page 7 of 82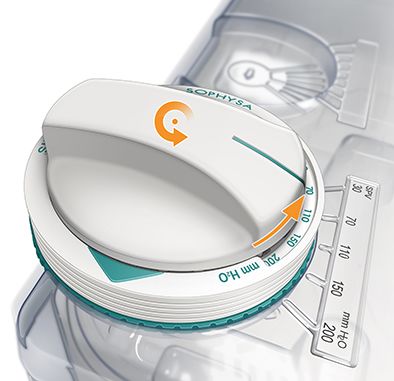
PT         Kit de Ajuste-2 Polaris® (PAK2) . . . . . . . . . . . . . . . . . . . . . . . . . . . . . . . . . . . . . . . . . . . . . . . . . . . . . . . . . . . . . . . . . . . . . . . . . . . . . . . . . . . . 69
                1. Utilização prevista . . . . . . . . . . . . . . . . . . . . . . . . . . . . . . . . . . . . . . . . . . . . . . . . . . . . . . . . . . . . . . . . . . . . . . . . . . . . . . . . . . . . . . . . . . 69
                2. Indicações . . . . . . . . . . . . . . . . . . . . . . . . . . . . . . . . . . . . . . . . . . . . . . . . . . . . . . . . . . . . . . . . . . . . . . . . . . . . . . . . . . . . . . . . . . . . . . . . . 69
                3. Populações de doentes . . . . . . . . . . . . . . . . . . . . . . . . . . . . . . . . . . . . . . . . . . . . . . . . . . . . . . . . . . . . . . . . . . . . . . . . . . . . . . . . . . . . . 69
                4. Ambiente de utilização . . . . . . . . . . . . . . . . . . . . . . . . . . . . . . . . . . . . . . . . . . . . . . . . . . . . . . . . . . . . . . . . . . . . . . . . . . . . . . . . . . . . . . 69
                5. Contraindicações . . . . . . . . . . . . . . . . . . . . . . . . . . . . . . . . . . . . . . . . . . . . . . . . . . . . . . . . . . . . . . . . . . . . . . . . . . . . . . . . . . . . . . . . . . . 69
                6. Descrição . . . . . . . . . . . . . . . . . . . . . . . . . . . . . . . . . . . . . . . . . . . . . . . . . . . . . . . . . . . . . . . . . . . . . . . . . . . . . . . . . . . . . . . . . . . . . . . . . .    69
                    6.1. Localizador . . . . . . . . . . . . . . . . . . . . . . . . . . . . . . . . . . . . . . . . . . . . . . . . . . . . . . . . . . . . . . . . . . . . . . . . . . . . . . . . . . . . . . . . . . .          69
                    6.2. Bússola . . . . . . . . . . . . . . . . . . . . . . . . . . . . . . . . . . . . . . . . . . . . . . . . . . . . . . . . . . . . . . . . . . . . . . . . . . . . . . . . . . . . . . . . . . . . . . .      70
                    6.3. Íman . . . . . . . . . . . . . . . . . . . . . . . . . . . . . . . . . . . . . . . . . . . . . . . . . . . . . . . . . . . . . . . . . . . . . . . . . . . . . . . . . . . . . . . . . . . . . . . . . .   70
                    6.4. Válvula de demonstração . . . . . . . . . . . . . . . . . . . . . . . . . . . . . . . . . . . . . . . . . . . . . . . . . . . . . . . . . . . . . . . . . . . . . . . . . . . . . .                        71
                7. Procedimento de limpeza e desinfeção . . . . . . . . . . . . . . . . . . . . . . . . . . . . . . . . . . . . . . . . . . . . . . . . . . . . . . . . . . . . . . . . . . . . . .                                 71
                    7.1. Introdução . . . . . . . . . . . . . . . . . . . . . . . . . . . . . . . . . . . . . . . . . . . . . . . . . . . . . . . . . . . . . . . . . . . . . . . . . . . . . . . . . . . . . . . . . . . .         71
                    7.2. Pré-requisitos . . . . . . . . . . . . . . . . . . . . . . . . . . . . . . . . . . . . . . . . . . . . . . . . . . . . . . . . . . . . . . . . . . . . . . . . . . . . . . . . . . . . . . . . .           71
                    7.3. Procedimento de limpeza . . . . . . . . . . . . . . . . . . . . . . . . . . . . . . . . . . . . . . . . . . . . . . . . . . . . . . . . . . . . . . . . . . . . . . . . . . . . . .                        71
                    7.4. Procedimento de desinfeção . . . . . . . . . . . . . . . . . . . . . . . . . . . . . . . . . . . . . . . . . . . . . . . . . . . . . . . . . . . . . . . . . . . . . . . . . . .                           71
                    7.5. Inspeção . . . . . . . . . . . . . . . . . . . . . . . . . . . . . . . . . . . . . . . . . . . . . . . . . . . . . . . . . . . . . . . . . . . . . . . . . . . . . . . . . . . . . . . . . . . . . .       71
                8. Leitura e ajuste da válvula . . . . . . . . . . . . . . . . . . . . . . . . . . . . . . . . . . . . . . . . . . . . . . . . . . . . . . . . . . . . . . . . . . . . . . . . . . . . . . . . . . .                71
                    8.1. Ajustar a pressão antes da implantação . . . . . . . . . . . . . . . . . . . . . . . . . . . . . . . . . . . . . . . . . . . . . . . . . . . . . . . . . . . . . . . .                                     72
                        8.1.1. Verificar a compatibilidade entre a válvula e o kit de ajuste . . . . . . . . . . . . . . . . . . . . . . . . . . . . . . . . . . . . . . . . .                                                      72
                        8.1.2. Apresentar a gama de pressão correta no Localizador . . . . . . . . . . . . . . . . . . . . . . . . . . . . . . . . . . . . . . . . . . . . . .                                                      72
                        8.1.3. Posicionamento do Localizador . . . . . . . . . . . . . . . . . . . . . . . . . . . . . . . . . . . . . . . . . . . . . . . . . . . . . . . . . . . . . . . . . . .                                  72
                        8.1.4. Leitura da pressão . . . . . . . . . . . . . . . . . . . . . . . . . . . . . . . . . . . . . . . . . . . . . . . . . . . . . . . . . . . . . . . . . . . . . . . . . . . . . . . .                   72
                        8.1.5. Ajuste da pressão . . . . . . . . . . . . . . . . . . . . . . . . . . . . . . . . . . . . . . . . . . . . . . . . . . . . . . . . . . . . . . . . . . . . . . . . . . . . . . . .                    72
                        8.1.6. Verificação do valor da pressão . . . . . . . . . . . . . . . . . . . . . . . . . . . . . . . . . . . . . . . . . . . . . . . . . . . . . . . . . . . . . . . . . . .                                73
                        8.1.7. Registo da pressão selecionada para implantação . . . . . . . . . . . . . . . . . . . . . . . . . . . . . . . . . . . . . . . . . . . . . . . . .                                                    73
                    8.2. Leitura e/ou alteração da pressão da válvula após implantação . . . . . . . . . . . . . . . . . . . . . . . . . . . . . . . . . . . . . . . . . .                                                          73
                        8.2.1. Identificar o modelo de válvula . . . . . . . . . . . . . . . . . . . . . . . . . . . . . . . . . . . . . . . . . . . . . . . . . . . . . . . . . . . . . . . . . . . .                              73
                        8.2.2. Apresentar a gama de pressão correta no Localizador . . . . . . . . . . . . . . . . . . . . . . . . . . . . . . . . . . . . . . . . . . . . . .                                                      73
                        8.2.3. Posicionar o doente . . . . . . . . . . . . . . . . . . . . . . . . . . . . . . . . . . . . . . . . . . . . . . . . . . . . . . . . . . . . . . . . . . . . . . . . . . . . . .                      73
                        8.2.4. Posicionamento do Localizador . . . . . . . . . . . . . . . . . . . . . . . . . . . . . . . . . . . . . . . . . . . . . . . . . . . . . . . . . . . . . . . . . . .                                  74
                        8.2.5. Leitura da pressão . . . . . . . . . . . . . . . . . . . . . . . . . . . . . . . . . . . . . . . . . . . . . . . . . . . . . . . . . . . . . . . . . . . . . . . . . . . . . . . .                   74
                        8.2.6. Regulação de uma nova pressão . . . . . . . . . . . . . . . . . . . . . . . . . . . . . . . . . . . . . . . . . . . . . . . . . . . . . . . . . . . . . . . . . .                                    74
                        8.2.7. Verificação do valor da pressão . . . . . . . . . . . . . . . . . . . . . . . . . . . . . . . . . . . . . . . . . . . . . . . . . . . . . . . . . . . . . . . . . . .                                75
                        8.2.8. Registo da nova pressão . . . . . . . . . . . . . . . . . . . . . . . . . . . . . . . . . . . . . . . . . . . . . . . . . . . . . . . . . . . . . . . . . . . . . . . . . .                          75
                        8.2.9. Monitorização pós-ajuste . . . . . . . . . . . . . . . . . . . . . . . . . . . . . . . . . . . . . . . . . . . . . . . . . . . . . . . . . . . . . . . . . . . . . . . . .                           75
                9. Verificar o desempenho do kit de ajuste . . . . . . . . . . . . . . . . . . . . . . . . . . . . . . . . . . . . . . . . . . . . . . . . . . . . . . . . . . . . . . . . . . . . . . 75
                    9.1. Inspeções visuais . . . . . . . . . . . . . . . . . . . . . . . . . . . . . . . . . . . . . . . . . . . . . . . . . . . . . . . . . . . . . . . . . . . . . . . . . . . . . . . . . . . . . . 75
                    9.2. Verificação funcional . . . . . . . . . . . . . . . . . . . . . . . . . . . . . . . . . . . . . . . . . . . . . . . . . . . . . . . . . . . . . . . . . . . . . . . . . . . . . . . . . . . 76
                10. Soluções em caso de ajuste difícil . . . . . . . . . . . . . . . . . . . . . . . . . . . . . . . . . . . . . . . . . . . . . . . . . . . . . . . . . . . . . . . . . . . . . . . . . .                          76
                    10.1. Movimentação do Íman para a frente e para trás . . . . . . . . . . . . . . . . . . . . . . . . . . . . . . . . . . . . . . . . . . . . . . . . . . . . . . .                                              76
                    10.2. Método de fim de curso . . . . . . . . . . . . . . . . . . . . . . . . . . . . . . . . . . . . . . . . . . . . . . . . . . . . . . . . . . . . . . . . . . . . . . . . . . . . . .                        76
                    10.3. Ajustar sem o Localizador . . . . . . . . . . . . . . . . . . . . . . . . . . . . . . . . . . . . . . . . . . . . . . . . . . . . . . . . . . . . . . . . . . . . . . . . . . . .                         77
                    10.4. Caso específico de válvulas implantadas ao contrário . . . . . . . . . . . . . . . . . . . . . . . . . . . . . . . . . . . . . . . . . . . . . . . . . .                                                  77
                    10.5. Leitura de válvulas implantadas em condições diferentes das recomendadas . . . . . . . . . . . . . . . . . . . . . . . . . . .                                                                            77
                11. Armazenamento . . . . . . . . . . . . . . . . . . . . . . . . . . . . . . . . . . . . . . . . . . . . . . . . . . . . . . . . . . . . . . . . . . . . . . . . . . . . . . . . . . . . . . . . . . . 78
                12. Processamento dos produtos após utilização . . . . . . . . . . . . . . . . . . . . . . . . . . . . . . . . . . . . . . . . . . . . . . . . . . . . . . . . . . . . . . . 78
                    12.1. Devolução de produtos . . . . . . . . . . . . . . . . . . . . . . . . . . . . . . . . . . . . . . . . . . . . . . . . . . . . . . . . . . . . . . . . . . . . . . . . . . . . . . . 78
                    12.2. Eliminação de produtos . . . . . . . . . . . . . . . . . . . . . . . . . . . . . . . . . . . . . . . . . . . . . . . . . . . . . . . . . . . . . . . . . . . . . . . . . . . . . . . 78
                13. Monitorização da segurança do produto . . . . . . . . . . . . . . . . . . . . . . . . . . . . . . . . . . . . . . . . . . . . . . . . . . . . . . . . . . . . . . . . . . . . 78
                14. Garantia . . . . . . . . . . . . . . . . . . . . . . . . . . . . . . . . . . . . . . . . . . . . . . . . . . . . . . . . . . . . . . . . . . . . . . . . . . . . . . . . . . . . . . . . . . . . . . . . . . 78
                15. Símbolos . . . . . . . . . . . . . . . . . . . . . . . . . . . . . . . . . . . . . . . . . . . . . . . . . . . . . . . . . . . . . . . . . . . . . . . . . . . . . . . . . . . . . . . . . . . . . . . . . . 78
                16. Referências . . . . . . . . . . . . . . . . . . . . . . . . . . . . . . . . . . . . . . . . . . . . . . . . . . . . . . . . . . . . . . . . . . . . . . . . . . . . . . . . . . . . . . . . . . . . . . . 79

     Page 8 of 82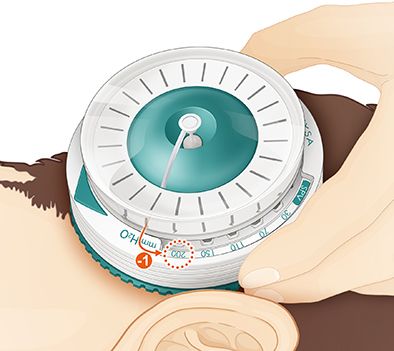
Figure 1. Polaris Adjustment Kit-2
  WARNING
  Federal (USA) law restricts this device to sale by or on
  the order of a physician.

                                                                                                                                             EN
  CAUTION
  Read these Instructions for Use carefully before adjust-
  ing the valve operating pressure.

  1. Intended use

The Polaris Adjustment Kit-2 is intended to read and change
the operating pressure of a Polaris valve in order to adapt to
the clinical need and evolution of the patient.
                                                                    Contains a Magnet, a Locator, a Compass, the present In-
  2. Indications                                                          structions For Use and a Quick Start Guide.

The Polaris Adjustment Kit-2 is indicated for patients implan-
                                                                  The Polaris Adjustment Kit-2 (hereinafter referred to as PAK2)
ted with a Polaris valve to treat hydrocephalus, subaracho-
                                                                  is designed specifically for setting the pressure of the Polaris
noid cysts, or idiopathic intracranial hypertension (IIH), also
                                                                  valves.
called Pseudotumor cerebri.
                                                                  It is not made with natural or synthetic latex.
  3. Patient populations                                          The components of the PAK2 are packaged non-sterile in a
                                                                  reusable box with magnetic shielding.
The device can be used on patients of all ages, including
pre-term infants.                                                   CAUTION
                                                                    The PAK2 must not be used in an MRI environment.
  4. Environment of use
                                                                    NOTE
Post-operative follow-up is done at the hospital (consulta-
tion, imaging service, emergency room), clinic or doctor's of-      This product is a reusable device, it is not intended for
fice.                                                               single use. It must be cleaned before first use and be-
                                                                    tween each patient.
The device must only be used by a neurosurgeon. It is not in-
tended for use in a patient's home. Patients are never expec-
ted to use the device by themselves.                              6.1. Locator
                                                                  The Locator is used to locate the valve through the skin.
  5. Contraindications                                            It is designed to work with Polaris valves regardless of their
                                                                  pressure range (see Table 1).
This device is not intended for any use other than those indi-
cated in these Instructions for Use.                              It houses the Compass and the Magnet in turn.
                                                                  The Locator is the only component to be in contact with the
  6. Description                                                  patient's skin for a limited time (a few minutes) when check-
                                                                  ing or adjusting the pressure. More rarely, it may also be in
The rotor of the Polaris valve is fitted with a patented mag-     contact with the scar tissue when used post-operatively,
netic locking system made up of two mobile micro-magnets.         though the scar is usually protected with a dressing.
Changing the operating pressure of the Polaris valve is per-
                                                                  Table 1. Table of pressures for Polaris valves
formed through the skin via a magnetic field using an adjust-
ment kit made up of 3 parts:                                      Valve model       SPV-140        SPV             SPV-300      SPV-400
                                                                  listed on the
– Locating instrument (hereinafter referred to as Locator),       Locator
– Reading instrument (hereinafter referred to as Compass),
                                                                  References        SPV-140,       SPV,       SPV-300  SPV-400
– Setting instrument (hereinafter referred to as Magnet).         concerned         SPV-140-SX,    SPV-2010,  SPVA-300 SPVA-400
For simplicity, for the rest of these Instructions for Use, the                     SPVA-140,      SPV-SX,
“operating pressure of the valve” will be referred to as “pres-                     SPVA-140-      SPVA,
sure”.                                                                              SX             SPVA-2010,
                                                                                                   SPVA-SX,
                                                                                                   SPVB,
                                                                                                   SPVB-2010

                                                                  Radiographic      0 point        1 point         2 points     3 points
                                                                  identification
                                                                  of the model

                                                                                                                              Page 9 of 82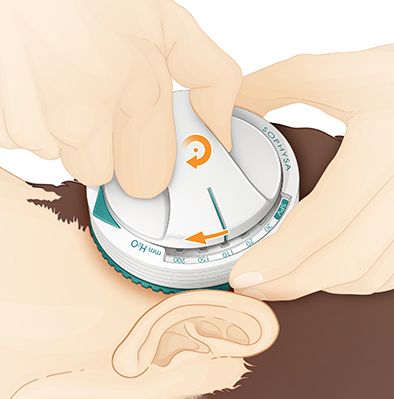
Valve model         SPV-140   SPV        SPV-300    SPV-400      [6] Central target. Used to refine the position of the Compass
listed on the                                                    above the valve.
Locator
                                                                 [7] Needle. Indicates the orientation of the valve rotor.
Available       1   10        30         50         80
pressures                                                        [8] Lateral lugs. Used to vertically guide the Compass into
(mmH2O)         2   40        70         100        150          the internal grooves of the Locator.
                3   80        110        150        230          [9] Compass needle shaft. To be centered in the target.
                4   110       150        220        330
                                                                 6.3. Magnet
                5   140       200        300        400

* The pressures are expressed in mmH2O.                            CAUTION
1 mmH2O corresponds to 9.807 Pa or 0.074 mmHg.                     Keep the Magnet away from electromedical devices for
                                                                   care or diagnosis (i.e. pacemaker, patient monitor, elec-
                                                                   tronic measuring devices, imaging devices, etc.). The
                                                                   magnetic field of the Magnet could provoke electro-
                                                                   magnetic disturbance and altere their operation.

                                                                   CAUTION
                                                                   Do not store or handle the Magnet near any device like-
                                                                   ly to be altered by a powerful magnetic field.

                                                                   CAUTION
                                                                   Do not move the Magnet close to a powerful magnetic
                                                                   field (e.g. MRI). It could become a dangerous projectile
                                                                   or its performance could be affected.

[1] Vertical grooves. Used to ensure the correct positioning       CAUTION
of the Compass and the Magnet inside the Locator.                  Handle the Magnet with care near metal objects (e.g.
                                                                   hospital furniture). They could become violently attrac-
[2] Reading area. Shows the valve model on the left and            ted.
each of the five pressure levels associated with this refer-
ence.                                                            The Magnet is made up of a specific assembly of magnets
                                                                 designed to enable the rotor to be unlocked and the pres-
[3] Rotating ring. Used to select the reading area corre-
                                                                 sure of the Polaris valve to be adjusted.
sponding to the valve model to be adjusted.
                                                                 To operate correctly, the Magnet must be properly centered
See Table 1 to determine the valve model and the pressure
                                                                 above the valve and aligned with the valve rotor.
range to be displayed.
                                                                 The Magnet fits into the Locator.
[4] Arrow showing the direction of the CSF flow. Used to po-
sition the Locator correctly in relation to the valve.           It makes it possible to adjust the pressure by rotating the
                                                                 Magnet.
[5] Central cut-out area. Used to center and position the Lo-
cator accurately and as closely as possible to the valve.

6.2. Compass
The Compass fits into the Locator and enables direct reading
of pressure values.
The needle indicates the exact orientation of the valve rotor.
When used in conjunction with the Locator, the Compass en-
ables the valve pressure to be read.

                                                                 [10] Blue mark. Used to align the Magnet with the valve rotor
                                                                 using the indication given by the Compass.
                                                                 [11] Lateral lugs. Used to vertically guide the Magnet into the
                                                                 internal grooves of the Locator.
                                                                 [12] Handle.
                                                                 The Magnet handle can be off-centered towards the front or
                                                                 the back to be able to make backwards and forwards move-
                                                                 ments.

Page 10 of 82
Removing the Magnet causes automatic re-locking of the 1. Clean the components for at least 1 minute using pre-
valve rotor via mutual attraction of the two mobile micro- soaked wipes with 70% isopropyl alcohol (IPA), to re-
magnets. move any visible residue. Change the wipe between
each component.
CAUTION 2. Inspect the components.
EN
Always remove the Magnet from the Locator vertically. If residue remains, take a new pre-soaked wipe with
This ensures that the rotor is optimally locked in its new 70% isopropyl alcohol (IPA) and wipe the surfaces
pressure. Failure to do so may cause the selected pres- again.
sure to change and/or result in incorrect locking of the
rotor. NOTE
Repeat this step until all visible residues are re-
6.4. Demonstration valve moved from all components.
A demonstration valve is supplied in the adjustment kit. It 3. Disinfect the Locator as described in the following sec-
provides training for adjusting the valve while displaying tion.
changes in the position of the rotor during the adjustment
procedure. 7.4. Disinfection procedure
The purpose of this procedure is to remove any microorgan-
7. Cleaning and disinfection procedure isms present on the Locator.
7.1. Introduction WARNING
The adjustment kit is delivered clean, but the Locator is not Disinfect the Locator before first use and between each
disinfected. patient. Failure to do so may provoke an infection, lead-
ing to surgery.
While the risk of infection is low (limited contact with the
skin, either healthy skin or scar tissue), clean all the adjust- 1. Thoroughly wipe the Locator using pre-soaked wipes
ment kit components and disinfect the Locator before first with 70% isopropyl alcohol (IPA). It must remain visibly
use and between each patient, as described in this section. wet for at least 2 minutes.
Take extra care when disinfecting the base of the Loca-
CAUTION
tor which is in contact with the patient's skin.
Do not sterilize or immerse the adjustment kit compo- If needed, use additional wipes to ensure continuous 2
nents. Irreversible alterations to the markings, distortion minutes of wet contact time.
of the plastic parts and/or demagnetization of the Mag-
2. Let the Locator completely air dry for 1 hour before us-
net risk rendering the adjustment kit unusable.
ing it again.
CAUTION
7.5. Inspection
Non-adherence to the disinfection rules described in
After each cleaning and disinfection procedure, visually in-
this section could induce a risk of microbial contamina-
spect the components for any damage. See Section 9.1. Vis-
tion.
ual checks (p. 15).
NOTICE 8. Reading and adjusting the valve
Do not use solvents or cleaning/disinfectant agents
which could damage the kit components:
WARNING
– phenol-based cleaning/disinfectant agents, Do not use the adjustment kit in the operative field. As
– cleaning/disinfection by boiling, the adjustment kit cannot be sterilized, using it during
– cleaning/disinfection with hot air/steam, the operation would cause a high risk of infection for
– acetone, ammonia, benzene, bleach, chlorine, chlori- the patient.
nated water, water above 60°, paint thinners, tri-
chloroethylene. CAUTION
For more information, contact Sophysa Customer Serv- Changing the valve pressure must only be done by a
ice at contact@sophysa.com, or contact your local dis- neurosurgeon.
tributor.
CAUTION
7.2. Prerequisites When reading or adjusting the pressure, make sure that
1. Put on gloves and keep them throughout the procedure. the Magnet, or any other ferromagnetic object, is loca-
2. Take pre-soaked wipes with 70% isopropyl alcohol (IPA). ted more than 50 cm away from the Compass so that
this reading cannot be falsified by the influence of mag-
netic fields.
7.3. Cleaning procedure
The purpose of this procedure is to remove any soiling and
visible residue from the external surfaces of the adjustment
kit components.
Page 11 of 82CAUTION 8.1.2. Displaying the correct pressure range on the Loca-
tor
Do not use an adjustment kit without previously check-
ing under the Locator that it corresponds to the valve CAUTION
model used.
Do not use an adjustment kit without ensuring that the
Overdrainage or underdrainage can result from taking a pressure range visible on the Locator corresponds to
reading and/or adjustment with a pressure range on the the valve model to be implanted.
Locator different from that of the implanted valve mod-
el. 1. Check that the pressure range displayed in the Locator
reading area corresponds to the previously identified
valve model.
Figure 2. Bottom of the Locator 2. If this is not the case, display the pressure range which
corresponds to the model of the valve to be implanted:
a. Hold the Locator with one hand.
b. Turn the rotating ring until a "click" is heard. This
click guarantees that a complete pressure range is
displayed.
c. Repeat the operation until the valve model used ap-
pears at the left end and the 5 pressures are visible.
The reference “PAK2-LI” and the sentence “Designed exclu-
sively for use with POLARIS® SPV series” are there to make
sure to use the Locator with the right valve model.
8.1. Adjusting the pressure prior to implantation
CAUTION
Do not unpack or implant the valve without previously
adjusting it to the initial operating pressure defined by
the neurosurgeon.
8.1.3. Positioning the Locator
Before opening the sterile packaging, it is necessary to
Position the Locator in the place provided on the shell of the
adjust the rotor in the position that corresponds to the pres-
outer packaging, centered above the valve, with the arrow of
sure selected by the surgeon for the implantation.
the Locator pointing in the direction of the CSF flow as
The double sterile packaging for each Polaris valve includes shown by the arrow on the valve.
a housing specifically for adjusting the valve through the
packaging. 8.1.4. Reading the pressure
1. Insert the Compass fully into the Locator.
Align the lines on the Compass with the pressure values
printed on the Locator, if this is not already the case.
2. On the Locator, read the pressure value shown by the
Compass needle.
NOTE
Reading of the pressure can also be performed visually
without using the adjustment kit, as the rotor and the
radiopaque points are visible through the valve and the
double sterile packaging.
8.1.1. Checking the compatibility between the valve and
adjustment kit
8.1.5. Adjusting the pressure
1. Check the model and pressure range of the valve to be
1. Remove the Compass.
adjusted against the label on the packaging.
2. Align the mark of the Magnet with the pressure read in
2. Check under the Locator that it is compatible with the
the previous section, and slide the Magnet vertically into
valve model used:
the Locator without changing the orientation of the Mag-
– reference is PAK2-LI, net.
– sentence says "Designed exclusively for use with PO- 3. Turn the Magnet until it reaches the position chosen as
LARIS® SPV series". the pressure for the valve to be implanted.
Page 12 of 82NOTE 8.2.2. Displaying the correct pressure range on the Loca-
tor
Do not attempt to turn the Magnet if it is not com-
pletely inserted into the Locator. The unlocking of CAUTION
the valve rotor and its drive could otherwise be Do not use an adjustment kit without ensuring that the
EN
compromised. pressure range visible on the Locator corresponds to
the valve model to be adjusted.
1. Check that the pressure range displayed in the Locator
reading area corresponds to the previously identified
valve model.
2. If this is not the case, display the pressure range corre-
sponding to the implanted valve model:
a. Hold the Locator with one hand.
b. Turn the rotating ring until a "click" is heard. This
click guarantees that a complete pressure range is
4. Place the Magnet more than 50 cm from the valve. displayed.
c. Repeat the operation until the valve model used ap-
8.1.6. Checking the pressure setting pears at the left end and the 5 pressures are visible.
Reinsert the Compass in order to check the pressure, or
check the setting visually on the valve.
8.1.7. Recording the pressure selected for the implanta-
tion 8.2.3. Positioning the patient
Note the pressure value read in the previous step on the Pa- CAUTION
tient Identification Card (PC-SPV) and make sure to hand the
Make sure the patient stays still during the adjustment
card to the patient.
of the pressure.
8.2. Reading and/or changing the valve pressure after If the patient moves, it could lead to a slight offset in re-
implantation lation to the valve, when positioning the Locator. Thus,
being off-center could create a gap between the pres-
CAUTION sure originally selected by the surgeon, and the pres-
The operation scar and/or post-operative edema can sure set in the end, potentially leading to overdrainage
make positioning the Locator painful and inaccurate. or underdrainage.
This could then cause difficulties in adjustment or even Position the patient so that the valve is as horizontal as pos-
make it temporarily impossible. sible and the implantation site is easy to access.
8.2.1. Identifying the valve model
1. Check the model and pressure range of the Polaris valve
to be adjusted:
– on the Patient Identification Card or in the patient's
medical record (traceability label),
– and/or with an X-ray examination of the valve.
See Instructions for Use Polaris® valve, Section “Post-
operative X-ray examination: identification of the valve
model and pressure reading”.
2. Check under the Locator that it is compatible with the
valve model used:
– reference is PAK2-LI, 8.2.4. Positioning the Locator
– sentence says "Designed exclusively for use with PO- 1. Palpate the valve implantation site in order to determine
LARIS® SPV series". both the location and orientation of the valve.
Page 13 of 82First find the inlet and outlet connectors, at each end of
the valve, and the reservoir (if fitted). These are the easi-
est components to locate.
2. Place the Locator on the implantation site with its axis
aligned with that of the valve connectors, and with the
arrow of the Locator pointing in the direction of the CSF
flow.
3. Center the Locator as well as possible over the valve: lo-
cate the valve by palpating it through the central cut-out
of the Locator.
The Compass needle may be aligned between two posi-
tions due to the Locator incorrect orientation. In this
case:
a. Re-perform the positioning of the adjustment kit
components from the start.
b. The Compass should now be aligned on one posi-
tion only. If there is no change:
– if the initial pressure is known: turn the Locator-
Compass assembly slightly so as to align the
Compass needle on the indicator corresponding
to the initial pressure,
– if the initial pressure is unknown: perform the stop
4. Press the Locator against the valve so as to center and method described in Section 10.2. Stop method
immobilize it above the valve. (p. 16).
4. On the Locator, read the pressure value shown by the
Compass needle.
NOTE
If palpating the valve is difficult, orienting the Locator in
relation to the valve, may be difficult. In this case, the
stop method described in Section 10.2. Stop method Under the recommended implantation conditions, X-ray ex-
(p. 16) can ensure alignment. amination is optional as the pressure can be read directly via
the adjustment kit.
8.2.5. Reading the pressure However, since X-ray examination provides absolute proof of
1. Hold the Locator with one hand so as not to lose the ref- the valve adjustment, it is especially recommended in the fol-
erence position. lowing cases:
2. Insert the Compass fully into the Locator. – If there is a disparity between the pressure read and the
Align the lines on the Compass with the pressure values value listed on the Patient Identification Card (PC-SPV)
printed on the Locator, if this is not already the case. and/or on the X-ray used to identify the valve model.
3. Center the shaft of the Compass needle in the circular – If the valve was implanted too deeply, under more than
target by sliding the Locator-Compass assembly over 8 mm of subcutaneous tissue. See Instructions for Use
the skin until it is above the valve. Polaris® valve, Section “Valve”.
– If the user is not familiar with the use of the adjustment kit.
8.2.6. Setting a new pressure
1. To avoid losing the reference position, hold the Locator
with one hand until the end of the procedure.
2. Remove the Compass, memorizing the pressure that it
indicates.
3. Insert the Magnet, aligning the mark on the memorized
pressure.
CAUTION
Being off-center could cause an incorrect pressure
reading and/or incomplete unlocking of the valve
rotor. This may falsify the change of pressure.
The Compass needle aligns with one of the lines on the
contour of the Compass and the corresponding pres-
sure value in the reading area of the Locator.
Page 14 of 82Vous pouvez aussi lire